2D Editor: Triggers: Difference between revisions
Lou Montana (talk | contribs) m (Text replacement - "[[{{arma3}}]]" to "{{arma3}}") |
Lou Montana (talk | contribs) m (Text replacement - "{{arma3}}" to "{{GameCategory|arma3|link= y}}") |
||
| Line 11: | Line 11: | ||
File:Arma2 editor trigger.jpg|[[:Category:Arma 2|{{arma2}}]] | File:Arma2 editor trigger.jpg|[[:Category:Arma 2|{{arma2}}]] | ||
File:tkoh editor triggers.jpg|[[{{tkoh}}]] | File:tkoh editor triggers.jpg|[[{{tkoh}}]] | ||
File:Arma3 editor trigger.jpg | File:Arma3 editor trigger.jpg|{{GameCategory|arma3|link= y}} | ||
</gallery> | </gallery> | ||
Revision as of 13:00, 19 March 2024
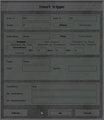
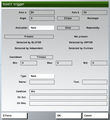
A trigger is an abstract game entity that will wait until it is condition block returns true, then carry out the On Activation string. When used effectively, they can make your mission seem much more dynamic and realistic. For example, you can use a trigger to set off a siren and call reinforcements when the player is spotted near an enemy base, or to start a convoy moving when the player gives a radio command. Triggers are represented in the mission editor by a dark blue ellipse or rectangle with a small blue flag in the centre. Triggers may be linked to an object in Groups Mode (F2), which generally means that only that object or group can activate the trigger. Triggers can be used in various ways, for example the location and dimensions of a trigger are not always used as part of it is conditions, and triggers do not necessarily require an On Activation block, instead being used to return a list of objects that satisfy it is conditions. Each trigger's Condition block will be checked approximately twice every second for the duration of the mission. To add a new trigger to your mission, double left click in some empty map space. The Trigger Menu will open.
Menu
Axis a/Axis b
These two controls define the radius size of the trigger, in metres. If a trigger has not been rotated (angle = 0), then Axis a is aligned East-West, Axis b is North to South.
Angle
Defines the angle of the trigger. 0 faces north, 90 faces east, etc. Triggers can also be rotated on the map by holding down shift, the left clicking on the trigger and dragging.
Ellipse/Rectangle
Choose the shape of the trigger.
Activation
These options provide a graphical method of creating a trigger condition. The chosen Activation option generally combines with selected condition type from the six condition types below (Present, Not Present, Detected by West, etc). Some of these conditions can not be easily or efficiently recreated using script commands. Note that these options only define what value this (in the condition string) will have each time the trigger is checked. Choose who or what will activate the trigger from the drop down menu. If the trigger is linked to a unit, only the relevant options will be available. You may choose :
- None - The trigger can still be activated when the Condition string returns true, but in this case this will always return false.
- <side> - Which of the sides will activate the trigger when any unit of that side satisfies the currently chosen one of the six conditions below.
- Radio <letter> - The trigger will be activated by a radio command available to all players leader of a group or possess a radio. Activation of radio triggers can be limited to specific players using the setRadioMsg command. Radio triggers do not make use of the six type conditions below, or wait for the Countdown/Timeout Counters!
- Seized by <side> - Will activate when the seizing side is deemed to be in control of the area. This trigger type works with the Timeout Counter values - a low level of dominance will activate the trigger after a period of time close to the max timeout, and visa versa. Depending on unit types, the seizing side can be completely outnumbered (4:1) and still satisfy the minimum required level of presence for the Maximum timeout counter. This trigger type can also be used with the any Detected By <side> option, meaning only units known to the Detected By side will be considered by the seized by calculation. This can easily create some interesting area domination effects. For example, a Seized by BLUFOR trigger using the Detected By BLUFOR option will activate when BLUFOR think they have seized the area, while the same trigger using Detected by OPFOR option will activate when OPFOR think BLUFOR have seized the area. The Not Present option inverts the triggers normal behaviour (ie, Not Seized by <side>).
- Vehicle - This option is only available if the trigger is linked to an unit, vehicle or object. Only that entity can activate the trigger when it satisfies whichever of the six conditions below is being used.
- Whole Group - This option is only available if the trigger is linked to a unit. The trigger will activate when the linked unit's entire group satisfy whichever of the six conditions below is being used.
- Group Leader - This option is only available if the trigger is linked to a unit. The trigger will activate when the linked unit's group leader satisfies whichever of the six conditions below is being used.
- Any Group Member - Again, this option only available if the trigger is linked to a unit. The trigger will activate when any single unit in the unit's group satisfies whichever of the six conditions below is being used.
Once/Repeatedly
Defines how many times the trigger can be activated. Only repeatable triggers can deactivate, single use triggers will remain active forever. Most repeatable triggers can only be reactivated once they have deactivated (radio triggers do not follow this rule).
Present/Not Present
If the activator is a side or object, the trigger will be activated if that side/object is or is not present within the trigger's boundaries. To be considered present, an object must be alive/undestroyed.
Detected By <side>
A unit is considered detected when the leader of any group on the detecting side can correctly identify the detected units side. Depending on the type of unit being detected, this may occur at various knowsAbout levels. The Seized by <side> Activation type also use these options, see above for details.
Countdown/Timeout Counters
These counters can add a degree of randomness to a trigger, and can make the trigger's activation less obvious to the player. For example, player immersion can be destroyed by a "enemy not present" trigger that completes an objective the very microsecond the bullet strikes the last enemy unit.
- Countdown - Once the trigger's conditions are met, the trigger will activate after the specified amount of time has elapsed. The activation conditions do not need to remain satisfied during this time.
- Timeout - The trigger's conditions must be satisfied for the entirety of specified amount of time for the trigger to activate. For example, if a soldier walks into a <side> Present type trigger but leaves the area before the timeout is complete, the trigger will not activate.
Below the Countdown and Timeout buttons you will see three boxes; Min, Max and Mid. These define the period of trigger activity in seconds between the Min and Max values, gravitating towards the Mid value. If all three are set to 10, then the period would be 10 seconds, with no randomness. If Min was 5, Max was 15 and Mid 10, the period would be somewhere between 5 and 15 seconds, most likely being close to 10.
Type
These are several types of trigger activation effects and abstract types that are generally unavailable through script code. These events will take place immediately after the On Activation code block is executed.
- None - The trigger will have no other effects other than those listed in the On Activation block. This is the default.
- Guarded by (side) - The trigger's centre point will define a point to be guarded. If the trigger is group linked to an object, it will be moved to that object's initial position during mission initialization. Guarded triggers do not activate, they only define guard points. Groups who are in Guard waypoint induced guard mode will move to the first placed (highest priority) available unguarded guard point. If an enemy unit is detected by any unit on the guarding group's side anywhere on the map, the group that is guarding the lowest priority guard point will leave their guard point to attack. Note they react over any distance, even if they are not capable of damaging the detected object. Also the normal Detected by rules do not apply - an unarmed man can detect a tank for the purposes of guarding. See the Guard waypoint type for more details. See also: Waypoint:Guard.
- Switch - A switch trigger is very useful for "breaking" a group out of a Cycle waypoint loop, or moving the group away from a Hold or Guard waypoint. When the trigger is synchronized with a waypoint, activating the trigger will instantly change the group's current waypoint to the first waypoint after the synchronized one. Note the synchronized waypoint's On Activation block is not executed.
- End <#> - Will cause the mission to end once the conditions are met. There are 6 different winning endings, each with a different possible debriefing text. Different endings to a mission can also lead the player down a different "branch" of a campaign.
- Lose - Activating a trigger of this type will end the mission in failure. Note this is not the same as the death of the player. If the mission is part of a campaign, the campaign can continue along the defined losing mission branch.
Name
Defines the name of the trigger, allowing it to be manipulated by script code. It must comply with normal variable name rules (no spaces, reserved characters or reserved words allowed, warnings may not be given!).
Text
If the trigger is activated by a radio command, this text will replace the default radio command name in both the command menu and on the radio visible on the mission map. This text will also be displayed within the editor when the mouse cursor hovers over the trigger, allowing the user to quickly identify what the trigger is and does.
Condition
The trigger will activate when this script code block returns true. If you leave the Condition box blank, the trigger will never activate. Within this block this refers to a boolean defined by whether the conditions chosen within the Activation options above are currently true or false, and thisList (or list <this trigger's name>) refers to an array of objects that are currently inside the trigger area and satisfy the trigger's Activation conditions, and thisTrigger refers to the trigger itself. Note that thisList does not always refer to units that are activating the trigger. Two exceptions are the Not Present condition, which is returns the same list as if it were a Present type (ie, returns objects of the chosen side that are inside the trigger) and the Seized by <side> trigger, which returns all units that are considered when calculating dominance (ie, if the Detected by side thinks that a unit is still within the trigger even though it is not, it will still be included in thisList). Using script code in the Condition box allows the creation of more complex trigger activation requirements, including multiple and/or conditions. The trigger checks the condition approximately once every 0.501239 seconds (averaged over 10,000 checks).
On Act(ivation)
This script code block will be executed when the trigger's conditions are met, so long as the trigger's type allows activation. Any actions defined by the trigger's Type will take place immediately after this activation block begins executing. Within the On Activation block, this is always false, thisList refers to the same array as it does in the Condition block above, and thisTrigger refers to the trigger itself like above. Any expressions in the On Act field must return nothing, or an error message will prevent the trigger dialogue from closing.
On Dea(ctivation)
A script code block that will be executed the first time a repeatable trigger's conditions check returns false after having been previously true. Only repeatable triggers deactivate. Radio <letter> types do not deactivate, or at least never execute On Deactivation block. Other than in the On Activation block, the special variables thisList and this are undefined in the On Deactivation block. Any expressions in the On Dea field must return nothing, or an error message will prevent the trigger dialogue from closing.
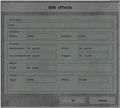
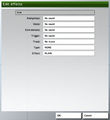
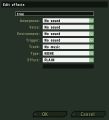
Effects
Click on this button to open the Trigger Effects menu. It allows for the easy creation of some audio and visual effects that will be carried out immediately after the trigger's On Activation code block. More than one effect may be used at once. Note that most if not all of the effects in this menu could be created using script code in the On Activation block.
Condition Block (untitled)
The script code block at the top of the Effects menu can be used to require a condition that must be satisfied in order to execute the chosen effects. The block must return true in order for the chosen effects to take place. This block is checked after the trigger's On Activation code block is executed.
Anonymous
This drop down list allows you to play an anonymous vocal sample. The audio will seem to be coming from a nearby source to all players in the mission, irrespective of their position. Some of these sounds do not have a text description.
Voice
This drop down list causes the trigger to play a vocal sample. The audio will seem to be coming from close to the entity that activated the trigger, or if the trigger is linked to a group, the unit will speak the vocal sample (with lip movement). Some of these sounds do not have a text description.
Environment
This list allows you to play the chosen environmental sound-scape sounds for the duration of a mission. Since the normal environmental sounds are chosen dynamically based upon the player's position, time and weather, this option is unlikely to be of any use other than testing. (NEEDS CONFIRMATION - does it stop?)
Trigger
The chosen sound effect will play. The sound source is at the centre of the trigger.
Track
The chosen music track will play once when the trigger activates, immediately halting any previously playing music.
Type
Defines the creation of one of the following types of visual effects:
- Object - This is apparently used to create a pre-defined 3d object in front of the player's field of vision.
- Resource - This can be used to display pre-defined graphical resources over the player's field of vision. This resource can be chosen from the Text drop down menu below.
- Text - will display the text entered in the Text box below, in the style chosen in the Effect menu. This effect is identical to the cutText script code command.
- Effect - Will only have an effect if Type is not "NONE", and the Text box is not empty. It creates the same visual screen effect as the cutText command would given the same type.
Text
This option will only be available if Type is not set to "None". It will either behave as a drop-down list of available Resource or Object types, or a box in which to enter text.
Scripting
See Command Group: Triggers for list of all triggers-related commands.
