Weapon Animation/Setup – Arma Reforger
Lou Montana (talk | contribs) m (Text replacement - "ized" to "ised") |
No edit summary |
||
| Line 203: | Line 203: | ||
{{GameCategory|armaR|Modding|Tutorials|Assets|Weapon Animation}} | {{GameCategory|armaR|Modding|Tutorials|Assets|Weapon Animation}} | ||
{{GameCategory|armaR|Modding|Tutorials|Assets|Weapon Creation}} | |||
Latest revision as of 11:34, 4 December 2024
This part of the tutorial covers the basics of setting up the animation workspace. You might expect to find information on how to create an animation workspace using one of the existing workspaces as a base. This means that this tutorial will not go into depth on creating new custom graphs, creating new nodes, and so on. In any case, following these instructions, you should be able to have a fully animated weapon in the game.
Animation Workspace Preparation
Workspace Creation
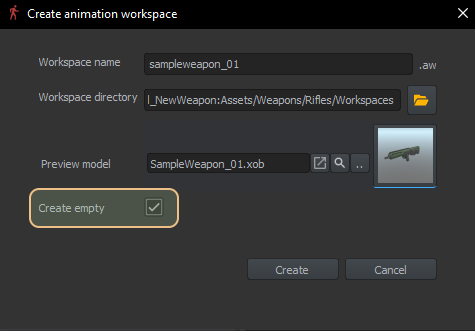
First step in creating animation for weapons is preparing new animation workspace for asset that is being worked on. To do so, navigate to File → New Workspace in top bar or use the Ctrl + N shortcut. Once that is pressed, Create New Workspace window where it is necessary to fill location where new workspace will be created. It is also important to check Create empty option - otherwise new workspace will create bunch of files which you cannot change anymore.
In Reforger, workspaces files for multiple similar assets are placed in asset folder one level higher than the asset is located in - f.e. Assets/Weapons/Rifles/Workspaces. In this tutorial, the sampleweapon_01.aw workspace was created in Assets/Weapons/Rifles/Workspaces inside SampleMod_NewWeapon addon.
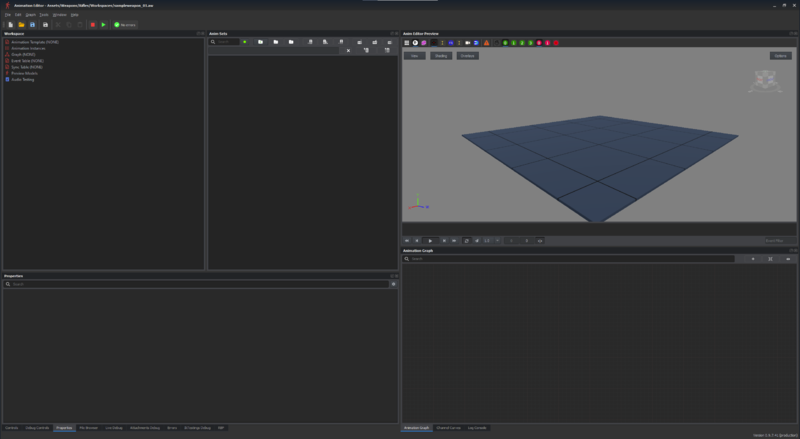
Once location & name of the file are confirmed, an empty sampleweapon_01.aw workspace should be automatically opened in Animation Editor.
Creating animation instance template (or reusing existing)
Next thing on the list will be configuration of Animation Template. That file contains template animation set - animation groups, columns and rows which are then used by all Animation Instances in current Animation Workspace.
Now, there are few possibilities when it comes configuring Animation Template - it is possible to use existing template, create duplicate of it or create new template from scratch. Both have its pros and cons and it all depends on various factors. If for instance new weapon is yet another variant of AK74, it might be possible to reuse existing animation template without any problems.
Creating new template
 All entries in animation template has to be set from scratch
 New animation groups & rows can be added or deleted
 Need to be manually updated in case there is some change in vanilla date
To create new template, click with Right Mouse Button on Animation Template line in Workspace window and then select New Template... option from the menu. After that, you will be asked where new file should be created.
Using existing template
 Minimal amount of work required to get it working
 Cannot be modified - it is not possible to add new groups or rows. Might be problematic if weapon is quite non standard
 Creates dependency on vanilla content - if it gets updated it can break your animation workspace but sometimes it might help you updating your content to latest standards
To use existing Animation Template, click with Right Mouse Button on Animation Template line in Workspace window and then pick Assign Existing Template... option from the context menu. After picking this option, you will be asked to locate Animation Template file (files using .ast extension)
Using duplicated template
 Relatively easy to set up but requires few more steps compared to using existing Animation Template
 New animation groups & rows can be added or deleted
 Need to be manually updated in case there is some change in vanilla date
In this tutorial, a duplicated animation template is used, since Sample New Weapon is going to use logic similar to already existing in-game weapon - AK74. To do so, follow below steps:
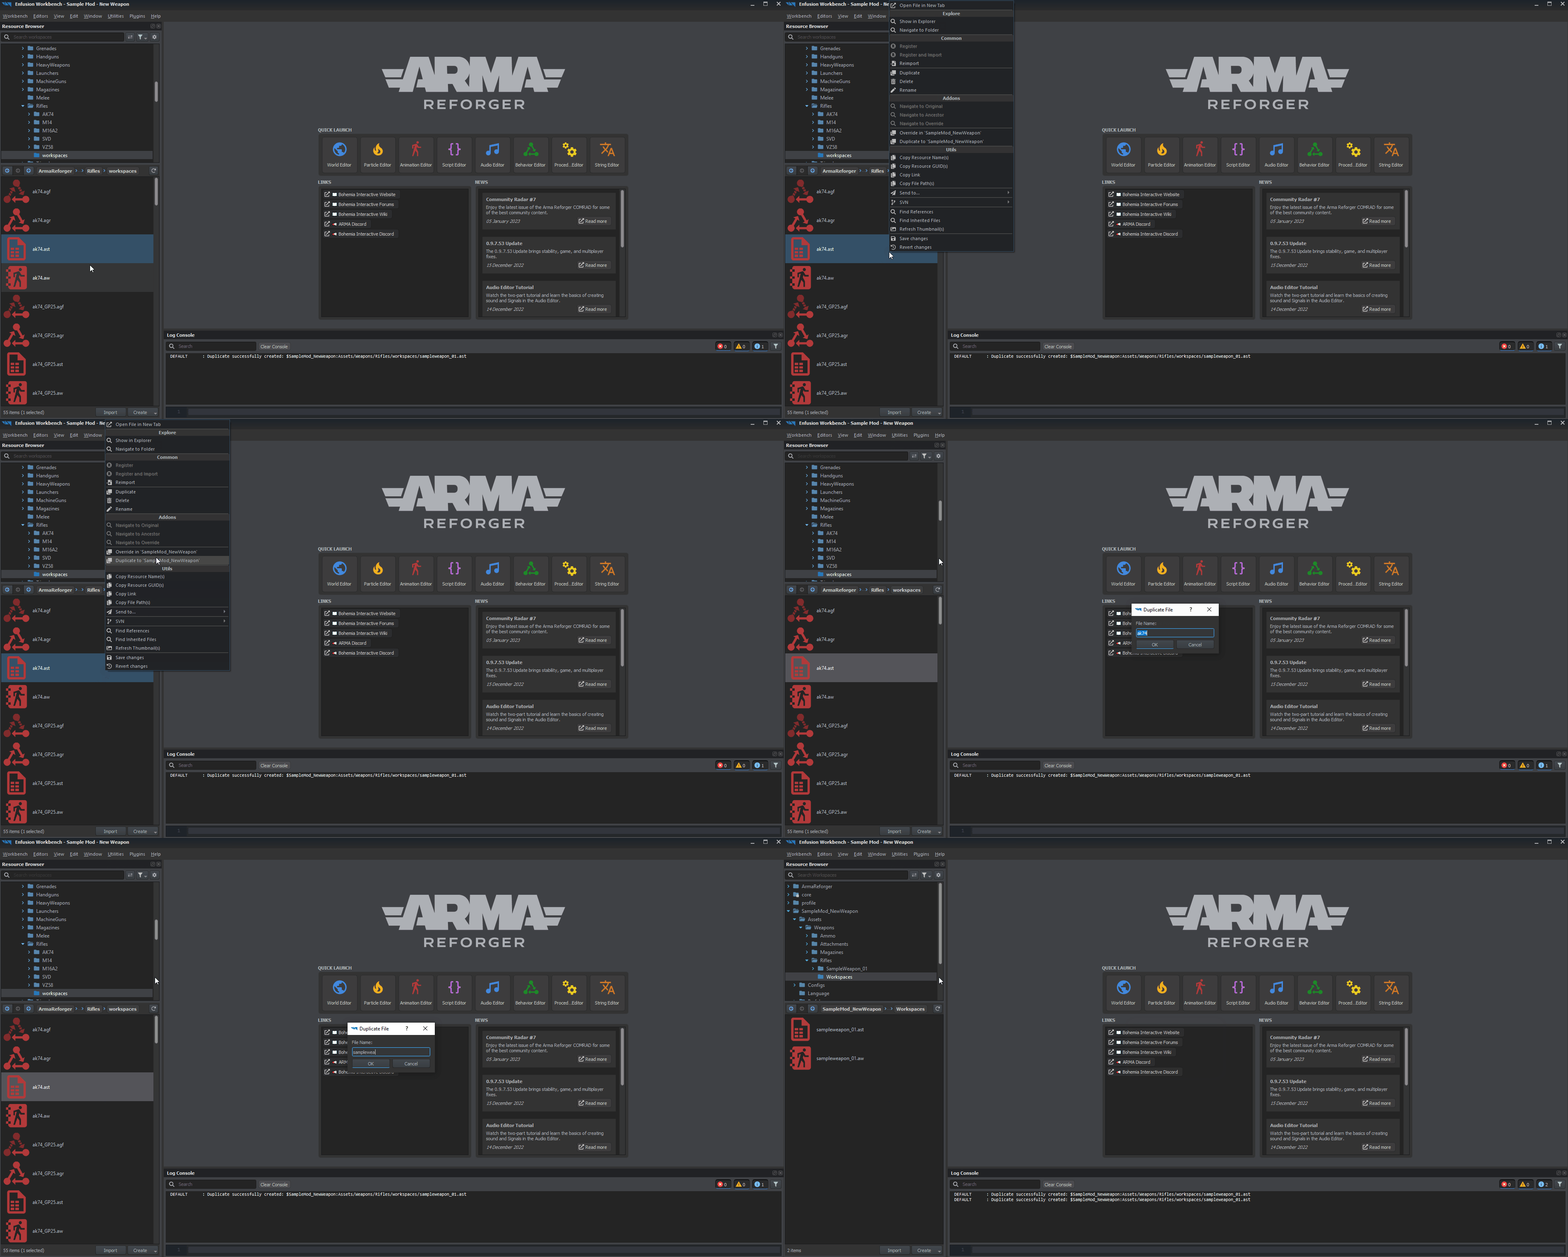
- Navigate to Animation Template that you want to duplicated. Animation Templates are using .ast extension. In this case ak74.ast was used
- Use Duplicate to addon functionality on that file and type your desired name - i.e. sampleweapon_01
After those steps are completed, it is possible to use this template in sampleweapon_01.aw workspace. To do so, follow the instructions mentioned in using existing template paragraph and select sampleweapon_01.ast when asked for existing template.
Creating animation instance for player & weapon
Once animation template is configured, it is right time to move to preparing Animation Instances. As mentioned in Animation Editor documentation, Animation Instances are unique sets of animations which share same logic.
Weapons are using two animation instances - one for player and one for weapon. Player animation instance is applied to character which is holding the weapon and weapon animation instance is applied to the weapon itself. When character is holding a weapon, both of those sets are played simultaneously, therefore it is quite important to keep both animations with same length so they stay synchronised. Some more info about power instances can be found on Animation Editor: Templates and Instances Tutorial page (it is a recommended read nevertheless!)
Creating new animation instances is fairly straightforward and involves the following actions:
- Click with Right Mouse Button on Animation Instances field in the Workspaces window
- Select New Animation Instance... option from the context menu
- Select new animation instance name & location and then confirm with Ok button
- It is recommended to use _player & _weapon suffixes for animation instances to keep data readable (it is not mandatory though)
- It is recommended to use _player & _weapon suffixes for animation instances to keep data readable (it is not mandatory though)
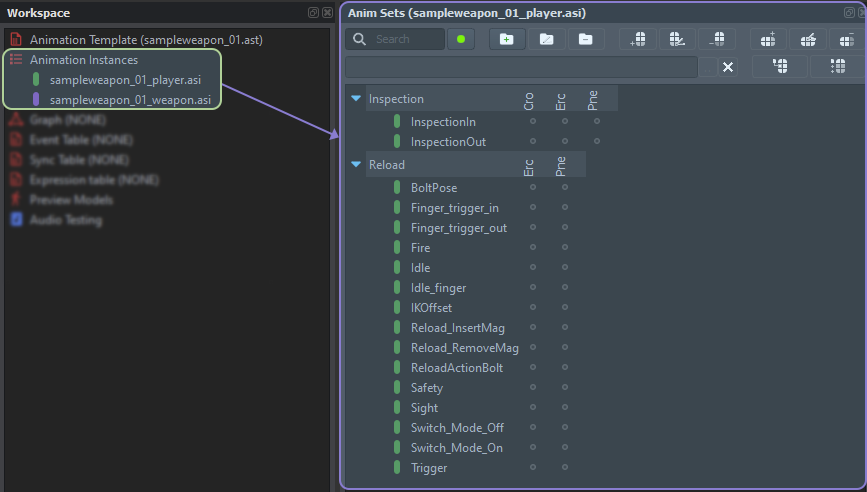
As it was mentioned before, weapon requires two animation sets and in case of sample weapon, following animation instances were created:
- sampleweapon_01_player.asi - animation instance containing character related animations
- sampleweapon_01_weapon.asi - animation instance containing weapon related animations
Both sets of animations are empty at this stage, and we will come back to fill them in as soon as we have some animations ready to use.
Setting animation graph
Animation Graph consist of Graph (.agr) and Graph File (.agf). Graph itself contains all Variables, Commands and IK Chains that would be available to all animations graph plus link to Graph File(s).
Graph File contain Sheets and those sheets contain actual animation graph with Animation Nodes.
Similar as with animation template, there are few possibilities when it comes to graph creation and again, same as with Animation Template, there are some pros and cons of such solution. If you intend to create a weapon that is similar to one of the existing weapons, then duplicating the animation graph is the suggested approach - unless the weapon you are preparing doesn't require any tweaks in the graph compared to the vanilla data.
Of course, if weapon is sort of unique (let's say bolt action rifle or some clip loaded rifles) then new graph might be necessary - in such scenario though it would be still wise to use existing weapon graph as reference.
Creating new graph
To create new graph, click with Right Mouse Button on Graph line in Workspace window and then select New Graph... option from the menu. After that, you will be asked where new file should be created.
Using existing graph
To create new graph, click with Right Mouse Button on Graph line in Workspace window and then select Assign Existing Graph... option from the menu. After picking this option, you will be asked to locate Graph file (files using .agr extension)
Duplicating existing graph
Process of duplicating Graph is exactly same as with Animation Template described before. Similar as with animation template, duplication of existing graph was chosen - mainly to save time required to define variables and mandatory commands. Even if you are doing some custom weapon In this case, ak74.agr was picked to be duplicated into sampleweapon_01.agr.
Once duplication is completed and new graph is assigned to Graph property, it will be necessary to remove reference to old Graph File and this can be done by clicking with Right Mouse Button on Files entry (ak74.agf in this case) in Graph section of the Workspace and then selecting Remove option from the context menu.
After duplication of .agr file, it will be necessary to change AnimSetTemplate property inside of that new .agr via text editor of your choice - it can be even notepad. Open Animation Workspace (.aw) in text editor, locate AnimSetTemplate and copy it. Next, open .agr file in text editor and replace AnimSetTemplate line by the one copied from animation workspace. Once its done, save file and restart workbench.
Creating Graph File
Process of creating Graph File is almost exactly the same as with graph or template. In most cases, duplication is still the most recommended method.
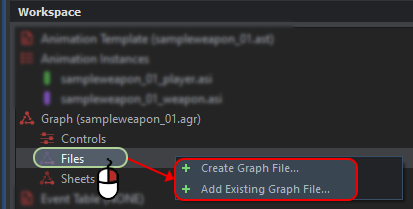
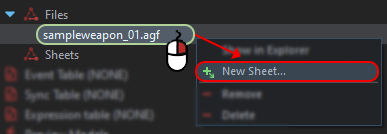
In case you want to make new file from scratch, new Graph File can be created through context menu which is available after clicking with Right Mouse Button on Files property in Graph section. Over there, you can either select Create Graph File... or Add Existing Graph File... options. Keep in mind
Setting graph file
Duplication approach can be also used to create a Graph File and since it is in many cases the easiest and fastest way, this solution was used to configure Sample Weapon animation workspace.
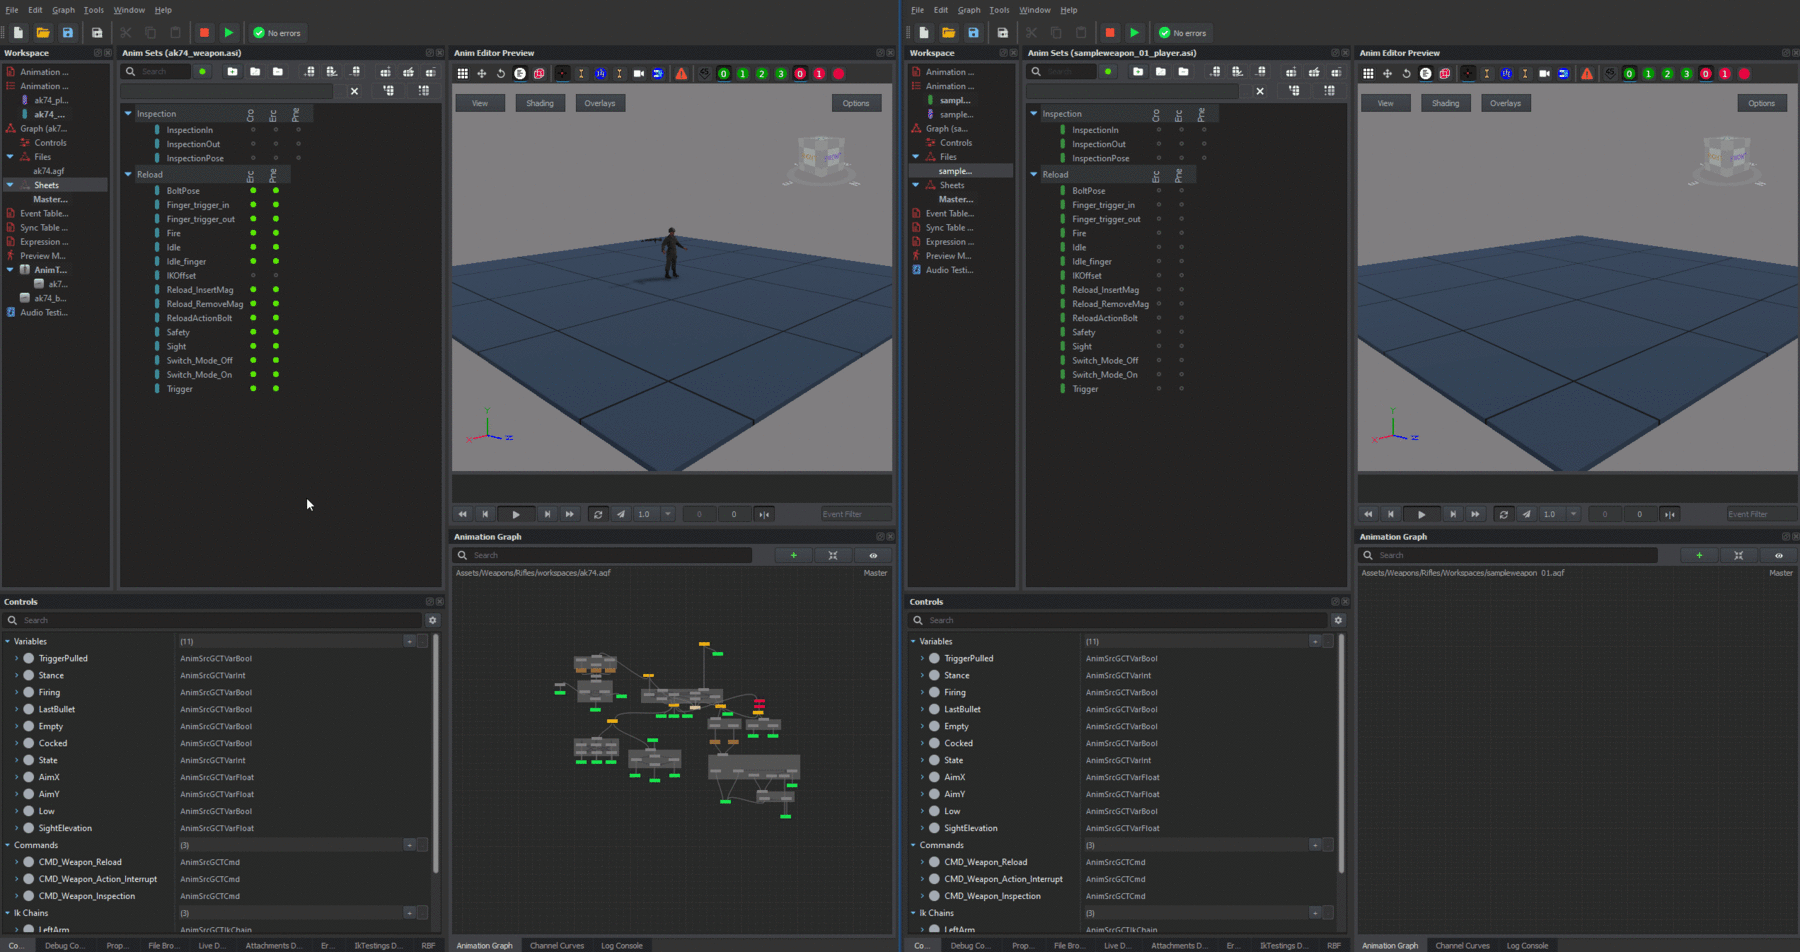
Perhaps it is worth mentioning here, that it is also possible to copy and paste animation nodes between Animation Graphs. To do so, open second instance of Animation Editor and then open Animation Workspace of your choice. Once it is loaded, select all nodes in Animation Graph window with mouse by holding ![]() which you want to copy paste, press Ctrl + C to copy those nodes, select again Animation Editor containing your weapon, click once with Left Mouse Button in Animation Graph inside of that Animation Editor and finally, press Ctrl + V to paste all those nodes.
which you want to copy paste, press Ctrl + C to copy those nodes, select again Animation Editor containing your weapon, click once with Left Mouse Button in Animation Graph inside of that Animation Editor and finally, press Ctrl + V to paste all those nodes.
Setting up preview models
It might be also quite handy to set Preview Models in current animation workspace - this will allow to quickly verify if animations are playing correctly and see if interpolations between nodes are working as intended in graph debug mode. Only one preview model can be active in Anim Editor Preview window, so it will be necessary to set two sets of preview models - one for debugging of weapon animation instance and second for debug of player animation instance.
Weapon preview models
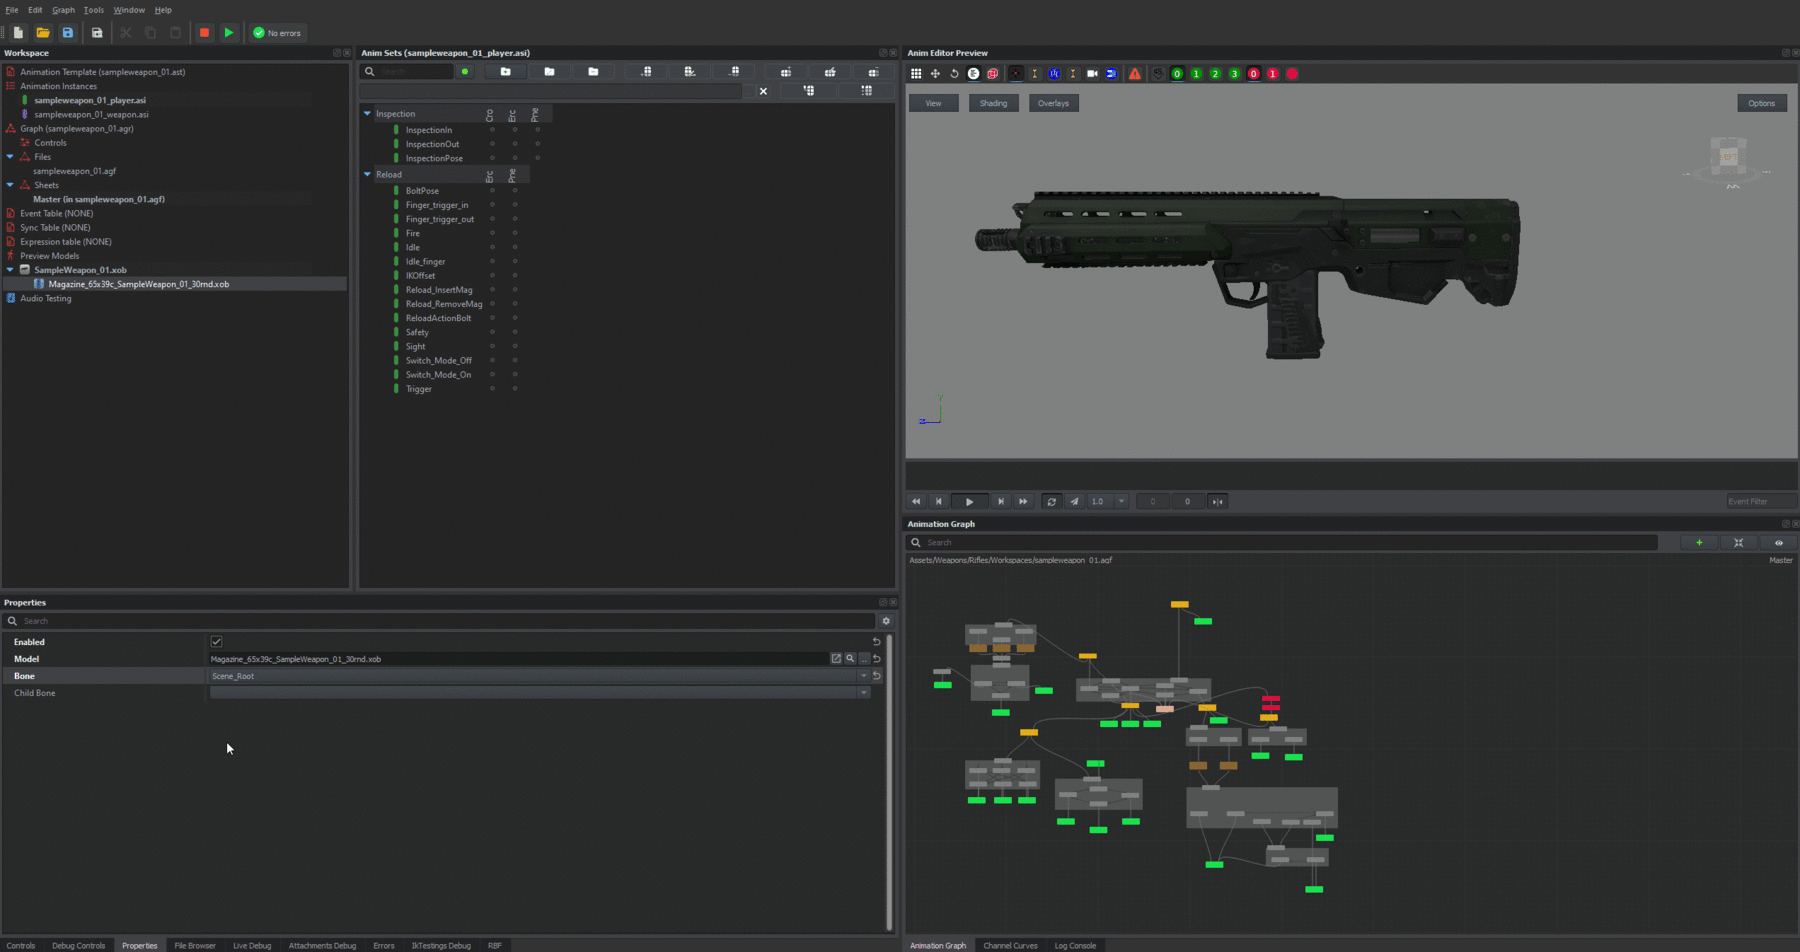
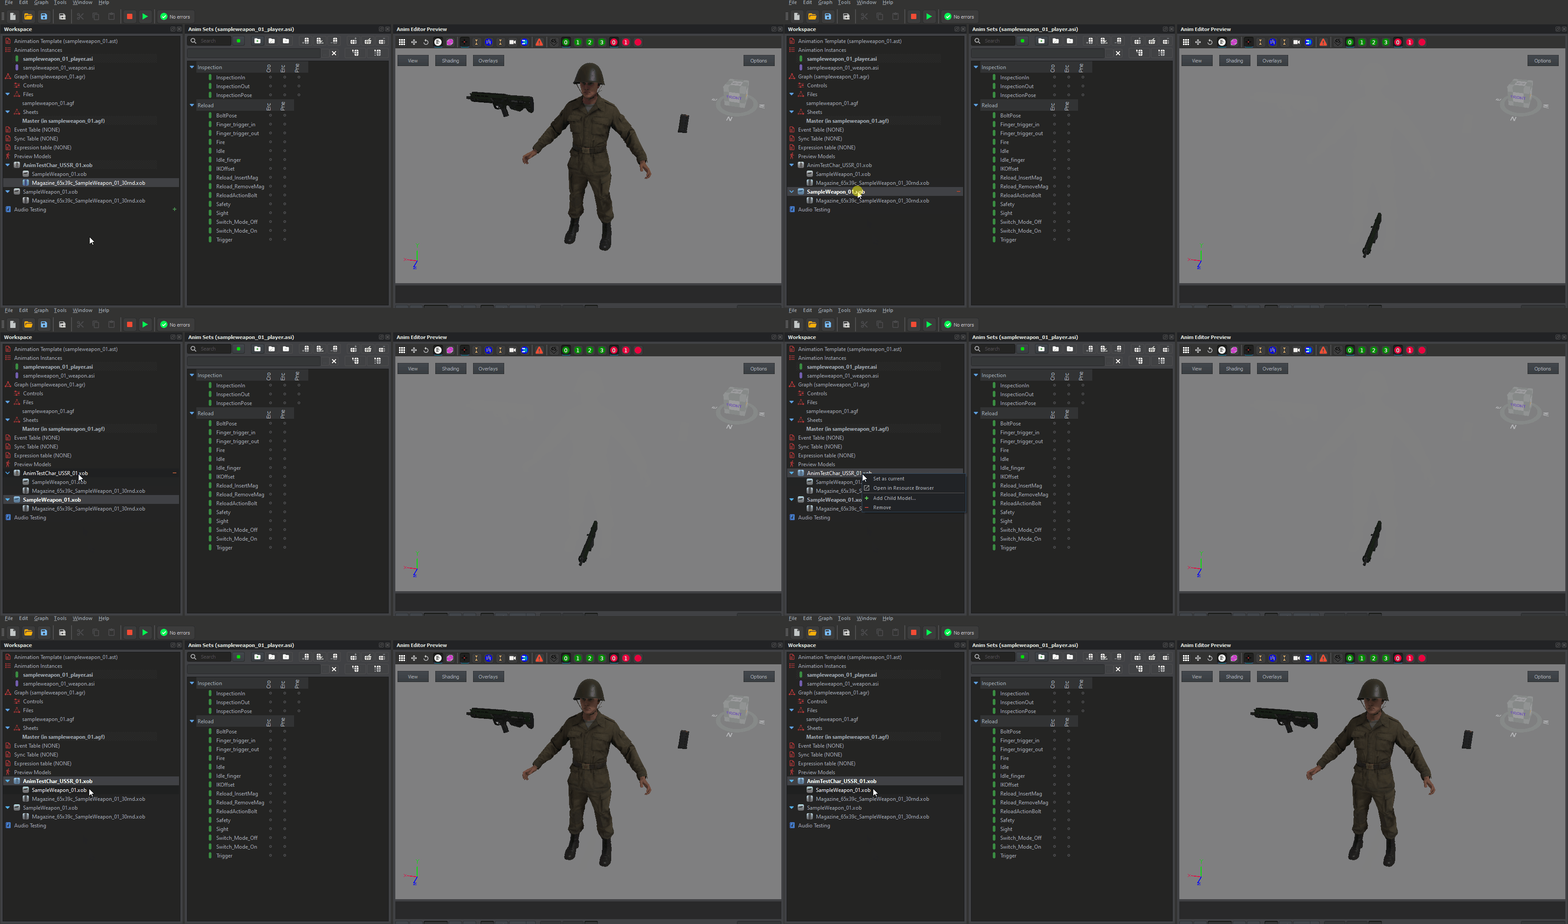
Beginning with setting preview model for weapon, following steps has to be performed to add:* Click with Right Mouse Button on Preview Models line in Workspace window and then select Add Preview Model... option. After that a proper model (.xob) has to be selected. In this case SampleWeapon_01.xob was selected.
Next, it might be nice to have (but not essential) to add magazine to the weapon by adding child model, to do so, click with Right Mouse Button on entry in Preview Models list (f.e. SampleWeapon_01.xob), then select from context menu option Add Child Model... and finally, pick model of the magazine (Magazine_65x39c_SampleWeapon_01_30rnd.xob) from the list.
By default, child model will be created at 0,0,0 and most likely such state in desired. It is possible to attach such child model to some bone in parent bone by changing Bone parameter in Properties window. In case of the magazine, it is possible to snap it to slot_magazine bone, which should result in model nicely sitting in magazine well.
Character preview model
Adding of character preview is using basically same principle as weapon but this time there will be two child models attached to it. Starting with character model itself, click with Right Mouse Button on Preview Models field and then select Add Preview Model... option. After that, you can pick one of the characters models in xob model. Vanilla data contains two models with some equipment merged in:
- AnimTestChar_USSR_01.xob - character with USSR uniform
- AnimTestChar_US_01.xob - character with US Army uniform
Once character model is present in Preview Models list, it is possible to add two child models:
- Weapon (SampleWeapon_01.xob) attached to Right Hand Prop
- Magazine (Magazine_65x39c_SampleWeapon_01_30rnd.xob) attached to Left Hand Prop - this should allow for previewing reload magazine animations.
Currently active preview models can be either switched in two ways:* Through context menu which appears after clicking on it with Right Mouse Button entry in Preview Models list and then selecting Set as current option
- By double clicking on it
Active preview model is marked with bold text.
Above set of preview models should be enough to preview all necessary weapon animations (both character and weapon itself) once Animation Workspace is filled with actual animations.
Assigning animation workspace to prefab
If everything went fine, the new weapon animation workspace should be ready to be plugged into the weapon.
Most of the weapon animation configuration is located in WeaponAnimationComponent. Unless weapon prefab is duplicate of some existing weapon, such component might not exist in a prefab which just inherits from Rifle_Base.et prefab. In this case, it will be necessary to add such component to the prefab first. This can be done in few steps:* Load weapon prefab (SampleWeapon_01_base.et) in World Editor - either by using Edit Prefab button in Resource Manager or by drag and dropping weapon prefab into World Editor view port
- Locate WeaponComponent in Object Properties window of the weapon
- Click on WeaponComponent with Right Mouse Button and select Add child component option from the context menu
- Select WeaponAnimationComponent from the list of components
After that, WeaponAnimationComponent should be ready for further configuration. If component
Setting weapon animation instance
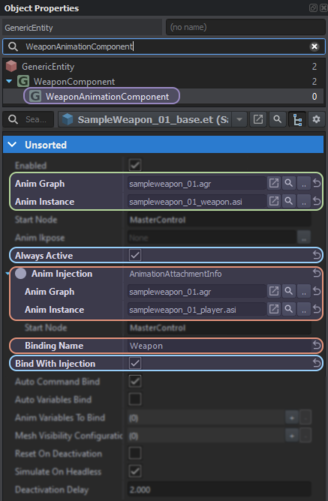
First, let's begin with general weapon animations and weapon graph & animation instance. Those two things are controlled by following parameters which can be found in WeaponAnimationComponentn* Anim Graph → This parameter expects animation graph used in animation workspace. In this case sampleweapon_01.agr was used
- Anim Instance → This parameter expects animation instance of the weapon. Over here sampleweapon_01_weapon.asi should be assigned
It is also necessary to switch those two parameters to on, to ensure proper working of the component* Always Active
- Bind With Injection
Setting player animation instance
Next, we can move to character animations configuration and to do so, click on set class button next to Anim Injection property. This will add new class to the component where you can configure following options:
- Anim Graph → Same as before, this parameter expects animation graph used in animation workspace. In this case sampleweapon_01.agr was used again
- Animation Instance → This parameter expects animation instance of the character. Over here sampleweapon_01_player.asi should be assigned
- Binding Name → Binding name in root graph. Type here Weapon
That's it for now! Now we are going to leave the Animation Editor for a while and move on to the creation of the actual animations.
