Enfusion Blender Tools: P3D Conversion – Arma Reforger
Lou Montana (talk | contribs) m (Text replacement - " " to " ") |
(update to reflect changes brought in 0.9.7 version of the plugin) |
||
| Line 5: | Line 5: | ||
=== Installation === | === Installation === | ||
P3D conversion is part of Enfusion Blender Tools therefor it is necessary to install that addon before proceeding. Installation instructions can be found on [[Arma Reforger:Enfusion Blender Tools#Installation|Enfusion Blenders Tool page]].{{Feature|important|Since 0.9.7 version of the addon, '''running Workbench with net API enabled''' in necessary!}} | |||
=== Related Plugin Settings === | === Related Plugin Settings === | ||
[[Image:armareforger-p3d-conversion-settings2.png|500px|left]] | [[Image:armareforger-p3d-conversion-settings2.png|500px|left]] | ||
There | There is one parameter in this plugin which affect some of the P3D conversion features. | ||
Addon settings can be found in '''Edit → ⚙ Preferences... → Addons → 3D View: Enfusion Tools''' | |||
=== Related parameters === | === Related parameters === | ||
| Line 19: | Line 18: | ||
==== Material Conversion Table ==== | ==== Material Conversion Table ==== | ||
Path to material conversion table. By default plugin will use one of conversion table already distributed with the addon | Path to material conversion table. By default plugin will use one of conversion table already distributed with the addon | ||
{{Clear}} | {{Clear}} | ||
| Line 115: | Line 111: | ||
--> | --> | ||
[[File:armareforger-p3d-conversion-batch-example.mp4|800px]] | [[File:armareforger-p3d-conversion-batch-example.mp4|800px|link=Special:FilePath/armareforger-p3d-conversion-batch-example.mp4]] | ||
{{GameCategory|armaR|Modding|Tutorials|Official Tools|Enfusion Blender Tools}} | {{GameCategory|armaR|Modding|Tutorials|Official Tools|Enfusion Blender Tools}} | ||
Revision as of 12:53, 2 January 2023
The Enfusion Tools plugin for Blender offers an easy, semi automated way to import & convert to Enfusion standards any model from Real Virtuality 4 engine in unbinarised (MLOD) P3D format. They are distributed with the Arma Reforger Tools package on Steam.
Installation
P3D conversion is part of Enfusion Blender Tools therefor it is necessary to install that addon before proceeding. Installation instructions can be found on Enfusion Blenders Tool page.
Related Plugin Settings
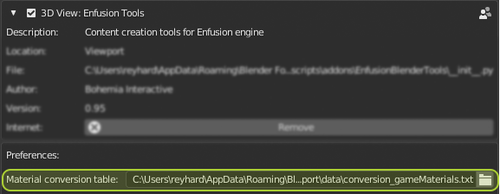
There is one parameter in this plugin which affect some of the P3D conversion features.
Addon settings can be found in Edit → ⚙ Preferences... → Addons → 3D View: Enfusion Tools
Related parameters
Material Conversion Table
Path to material conversion table. By default plugin will use one of conversion table already distributed with the addon
Interface
P3D Import
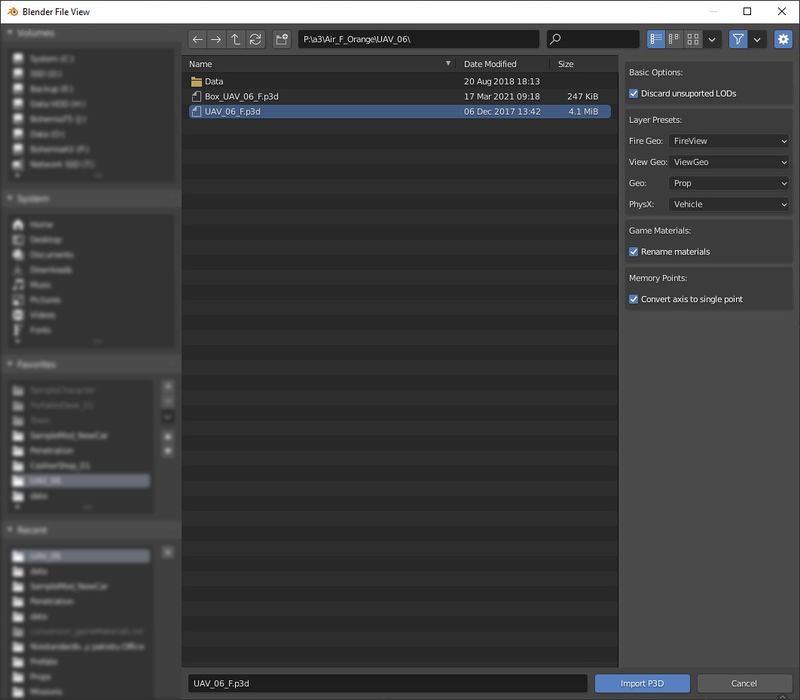
To begin P3D import, navigate to Enfusion Tools → Import tab & then select "Arma 3 P3D (.p3d)". This will bring you typical Blender File View window where you can select file to import & specify some parameters.
Import Window Interface
This window allows to select the P3D file to be imported & specify import parameters.
- Discard unsupported LODs -
- Layer Presets -
- Here you can define which layer presets will be assigned to each imported LOD
- Rename Materials -
- Convert axis to single point -
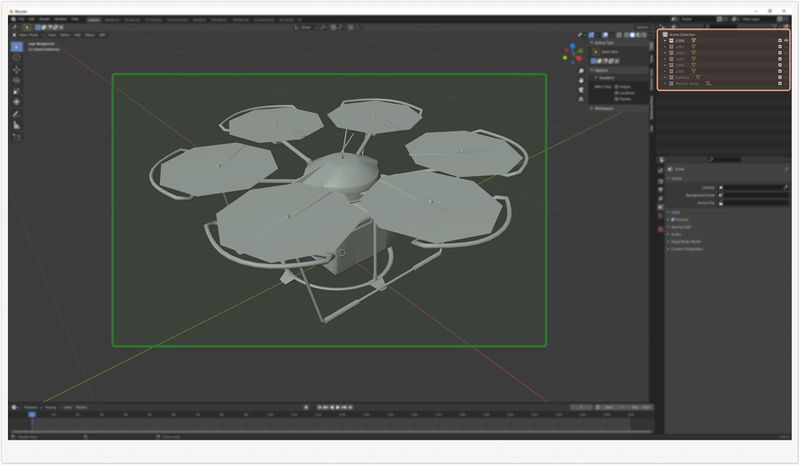
Imported Content Overview
Once P3D import is completed, all your objects will be organised into separate collections. Collections are created using following rule set:
- Each resolution LOD will be in its own - LODx - collection,
- Geometry related objects (Geometry, Geometry PhysX, View Geometry, etc) are stored in Colliders collection
- Memory points are stored in... Memory points collection
Functions
P3D Import
Any non binarised P3D model created for Arma 3 or DayZ can be imported into Blender using this plugin
Obsolete LODs Discarding
All non compatible LODs are discarded during import. Only the following LODs are imported:
- Resolution LODs
- Geometry
- Geometry PhysX
- View Geometry
- Fire Geometry
- Memory
There is the possibility to import unsupported LODs by unchecking "Discard unsupported LODs" option.
Objects Renaming
All imported objects are renamed to Enfusion standards so they can be correctly recognised during import to Workbench.
There are 2 main rules:
- All resolution LODs are receiving _LODx suffix. LODs are automatically renumbered from 0 to 15.
- Geometry LODs receive UTM_ prefix.
Add Layer Presets & Game Materials
Geometries are receiving proper Layer Presets and Game Materials depending on their type and RVMATs they have assigned.
Rules for material renaming can be customised by creating your own version of conversion_gameMaterials.txt & then selecting that custom file in addon settings
Convert Memory Points Axis to Single Socket
Rotation & translation transformations in RV engine are using 2 memory points to determine axis of movement. Enfusion is using rotation of a single point to determine the origin of transformation.
FBX Batch Conversion
Preparation
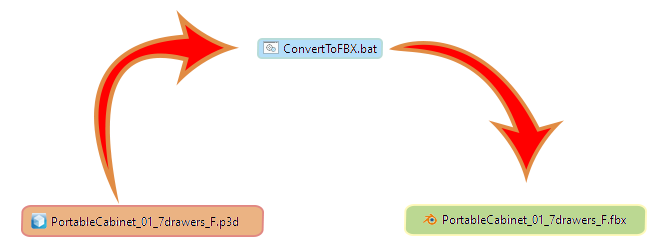
Batch file convertToFBX.bat is bundled together with the plugin. You can use this batch file to convert multiple P3Ds at once. This file is located in zip file in the following location: BohemianBlenderTools\p3d_import\batch
After extracting it to your drive, default parameters will have to be modified:
Blender Executable Location
Quite self explanatory - provide the path to the Blender executable
set Object=C:\Program Files\Blender Foundation\Blender 2.92\blender.exe
Plugin Location
This path should lead to P3DtoFBX.py file which should be located in the plugin's installation directory.
set Script=%APPDATA%\Roaming\Blender Foundation\Blender\2.92\scripts\addons\BohemianBlenderTools\p3d_import\P3DtoFBX.py
Once those paths are adjusted, you can simply drag and drop single or multiple P3D files on convertToFBX.bat. New FBX files will be created next to the original P3Ds.


