Audio Editor – Arma Reforger
The Audio Editor is the tool that defines how sounds behave in-game. It allows the creation of graphical signal chains that define the logic for how sounds are triggered based on in-game events, and how they respond to changes in various game parameters.
It allows listening to how sounds behave inside the editor with the built-in tools.
Projects created in the audio editor are saved as files with an .acp extension; outside of the editor, they can later be used to control the sound that in-game entities make by applying the file to the entity's respective SoundComponent inside the World Editor.
User Interface
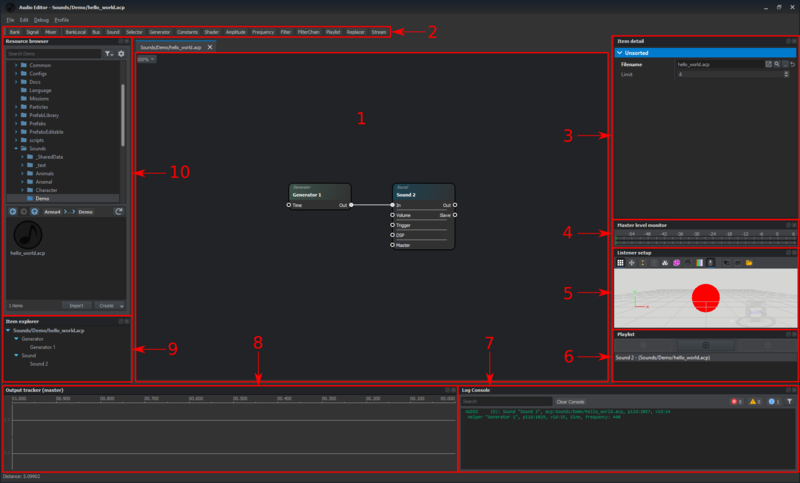
The Audio Editor shows the following interface on first launch:
Panels
The audio editor UI is composed of the following panels:
- Design canvas: This is the area where the user can create audio signal chains by placing nodes and creating connections between them.
- Nodes palette: This section contains the names of all the types of nodes that can be placed on the design canvas. Clicking on a name creates a new instance of the corresponding node on the canvas.
- Item detail: This section contains the details/parameters of the currently selected object. By default, the details of the current project are displayed.
- Master level monitor: The levels of the currently-playing sound are displayed here.
- Listener setup: This section gives a visual depiction of the virtual audio source (emitter) in 3D space from the listener's perspective. The spatial relation between the listener and emitter can be adjusted here.
- Playlist: Displays a list of previously-played sounds from the current session.
- Log console: Displays relevant info about the actions performed in the current session.
- Output tracker: Displays the output waveform of the current and previously played sounds over time.
- Item explorer: Displays the nodes present in the current project, grouped by type.
- Resource browser: Displays the location of the open project in the context of the resource database hierarchy.
For a full description of the usage of each panel in the context of designing sounds, see the Getting Started Tutorial.
Node Groups
Groups in the Enfusion Audio Editor are a great way to keep your audio files organised and clean. They also improve workflow by moving all included nodes relative to the group's location.
Group Creation
- Select multiple nodes.
- Hold ⇧ Shift +
 drag to make a selection region.
 - Hold Ctrl and click on every node you want included in the group.
- Hold ⇧ Shift +
- Right click on one of the nodes included in your selection.
- Select "Group".
Add/Remove Node from Group
Nodes can easily be removed from a group by either right-clicking them and selecting "remove from group" or holding Alt while dragging them out of the group.
Group Options
| Option | Functionality |
|---|---|
| Ungroup | Removes all nodes from the group and destroys the group. |
| Select All | Selects all nodes included in the group. |
| Lock | Locks the group so that it can not be modified or moved. |
| Color | Opens a dialog where the color of the group can be adjusted. |
Keyboard Shortcuts
The Enfusion Audio Editor has many shortcuts and hotkeys that are specifically designed to improve workflow and boost productivity of Audio Designers.
This section gives an overview of most of the available shortcuts and hotkeys in the Audio Editor and its Signal Editor.
| File | |
|---|---|
| New Project | Ctrl + N |
| New Signal | Ctrl + ⇧ Shift + N |
| Open | Ctrl + ⇧ Shift + O |
| Close | Ctrl + ⇧ Shift + C |
| Save | Ctrl + S |
| Save As | Ctrl + ⇧ Shift + A |
| Save All | Ctrl + ⇧ Shift + S |
| Exit | Alt + F4 |
| Window | |
|---|---|
| Item Explorer | ⇧ Shift + F1 |
| Resource Browser | ⇧ Shift + F2 |
| Item Detail | ⇧ Shift + F3 |
| Master Level Monitor | ⇧ Shift + F4 |
| Listener Setup | ⇧ Shift + F6 |
| Playlist | ⇧ Shift + F7 |
| Output Tracker (Master) | ⇧ Shift + F8 |
| Log Console | ⇧ Shift + F9 |
| Signals Simulation | ⇧ Shift + F10 |
| Edit | |
|---|---|
| Undo | Ctrl + Z |
| Redo | Ctrl + Y |
| Copy | Ctrl + C |
| Cut | Ctrl + X |
| Paste | Ctrl + V |
| Groups | |
|---|---|
| Create Group | Ctrl + G |
| Add Node | Alt + |
| Remove Node | Alt + |
| Debug | |
|---|---|
| Toggle Debug | F5 |
| Listener Setup | |
|---|---|
| Move Tool | W/A/S/D |
| Front View | 1 |
| Right View | 3 |
| Top View | 7 |
| Scene | |
|---|---|
| Pan | |
| Zoom In/Out | |
| Region Select | ⇧ Shift + |
| Multiselect Nodes | Ctrl + |
| Nodes | |
|---|---|
| Play Selected Node | Space |
| Start Quick Connection
(on port) |
Alt + |
| End Quick Connection
(on port) |
Alt + |
| Node Dialog | |
| Move nodes only horizontally/vertically | ⇧ Shift + |
| Connections | |
|---|---|
| Duplicate Connection | ⇧ Shift + |
| Reconnect Connection | Ctrl + |
Signal Editor
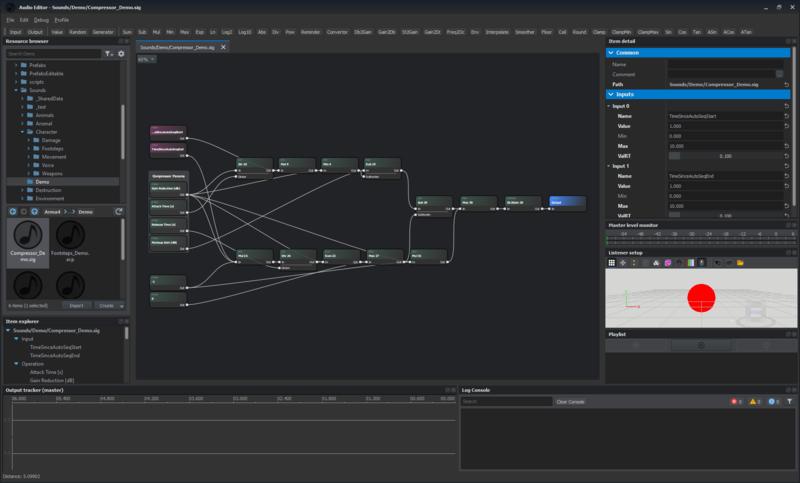
The Signal Editor is a sub-component of the Audio Editor - BIKI, where the user can edit the internal configurations of Signal nodes. Using the available node types in the signal editor, the user can define the input/output behavior of the Signal resource opened in the editor, transforming one or more inputs into one or more outputs.
User Interface
The Signal Editor UI is identical to that of the parent Audio Editor, save for the types of nodes available in the Nodes palette.

