Weapon Modding – Arma Reforger
(→New Ammo AI Config: removed obsolete note) |
Lou Montana (talk | contribs) m (Fix links) |
||
| (2 intermediate revisions by one other user not shown) | |||
| Line 12: | Line 12: | ||
* How to change muzzle flash & bullet impact particle effects | * How to change muzzle flash & bullet impact particle effects | ||
* Configuring animations | * Configuring animations | ||
{{Feature|informative|It is assumed that you already have some know how to [[Arma_Reforger:Mod_Project_Setup|'''create new project''']]. It is also recommended to make yourself familiar with | {{Feature|informative| | ||
It is assumed that you already have some know how to [[Arma_Reforger:Mod_Project_Setup|'''create new project''']]. | |||
It is also recommended to make yourself familiar with '''{{GameCategory|armaR|Modding|Official Tools|text= Workbench editors]]''' and [[Arma_Reforger:Prefabs_Basics|'''prefabs basic operations''']]. | |||
}} | |||
{{Messagebox|Sources files for this tutorial can be found on | {{Messagebox|Sources files for this tutorial can be found on | ||
[https://github.com/BohemiaInteractive/Arma-Reforger-Samples/tree/main/SampleMod_ModdedWeapon '''Arma Reforger Samples Github repository''']|📥|orange}} | [https://github.com/BohemiaInteractive/Arma-Reforger-Samples/tree/main/SampleMod_ModdedWeapon '''Arma Reforger Samples Github repository''']|📥|orange}} | ||
| Line 32: | Line 35: | ||
* Creation of new entity prefab which inherits from other, already existing prefab | * Creation of new entity prefab which inherits from other, already existing prefab | ||
{{Feature|informative|For more information about what a Prefab is, see the [[Arma_Reforger:Prefabs_Basics]] page.}} | {{Feature|informative|For more information about what a Prefab is, see the [[Arma_Reforger:Prefabs_Basics|Prefabs Basics]] page.}} | ||
==== Method 1: Create Inherited Prefab ==== | ==== Method 1: Create Inherited Prefab ==== | ||
[[File:armareforger-vehicle_modding_inherited_prefab.png]] | [[File:armareforger-vehicle_modding_inherited_prefab.png]] | ||
The simplest method to create a Prefab inheriting from another one is using the "'''Inherit | The simplest method to create a Prefab inheriting from another one is using the "'''[[Arma Reforger:Data Modding Basics#Using .22Inherit in....22 function|Inherit in]]'''" action which is located in '''Resource Browser''' context menu. This method has similar amount of steps compared to the following (Method 2) one and it's matter of user choice on which one to use: | ||
* Find [enfusion://ResourceManager/~ArmaReforger:Prefabs/Weapons/Rifles/AK74/Rifle_AK74.et '''Rifle_AK74.et'''] file in World Editor's '''Resource Browser''' window and use {{Controls|rmb}} on this prefab | * Find [enfusion://ResourceManager/~ArmaReforger:Prefabs/Weapons/Rifles/AK74/Rifle_AK74.et '''Rifle_AK74.et'''] file in World Editor's '''Resource Browser''' window and use {{Controls|rmb}} on this prefab | ||
* In the context menu that appeared,select | * In the context menu that appeared,select '''[[Arma Reforger:Data Modding Basics#Using .22Inherit in....22 function|Inherit in 'AddonName]]'''' | ||
* After typing name for that inherited prefab, a new prefab file will be created in '''SampleMod_ModdedWeapon''' addon. | * After typing name for that inherited prefab, a new prefab file will be created in '''SampleMod_ModdedWeapon''' addon. | ||
| Line 308: | Line 311: | ||
[[File:armareforger-modded-weapon-saving-texture.png|frame|left|600px|TIFF Export settings]] | [[File:armareforger-modded-weapon-saving-texture.png|frame|left|600px|TIFF Export settings]] | ||
''More information over that can be found on the Textures | ''More information over that can be found on the [[Arma Reforger:Textures|'''Textures''']] page'' | ||
Latest revision as of 20:10, 5 April 2024
Goals
This tutorial will explain how to:
- Create inherited entity prefab instance
- Differences between entity instance and prefab
- How to change some basic firing characteristics of weapon
- Adding new magazine type
- How to change materials assigned to the weapon (retexture of the weapon)
- How to change sounds of the weapon, including firing sound, reload & bullet impacts
- How to change muzzle flash & bullet impact particle effects
- Configuring animations
{{Feature|informative| It is assumed that you already have some know how to create new project. It is also recommended to make yourself familiar with Workbench editors and prefabs basic operations.]]
Modification
Structure Overview
It is recommended to follow the structure of Arma Reforger, as listed in Directory Structure, to ensure that all automation plugins are parsing assets correctly and also to make it later easier to navigate.
Therefore, the first task is to prepare the following file structure:
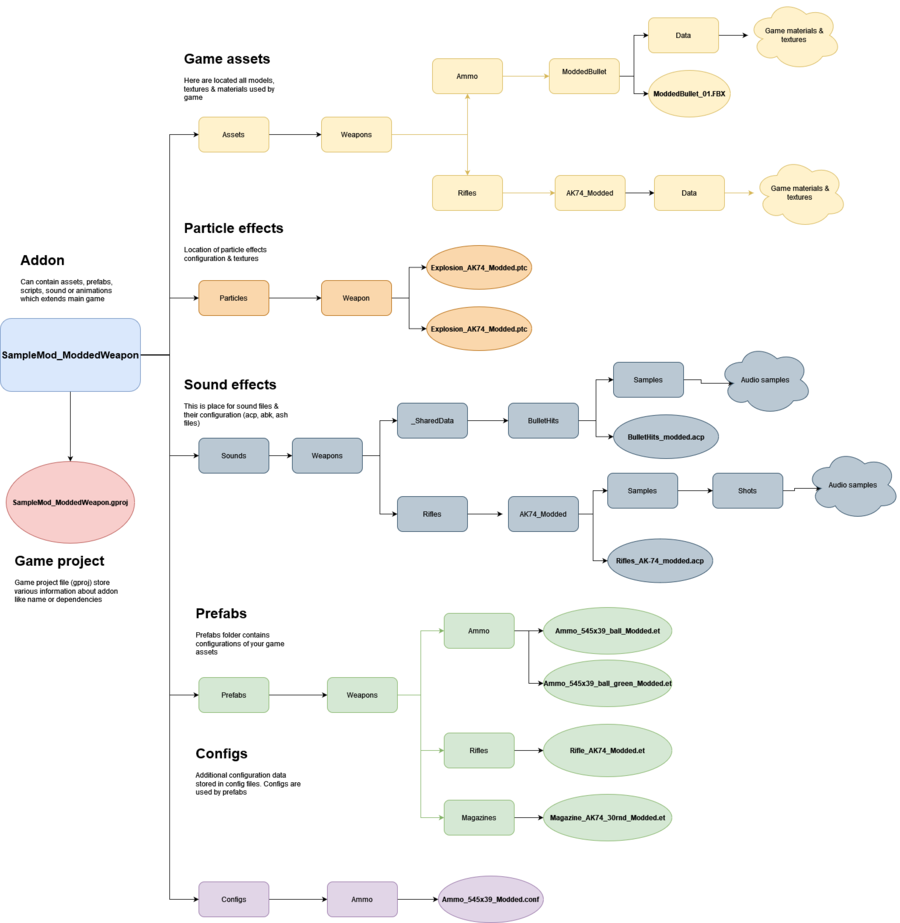
New Variant Creation
In this part of the tutorial the following topics will be covered:
- How to place entity prefabs into the world
- Creation of new entity prefab which inherits from other, already existing prefab
Method 1: Create Inherited Prefab
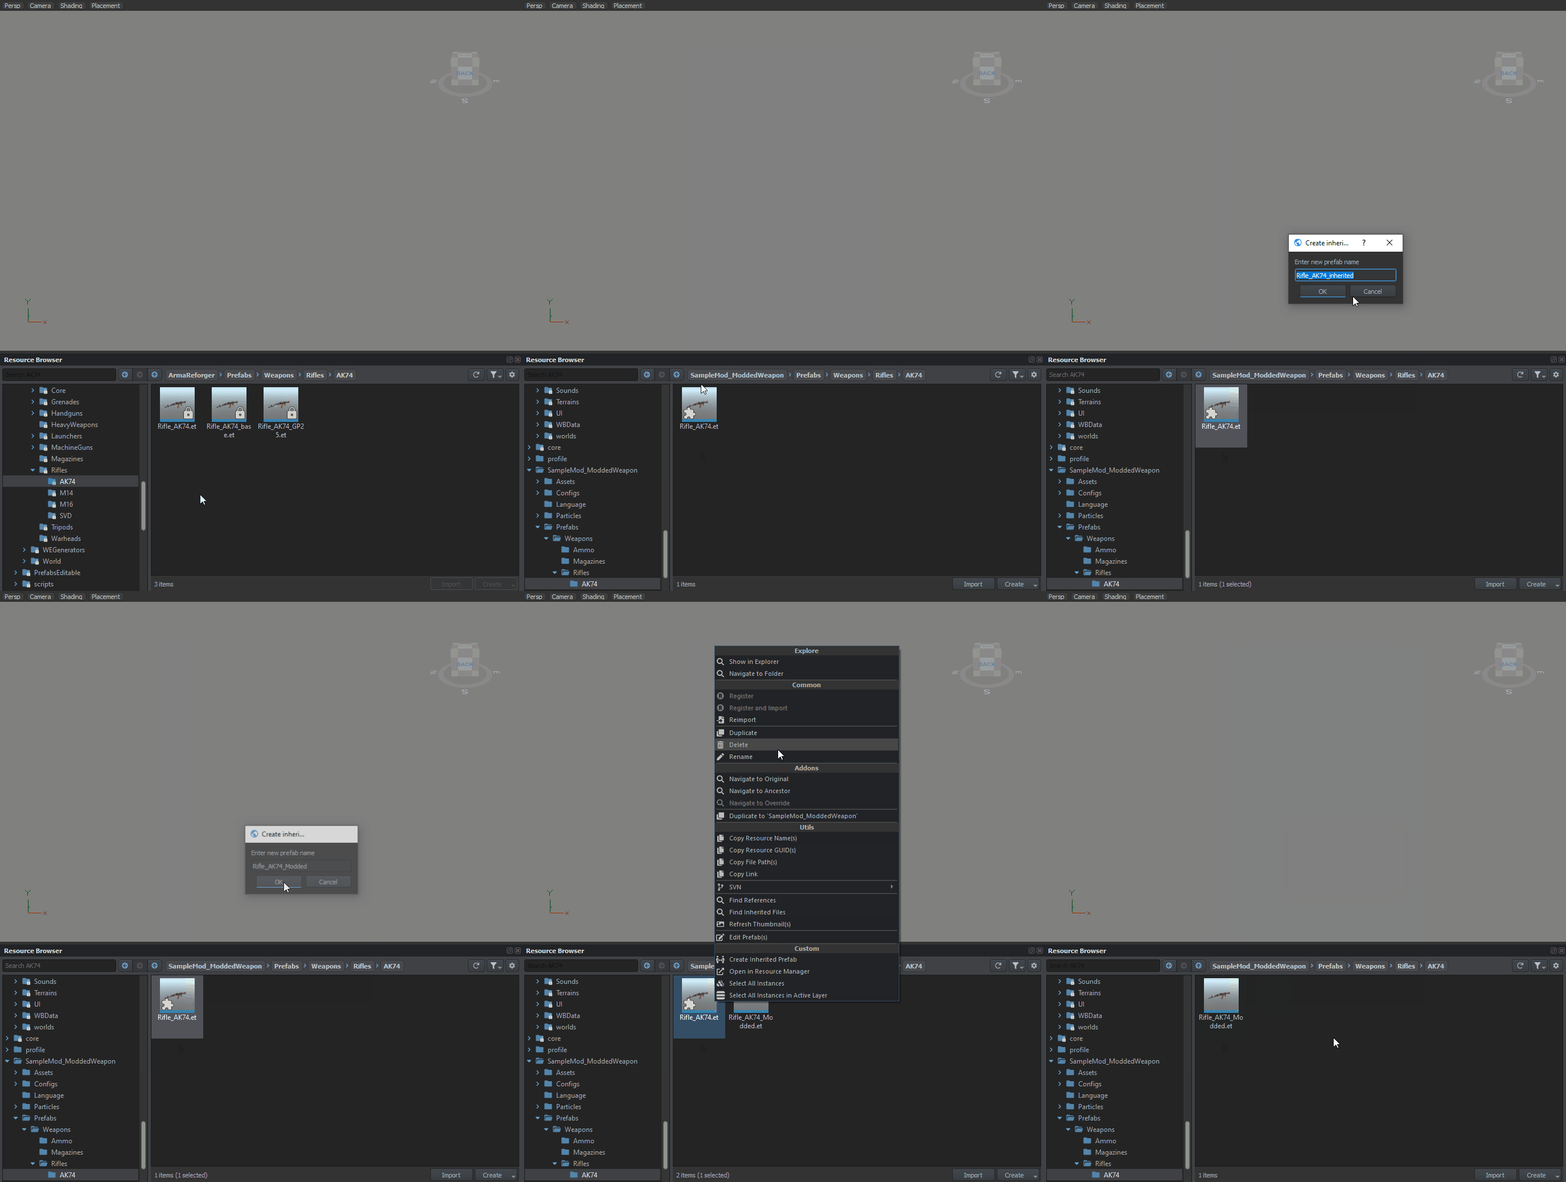
The simplest method to create a Prefab inheriting from another one is using the "Inherit in" action which is located in Resource Browser context menu. This method has similar amount of steps compared to the following (Method 2) one and it's matter of user choice on which one to use:
- Find Rifle_AK74.et file in World Editor's Resource Browser window and use
 on this prefab
 - In the context menu that appeared,select Inherit in 'AddonName'
- After typing name for that inherited prefab, a new prefab file will be created in SampleMod_ModdedWeapon addon.
Method 2: Drag & Drop
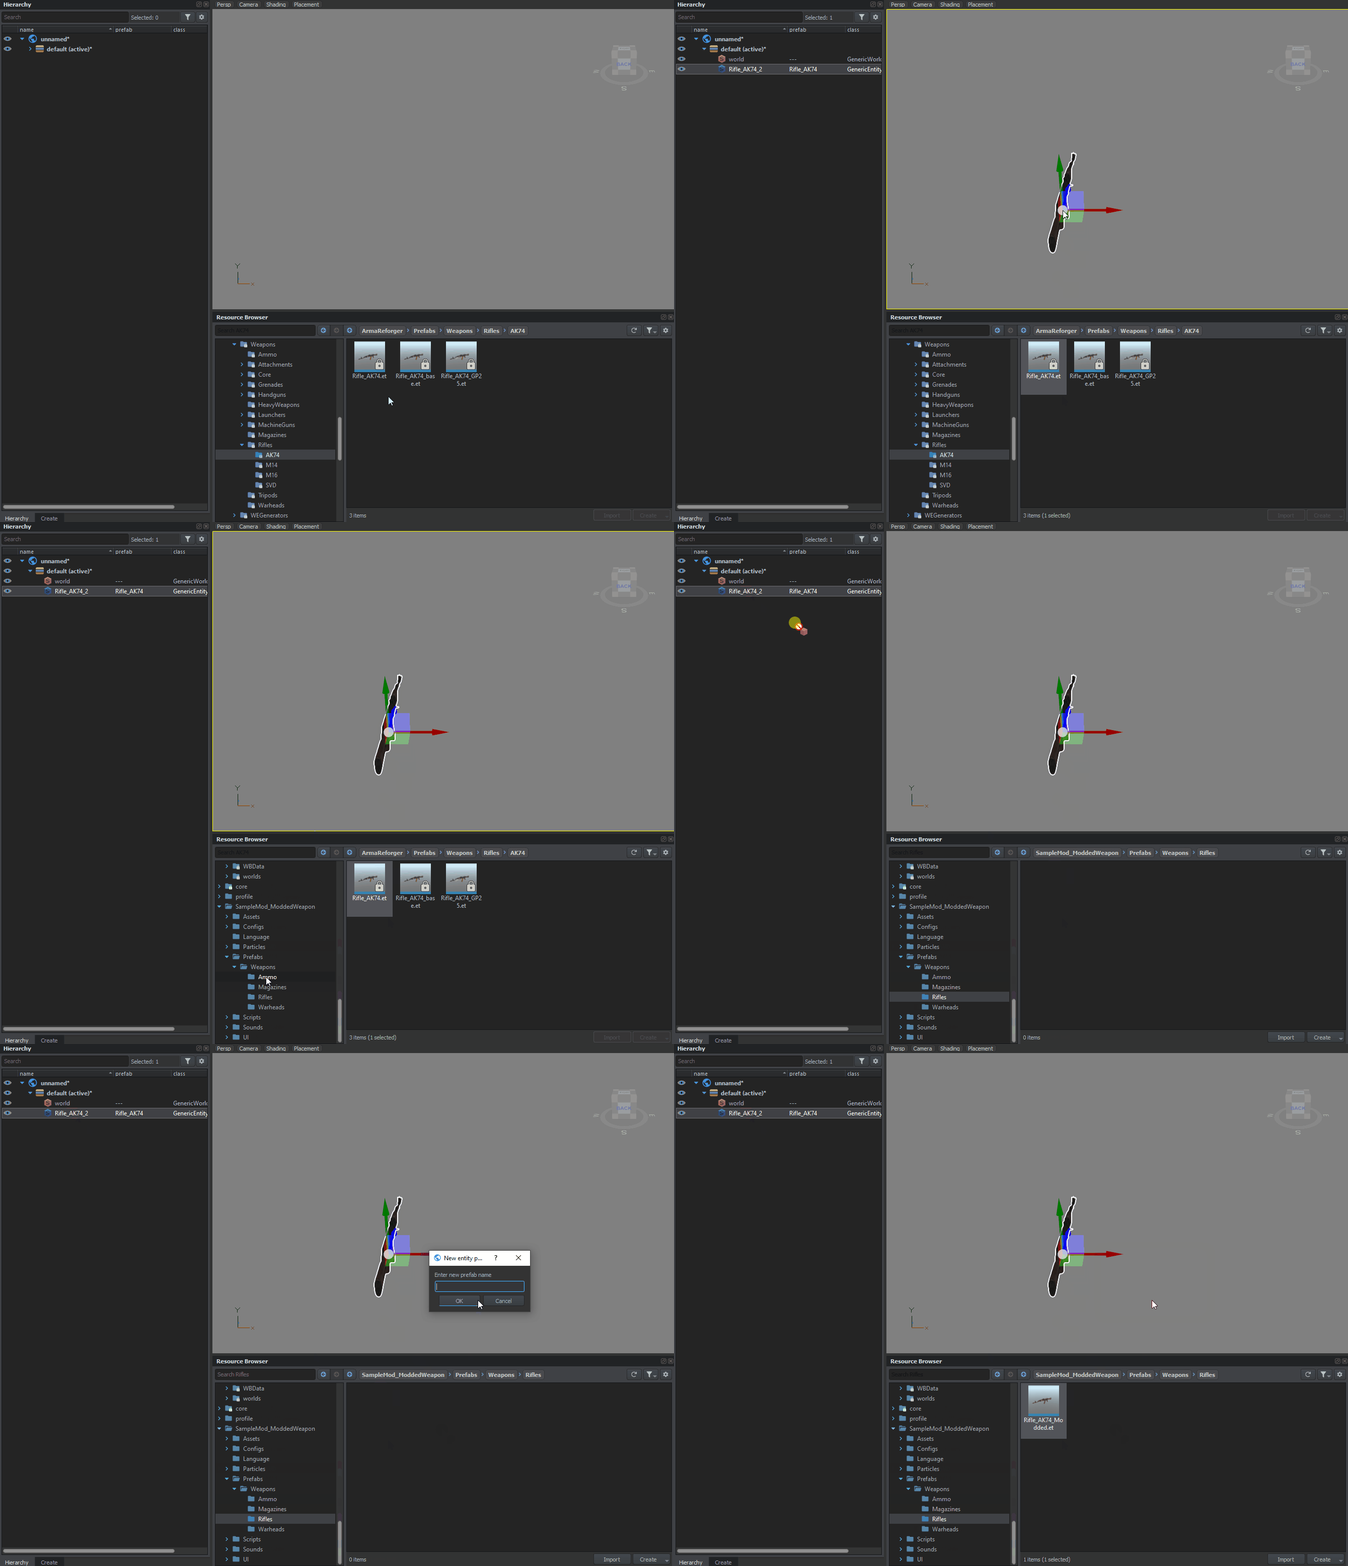
- Find Rifle_AK74.et file in World Editor's Resource Browser window
- Drag and drop this prefab into World Editor's viewport
- An instance of Rifle_AK74 entity prefab is created in the world; it should be listed in the hierarchy window (by default on World Editor's left side)
- Navigate to the SampleMod/Prefabs/Weapons/Rifles directory in the Resource Browser
- Click on the entity instance in Hierarchy window and drag it back to Resource Browser, still in the World Editor window. A new window will pop up and ask to specify the name of the new entity prefab
- Type in there "Rifle_AK74_Modded" and click the OK button - this action triggers the creation of a new Rifle_AK74_Modded.et file in the previously selected location
- Delete the existing instance of AK74 in "Hierarchy" tab
- Drag and drop the new Rifle_AK74_modded prefab from Resource Browser to the viewport to instanciate the new prefab
Configuration
In this part of the tutorial we will try to do following changes to our newly created variant of AK74:
- We will learn how prefab inheritance works
- We will change rate of fire to 200 rounds per fire
- We will add new 2 rounds burst mode
- And finally, we will add new magazine type for this weapon which will be using custom high explosive blob bullets!
Prefab Inheritance & Structure
As mentioned earlier, placing a Prefab into World Editor creates an instance (entity) of that Prefab. This means that any change done to the instance are only applied to that single entity.
If the changes should be applied to the Prefab itself, two methods are offered:
Method 1: Apply to Prefab
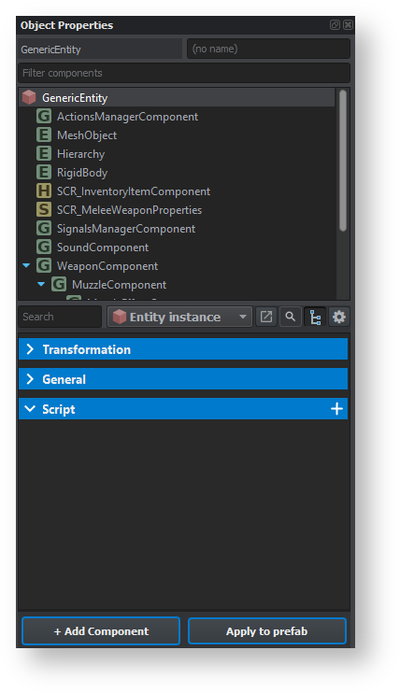
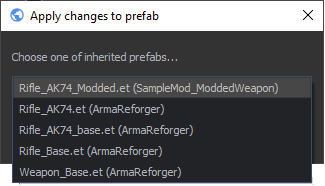
First one involves using "Apply to prefab" button which is available in "Object Properties" window's bottom-right corner. The button will be available only if there are any changes to merge and the instance is selected. Clicking on that button will open a new window listing the whole inheritance tree. Selecting "Rifle_AK74_Modded.et" would mean that all changes that have been made will be stored in that Prefab.
Method 2: Use Inheritance Tree
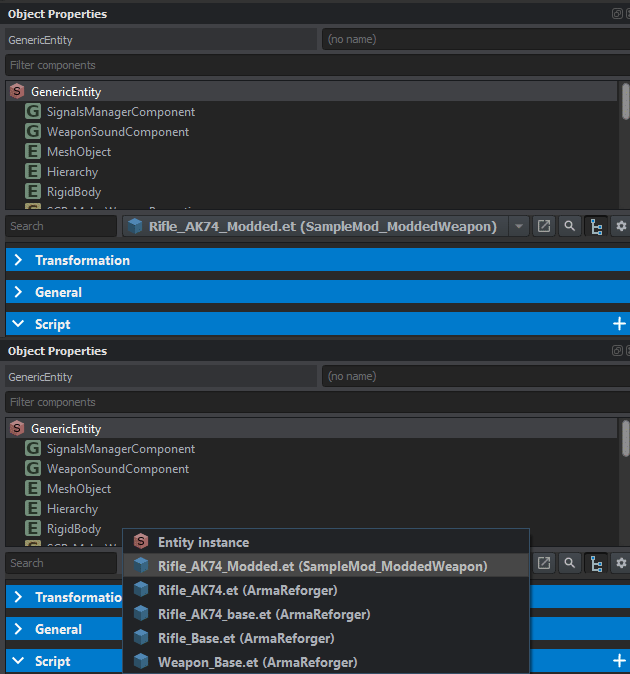
Clicking on "Entity instance" in Object Properties window will expand a list with current inheritance of our asset. Selecting i.e. "Rifle_AK74_Modded.et" will show the current configuration of that prefab (together with already inherited parameters). Any change made in this mode will be automatically propagated to all entities instance using "Rifle_AK74_Modded.et" prefab; this means that using "Apply to prefab" button is not necessary. However, the same rule applies as for "Apply to prefab" button - anything done to prefabs must be manually saved to them by saving the currently loaded world!
Components Parameters
Now knowing how to save changes, it is time to actually modify some parameters!
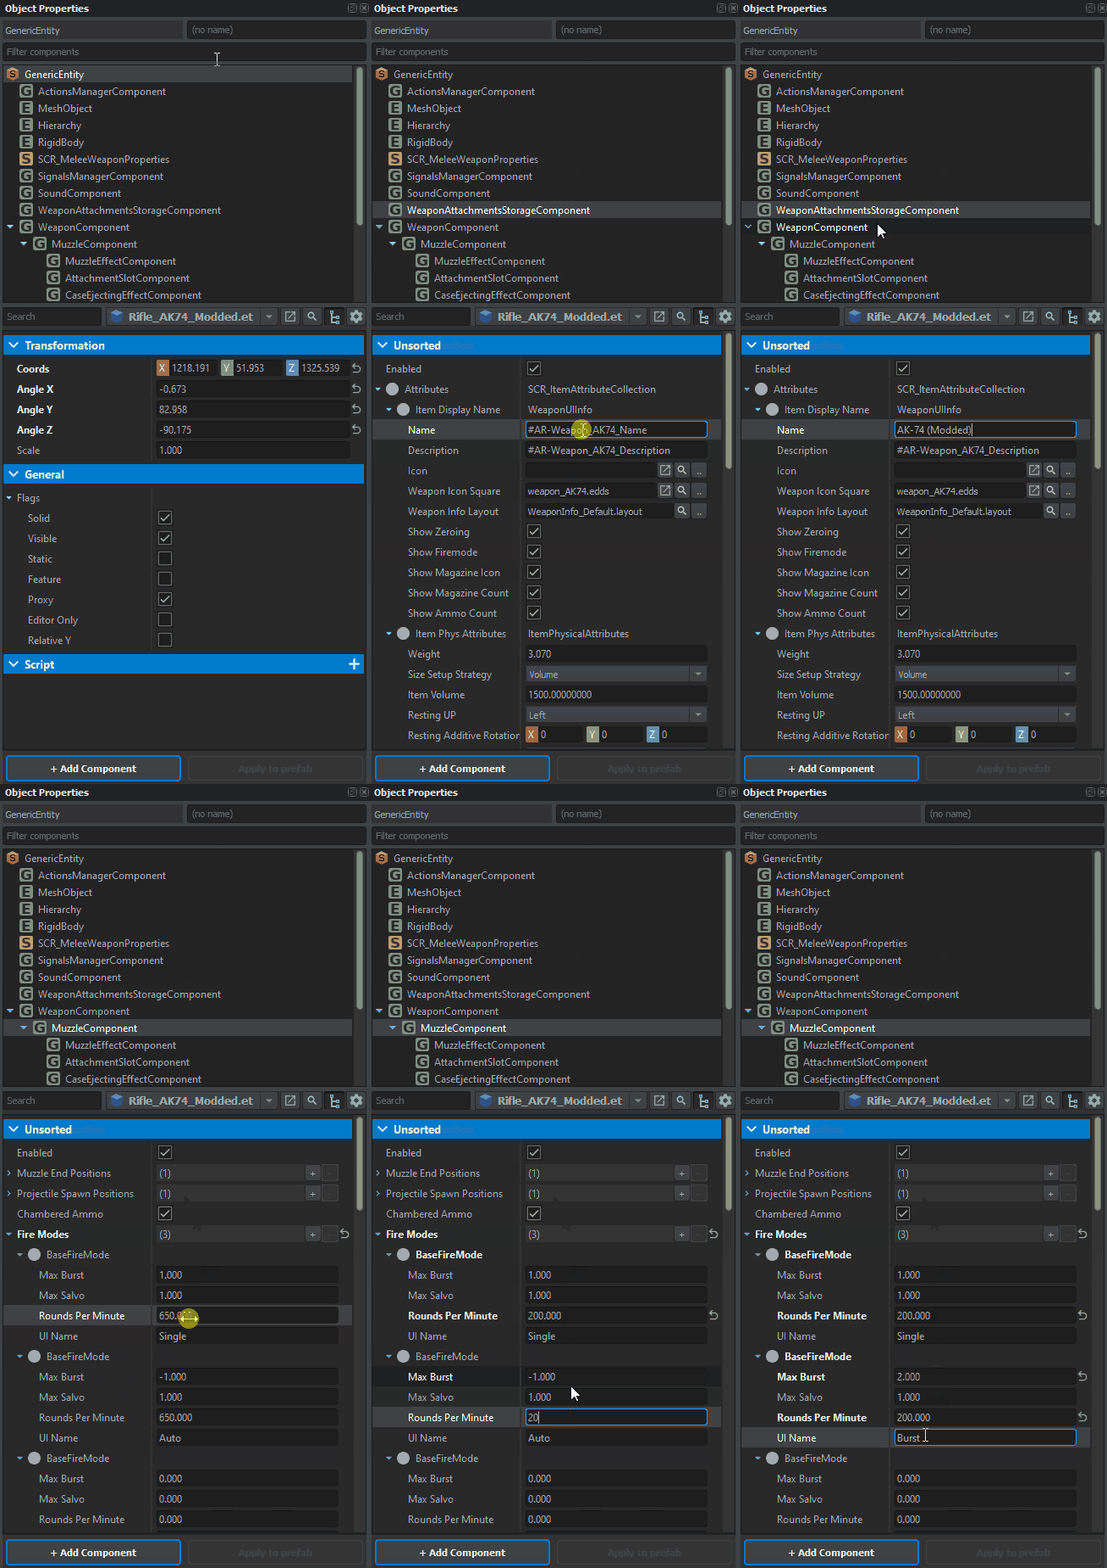
The goal at hand is to change weapon's name, rate of fire and add a 2 rounds burst mode to it. Taking a look at Weapon Components list, the name is defined in SCR_WeaponAttachmentsStorageComponent whereas rate of fire, along with burst behaviour, is defined in the FireModes section of MuzzleComponent.
After selecting the Rifle_AK74_Modded instance in World Editor, let's navigate first to its SCR_WeaponAttachmentsStorageComponent in the Object Properties window. There should be "Name" property with string inherited from Rifle_AK74.et. Type in there the new weapon name; once done, navigate to MuzzleComponent.
Weapons' rate of fire is controlled by the "Rounds Per Minute" parameter which exists in all fire modes. The way fire modes are controlled should be quite familiar to anyone who did Arma 3 modding - weapon can have multiple muzzles and each muzzle (which defines for instance muzzle-specific parameters like muzzle speed coefficients, available magazines, etc) can have fire modes with separate firing characteristics. The main difference with Arma 3 is that all of it is handled in the Workbench itself.
To have values consistent, Rounds Per Minute should be changed in all fire modes. Adding new fire mode is as simple as pressing "+" sign next to "Fire Modes" parameter. A new BaseFireModeClass will be created at the bottom and there, the Max Burst parameter can be set to 2 and UI Name to "Burst".
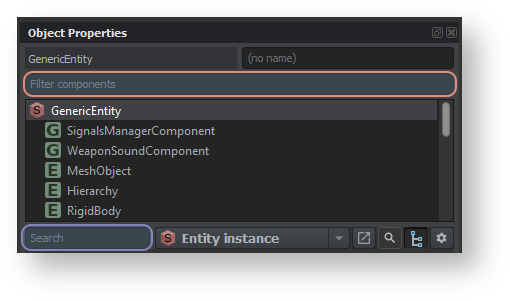
"Filter components" can be used to filter specific components and "Search" to look for desired parameter.
New Ammo Type
The goal is going to create new ammo variant with the following attributes:
- High explosive rounds
- Slow flying visible orb like bullet
In order to create a new variant of ammo, a new Prefab must be created, inheriting from Ammo_545x39_ball_7N6.et. Use one of the aforementioned methods to create a new Prefab called "Ammo_545x39_ball_modded.et". Once the new Prefab is placed in World Editor, its modification can happen.
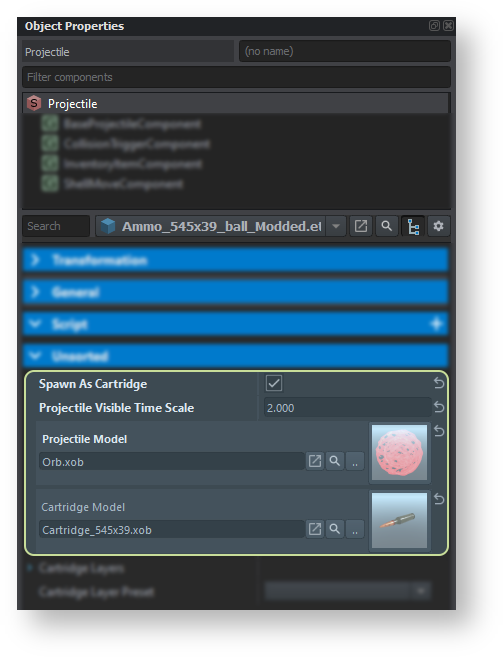
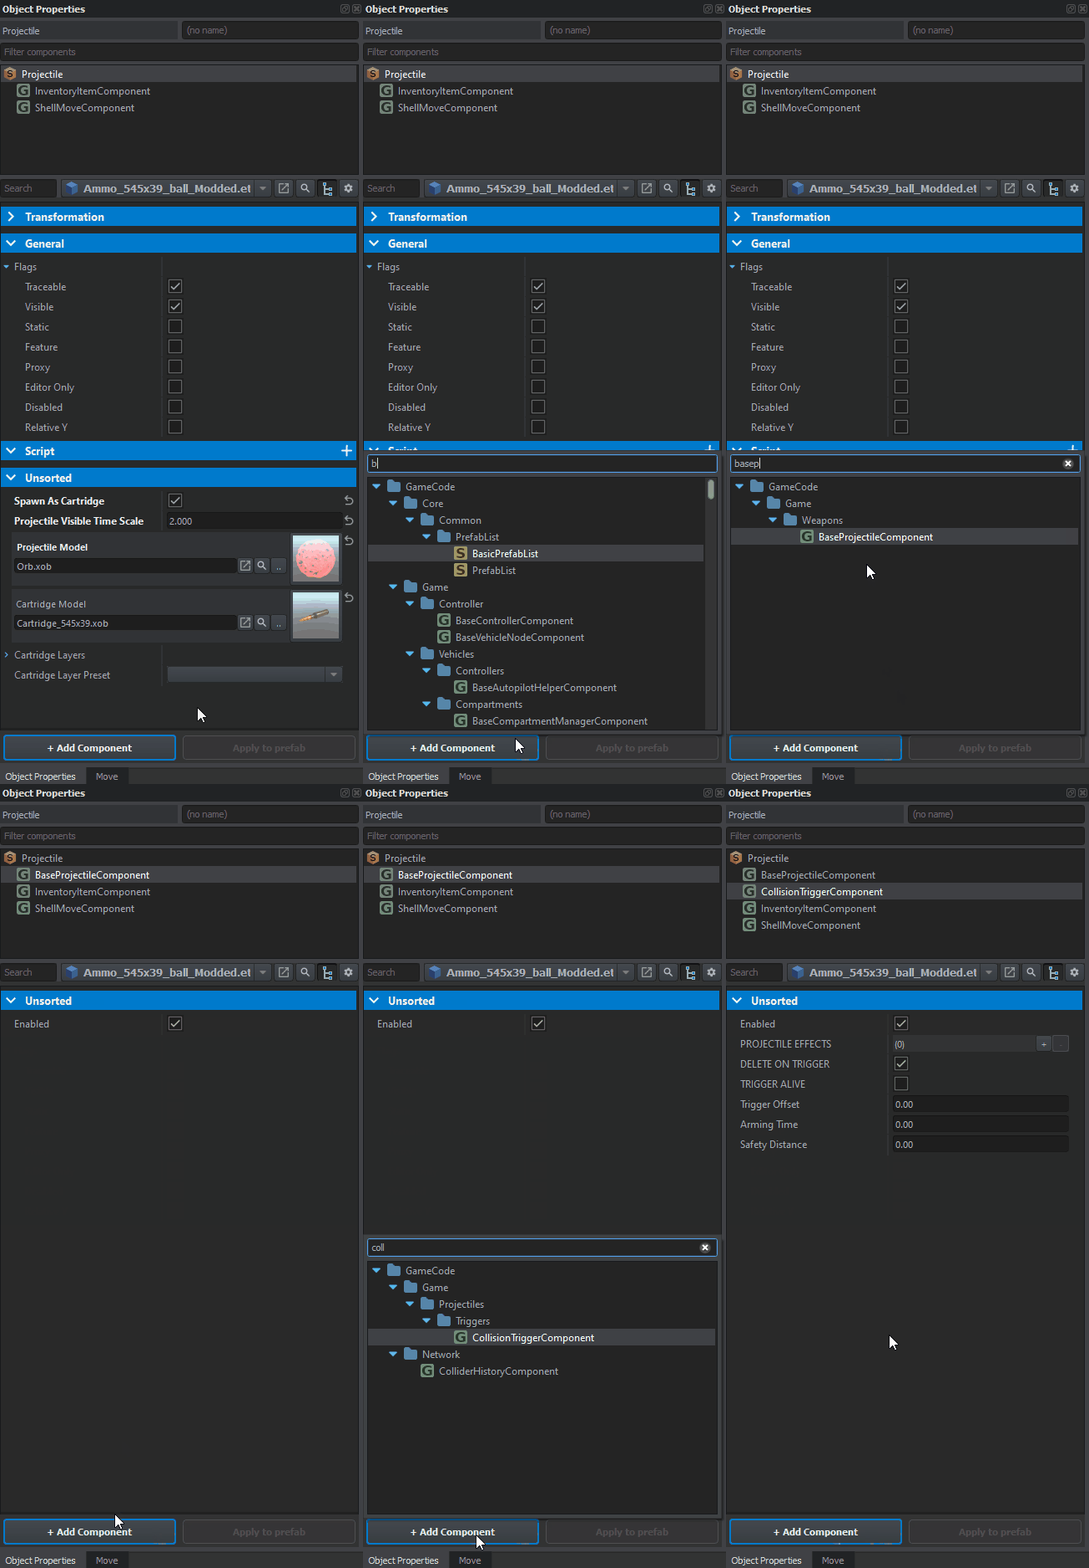
Projectile type Prefabs have 4 parameters:
- Spawn As Cartridge - When the projectile is created, it will use cartridge model
- Projectile Visible Time Scale - Below this value shell will start being visible. For always visible use 2, for never 0
- Projectile Model - Model of the flying projectile
- Cartridge Model - Model of the whole cartridge
The Projectile Model property has to change in order to see the wanted flying orb. To do so, click on it and use the already existing Orb.XOB model in SampleMod.
Add Explosive Effects
Next, ballistic characteristics of our new ammo. For bullets, ShellMoveComponent is responsible for kinetic ammo simulation, while CollisionTriggerComponent is being triggered upon impact with obstacle.
Add New Components
Before going any further, it is necessary to add two missing components: CollisionTriggerComponent and BaseProjectileComponent.
New components can be added to entity via "+ Add Component" button in the bottom section of Object Properties window. Once that is pressed, it possible to select desired component from the pop up list. To speed up things, it is recommended to use search function in that components list and start typing names of wanted components.
If those components were added to entity and not via hierarchy tree, then it might be necessary to use Apply to prefab button afterwards.
Components Configuration
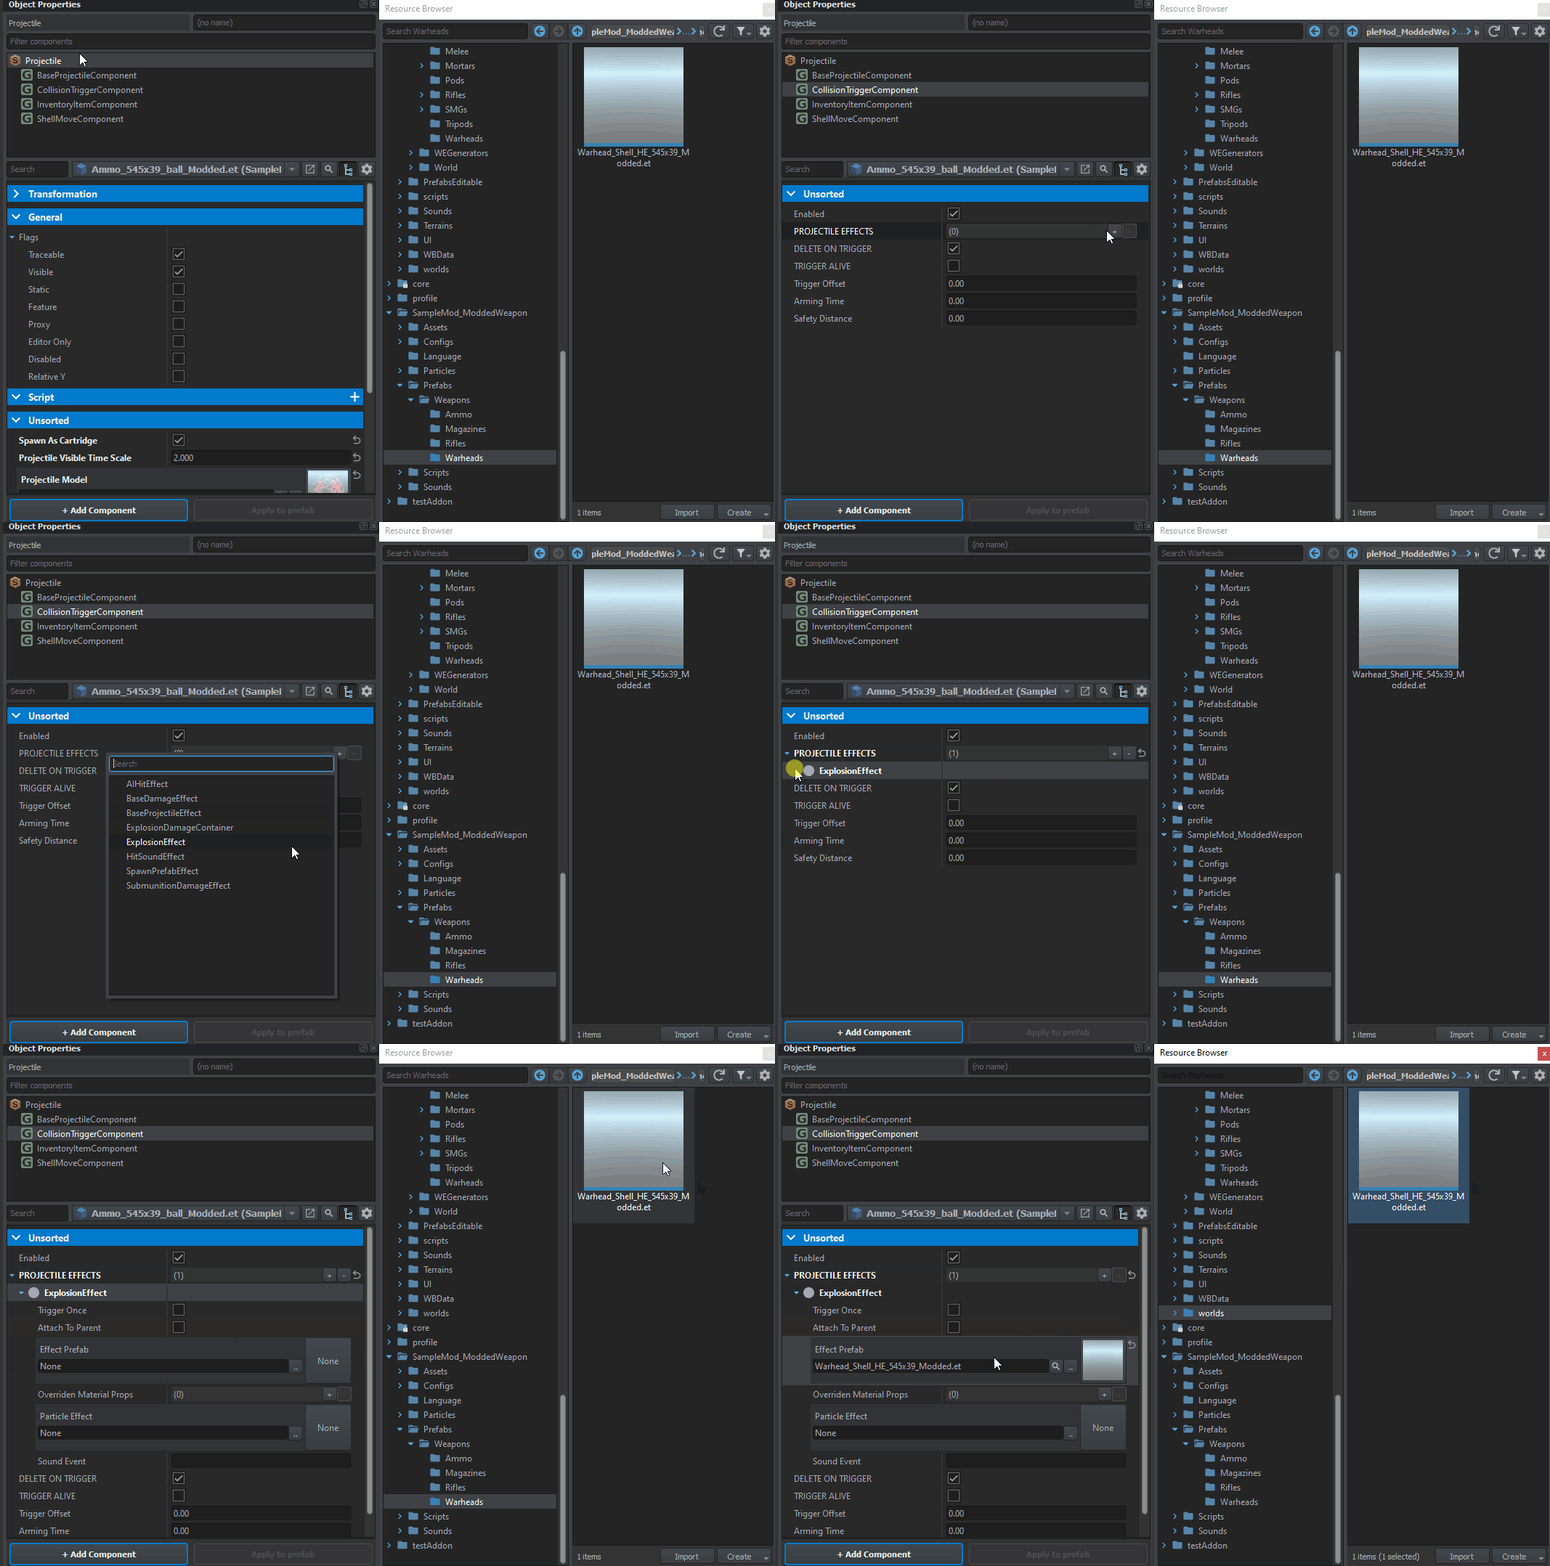
In CollisionTriggerComponent, a new element has to be added to Projectile Effects array: ExplosionEffect. This element is merely a link to the prefab which controls the explosion effects itself; this means a new warhead type prefab has to be created first.
A new warhead can be prepared by inheriting from Warhead_Grenade_HE.et prefab, located in Prefabs/Weapons/Warheads. This new prefab can be called Warhead_Grenade_HE_545x39_Modded. Once it is ready, parameters inside of that prefab can be adjusted.
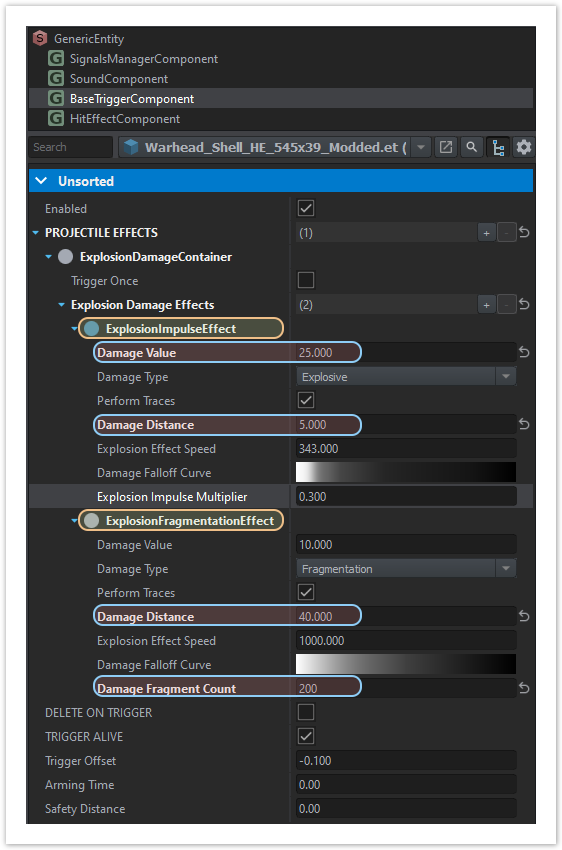
If inheritance was done properly, the newly created Warhead_Grenade_HE_545x39_Modded should already contain BaseTriggerComponent with some default explosive parameters in ExplosionImpulseEffect & ExplosionFragmentationEffect classes.
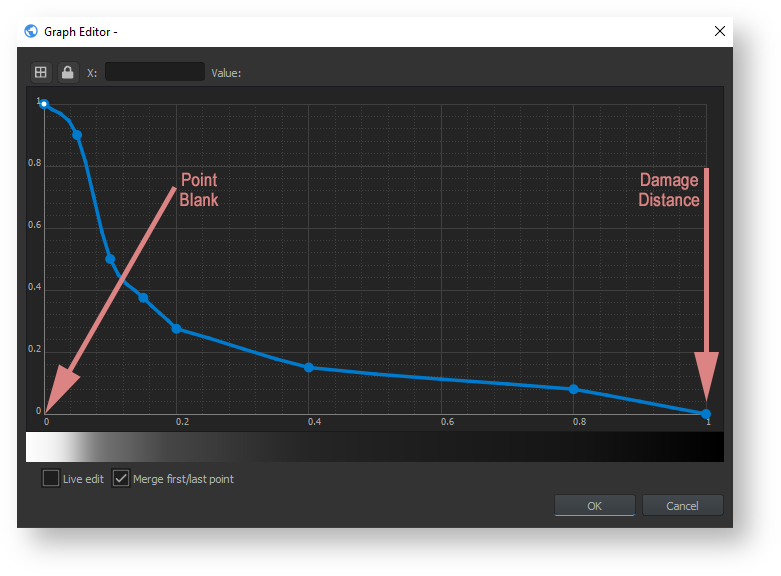
ExplosionImpulseEffect is responsible for simulating the blast wave. Changing Damage Value to 25 & Damage Distance to 5 (meters) will translate to 25 damage point being dealt at point blank. This value will drop in non-linear way according to Damage Falloff Curve parameter, scaled with Damage Distance on a 0..1 range.
As its name suggests, ExplosionFragmentationEffect is responsible for simulating of deadly shrapnel, which usually have few times higher deadly range compared to the blast wave. In this class, Damage Fragment Count is an interesting parameter since it controls how many small fragments are being simulated. Since Ammo_545x39_ball_Modded.et is a rather small projectile, Damage Distance can be reduced to 40 and Damage Fragment Count can be set to 200.
HitEffectComponent controls which particle effects are being played upon projectile impact. Those effects are linked via Particle Effect property and in this case, they are referencing to Explosion_VOG25.ptc. Changing this parameter should conclude work on Warhead_Shell_HE_545x39_Modded prefab and it should be now possible to get back to Ammo_545x39_ball_Modded.et.
Back in Ammo_545x39_ball_Modded prefab, the new warhead can be finally linked in CollisionTriggerComponent. To do so, ExplosionEffect class has to be added to the Projectile Effects array and it then should be possible to change Effect Prefab parameter so it is linking to Warhead_Shell_HE_545x39_Modded. After that step is completed, Ammo_545x39_ball_Modded is ready to produce some nice explosive effects.
New Ammo AI Config
Once ballistic properties of the ammo are set, it is possible to configure data necessary for AI. Without it, AI won't be able to accurately engage enemies.
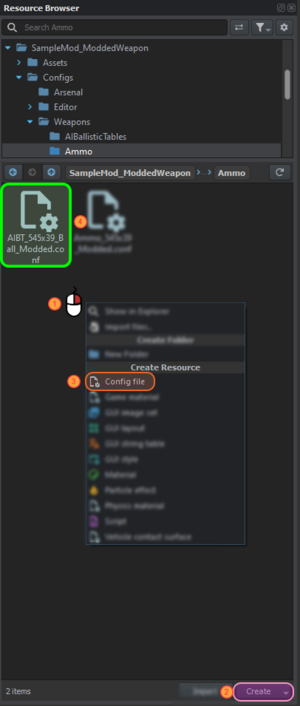
First step towards creation of new AI Ballistic Table will be creation of new config in Configs->Weapons->AIBallisticTables folder. To do so, use either Create (1) button in Resource Browser window or click with RMB somewhere inside the folder (2). Then select from Config (3) the context menu, type name of the new config (in this case it is AIBT_545x39_Ball_Modded) , confirm it and once prompted to select type of config, pick BallisticTableArray type from the menu.
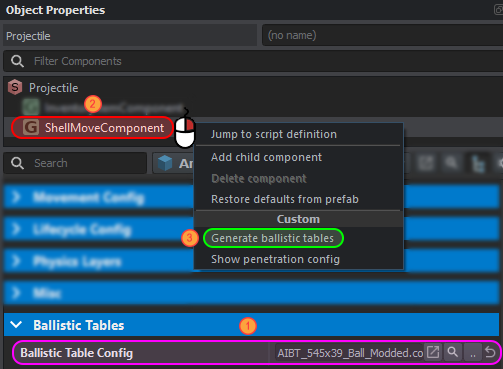
After new config is created, it is time to go back to the Ammo_545x39_ball_Modded.et prefab. Over there, in Ballistic Tables tab section of ShellMoveComponent, a Ballistic Table Config (1) property can be found. Once this property is located, assign previously created AIBT_545x39_Ball_Modded.conf to it by either by drag and dropping it or by clicking on button with two dots and the selecting this config from the resource selection window.
If that step was done properly, it is now possible to generate data for Ballistic Tables by clicking with RMB on ShellMoveComponent (2) and selecting Generate ballistic tables (3) option from the context menu. Processing of the data should be fairly quickly and once it is complete, it will be necessary to save current world (via Save button or Ctrl+S shortcut) in order to permanently store data on the drive. After that, AI should be able to use such weapon without problems.
New Magazine
With new ammo prefab ready in game data, a new magazine must be created to host it and use it in the new weapon. its capacity will also be increased to 200 rounds.
First step is the creation of "Magazine_545x39_AK_30rnd_modded" prefab inheriting from Magazine_545x39_AK_30rnd_Base.et. Then, the assigned ammo and magazine capacity will be changed. Both these parameters are located in MagazineComponent. Ammo Config along with Ammo Mapping, defining which round will be used in the magazine, and Max Ammo, which is the magazine's total capacity.
New Ammo Config
New Ammo Config can be created in Resource Browser by using in Resource List. From that context menu select "Config File" under "Create Resource" tab and type the name of the new config, e.g Ammo_545x39_Modded.conf. It will ask to specify the kind of config to be created; search for Magazine and select "MagazineConfig" from the filtered list.
Once the config is ready, double-click on it to open it. This opens the new config in Asset Preview Window with empty Ammo Resource Array. Click the + sign to add a new entry to the array. At least one bullet type must be defined in order for the config to be considered valid.
Apply Ammo Config to Magazine
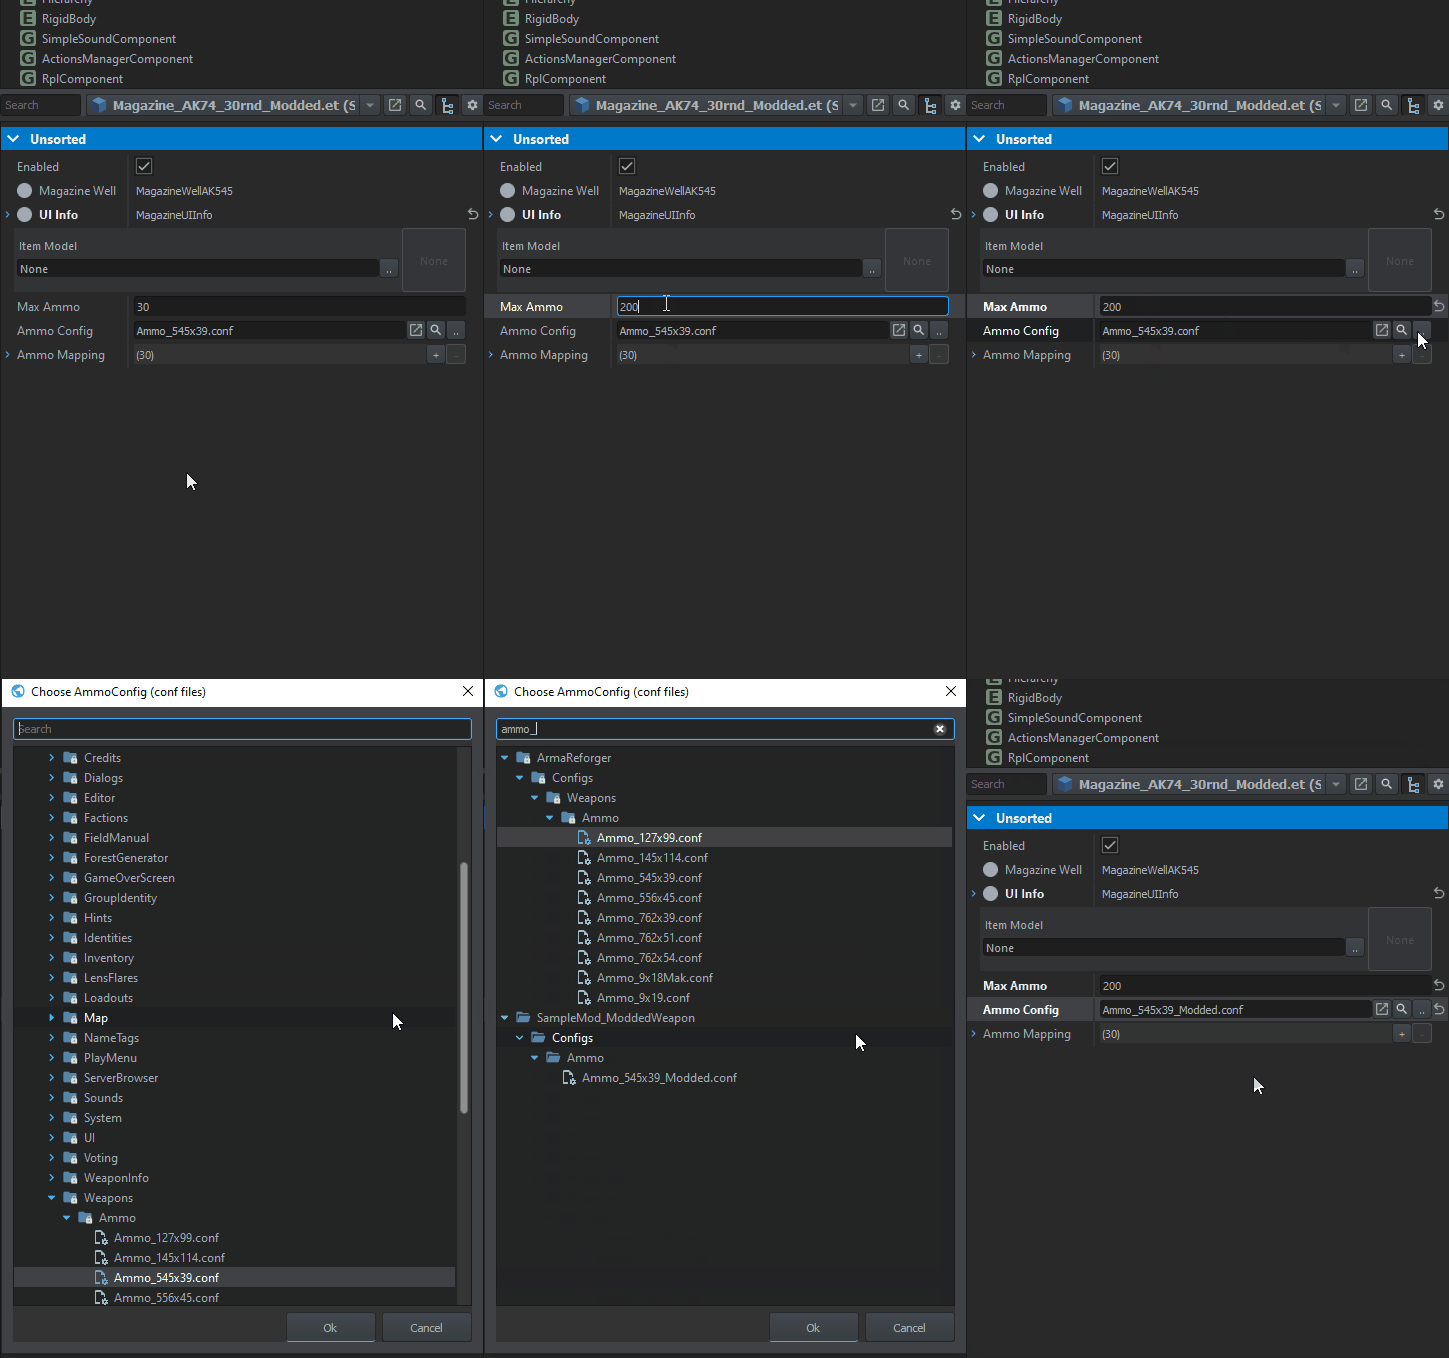
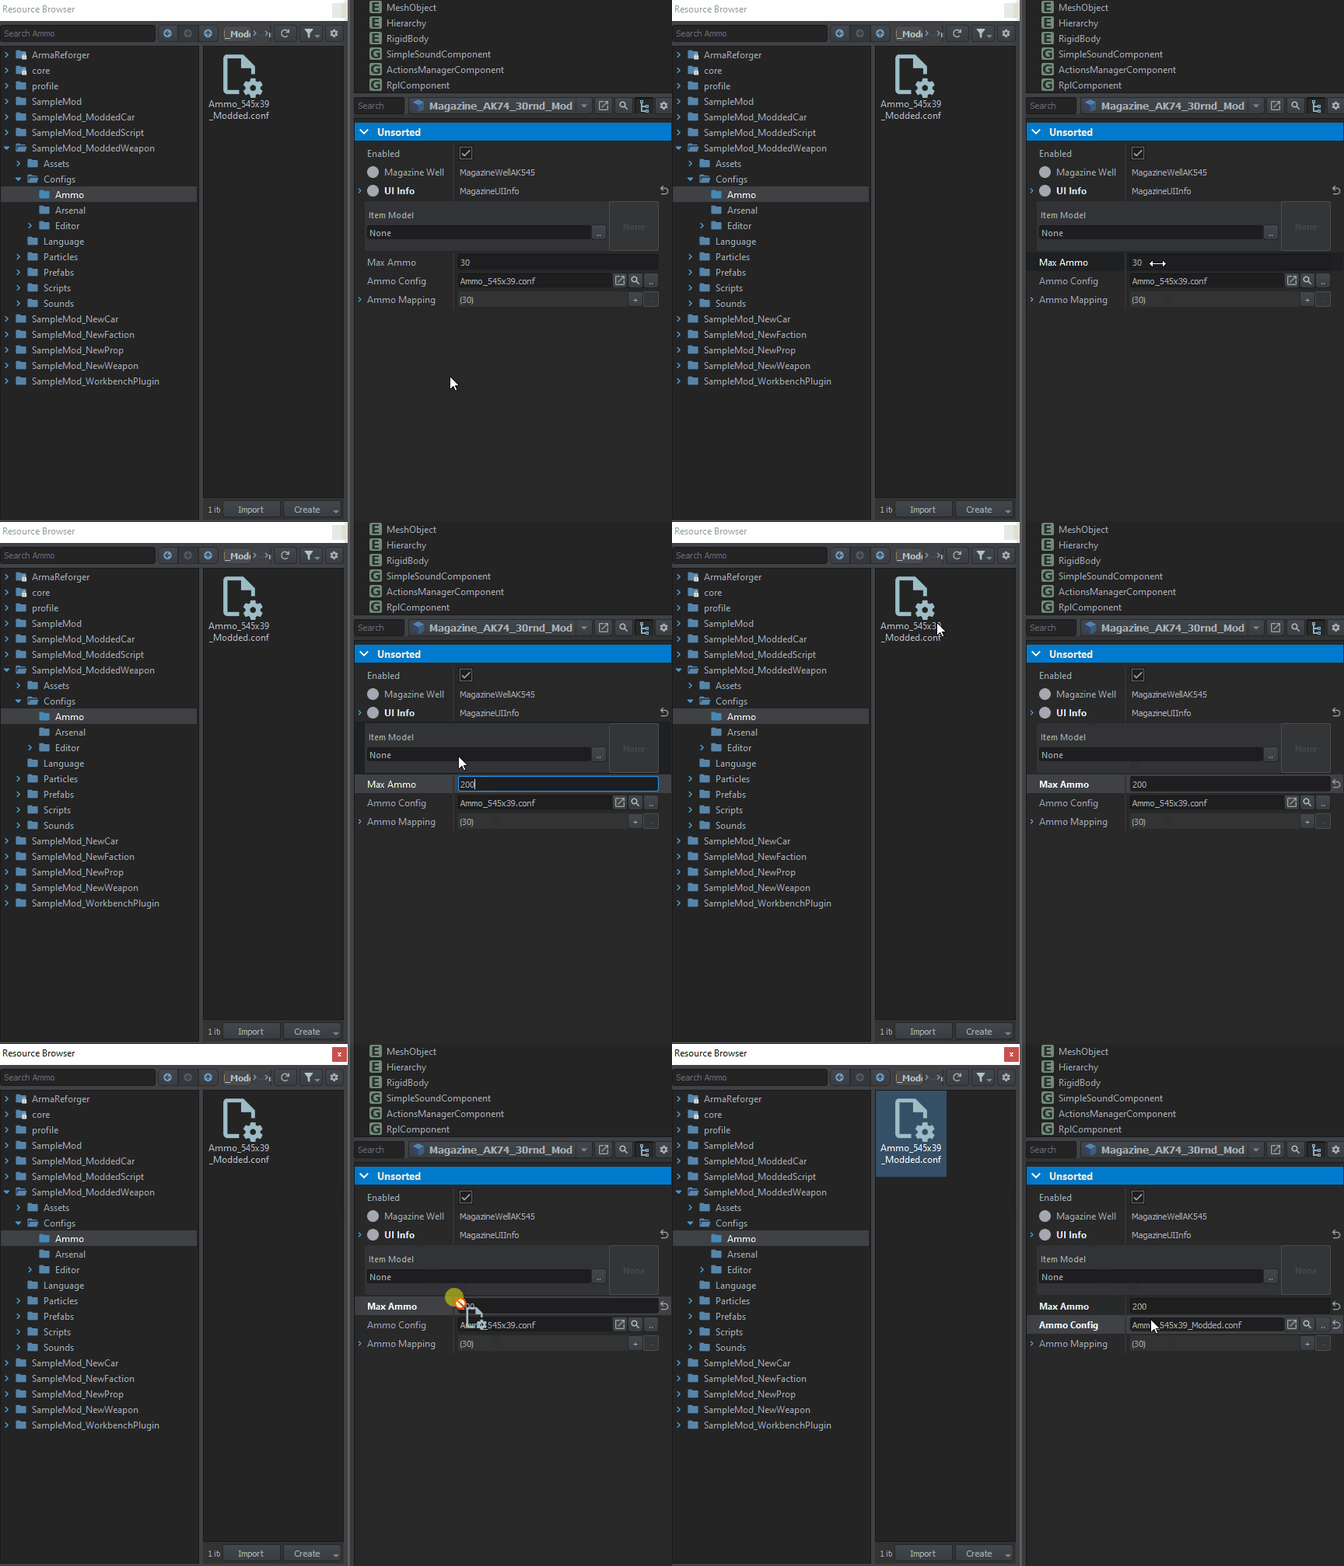
Once the new Ammo Config is ready, apply it to the previously created magazine by using one of the presented below methods. Once done, start filling Ammo Mapping values with different bullet types that were defined in Ammo Config. There are 2 rules:
- 0 in Ammo Mapping array means that the first bullet from Ammo Resource Array will be used. 1 = second bullet from Ammo Resource Array, 2 = third one and so on. If an invalid index is provided, no bullet will be created
- If the amount of entries in Ammo Mapping is smaller than Magazine Capacity, then the first round from Ammo Resource array will be used until the end of magazine. In the example below, there are 30 entries in Ammo Mapping array and the magazine capacity is set at 200. This means that after the 30th round the weapon will only be firing Ammo_545x39_ball_Modded rounds.
Assigning resource by clicking on 3 dots or resource icon
Drag and drop method
Changing AI properties
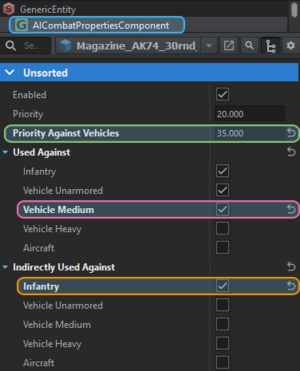
Since this magazine contain some really explosive ammunition, it might be worth to tweak AI properties of the magazine. In AICombatPropertiesComponent inside of the magazine prefab, you can define how AI is going to use this magazine - will it decided to use it against vehicles, infantry or aircraft. Additionally, it is also possible to set if this magazine should be preferred when engaging vehicles or whether it should be used when engaging enemies indirectly (i.e. behind some cover). In this case, we want to have a magazine which can:
- Engage infantry directly
- Engage unarmored & medium vehicles directly & prefer such targets over infantry
- Engage infantry indirectly
To do so, change following parameters:
- Priority Against Vehicles - change it from -1 to 35. Since priority is higher than regular Priority parameter, AI will prefer engaging vehicles if both infantry and vehicles are present on the battlefield.
- In Used Against array enable Vehicle Medium property - vehicles like armored M1025 or BTR-70 (unit type is defined in VehiclePerceivableComponent inside those vehicle prefabs) should be engaged using this magazine
- In Indirectly Used Against array enable Infantry parameter - AI will try to engage enemy infantry if its behind some light cover
Apply New Magazine to Weapon
After configuring Magazine_545x39_AK_30rnd_modded prefab, it is time to apply this magazine to the modded variant of AK-74.
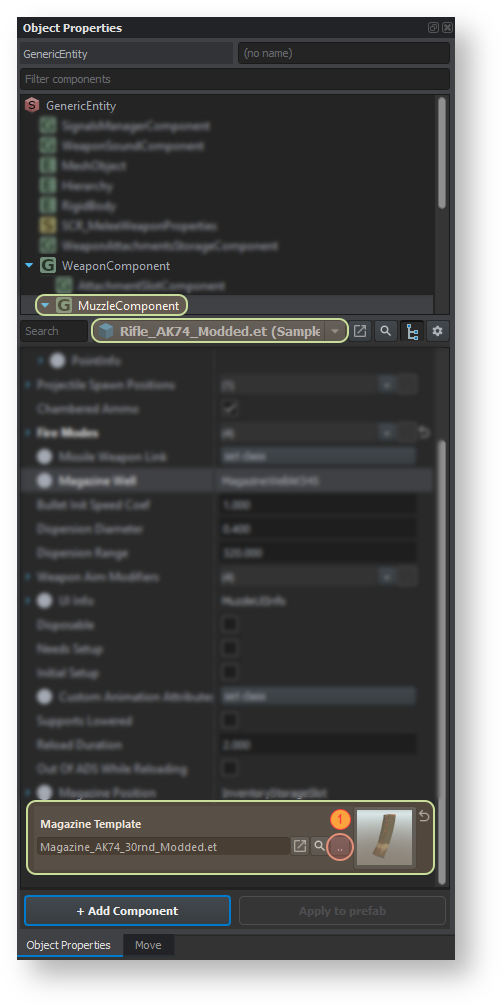
Once Rifle_AK74_Modded prefab is present in World Editor, it is possible to move to Object Properties window. Over there, navigate to MuzzleComponent and try to locate Magazine Template property.
When Magazine Template property is in sight, it possible to finally change the prefab which is assigned to it. This can be done in two ways:
- By clicking on two dots (1) and selecting Magazine_545x39_AK_30rnd_modded in pop up window that appeared
- Drag and dropping Magazine_545x39_AK_30rnd_modded prefab into Magazine Template property (see Applying Ammo Config to weapon segment about drag and drop method)
As soon as this action is completed, don't forget to save the result. If change was applied to entity instance, don't forget to use Apply to prefab button and save current world afterwards!
Retexturing asset
In this chapter the following operations will be performed on the modified AK74:
- Create new materials based on original one and convert them to MatPBRCamo
- Apply new materials to the modded weapon
New Materials
When making a retexture of an asset there are basically two choices; creating new material from scratch and assigning all the texture parameters manually or duplicating existing material and only change wanted parameters. For purpose of this tutorial we will cover both ways and begin with creation of new material from scratch.
From Scratch
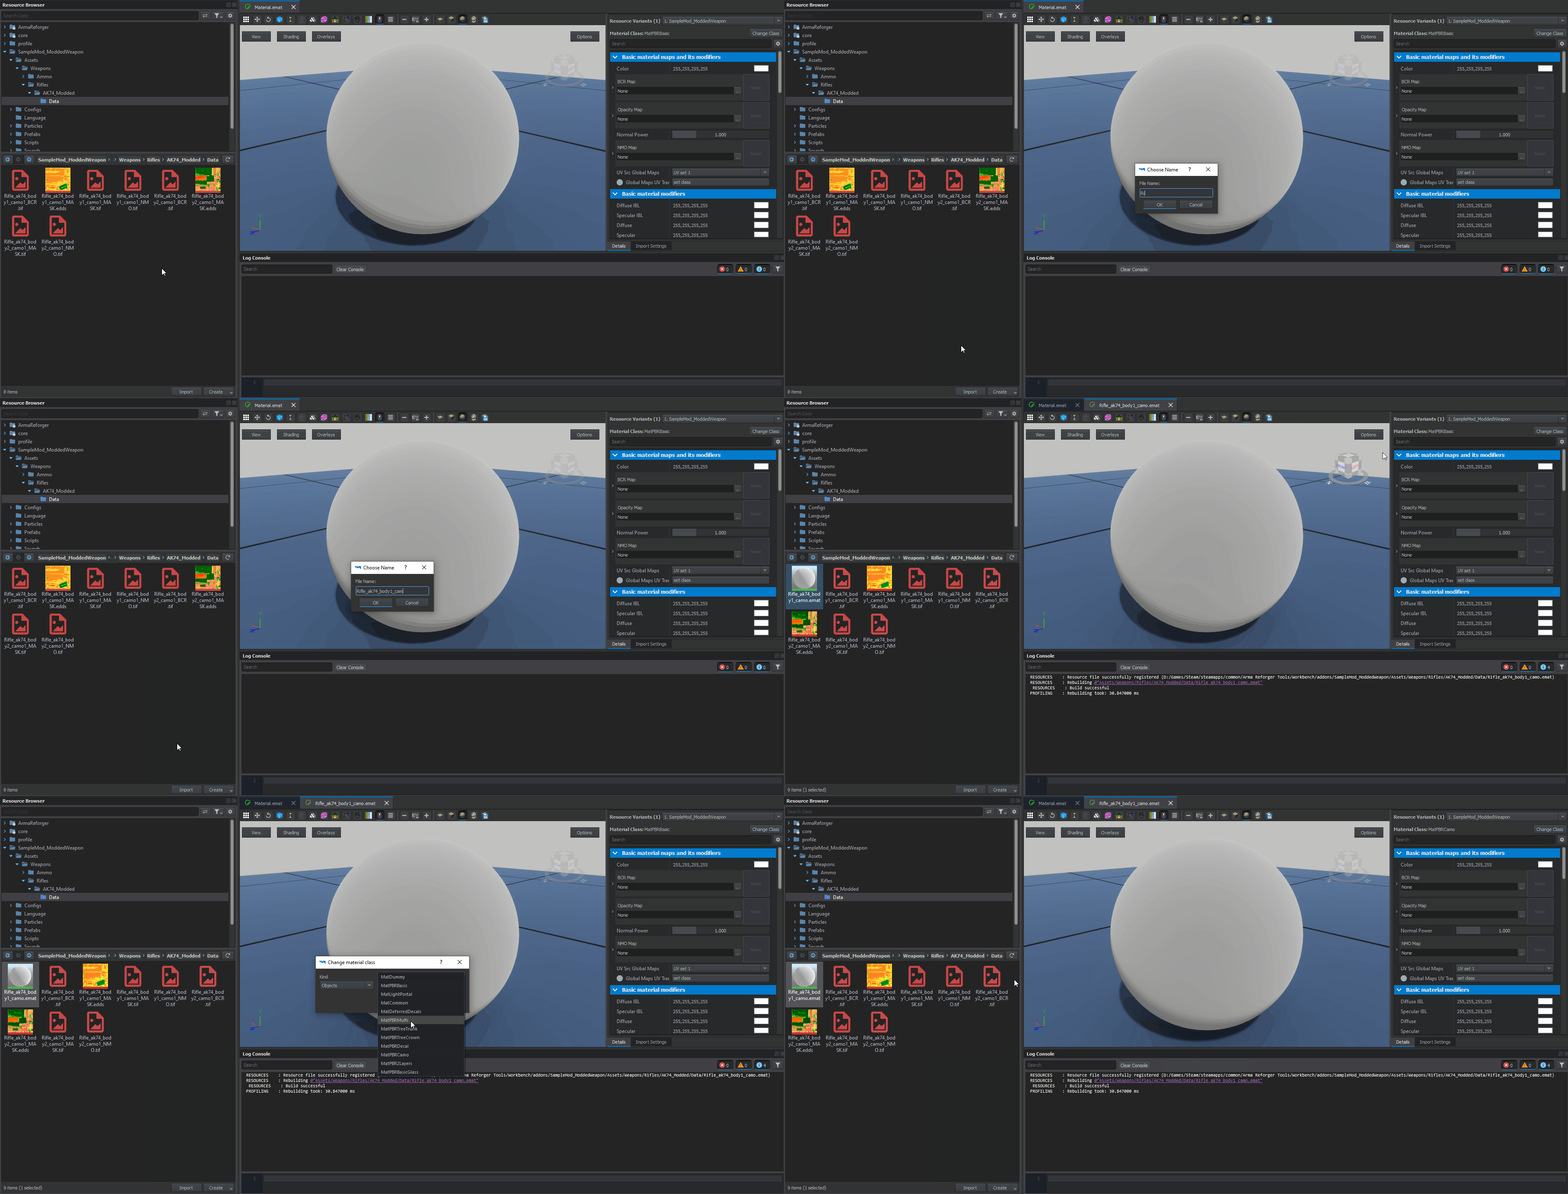
New material can be created by moving the mouse over Resource Browser asset list and using RMB. A small context menu should pop up, click "Material" from "Create Resource" list. After clicking that, write the new material's name in the separate window that popped up. The material has been created! It is now time to change its properties. In order to do so, double click on the new material in the assets list to open it, then navigate to ChangeClass button on the right side of the resource browser in the "Details" tab. By default, all materials are created as MatPBRBasic and since this is a simple retexture, MatPBRCamo will do. More about different kind of materials can be read in Naming Conventions and File Formats.
Duplicating Existing Material
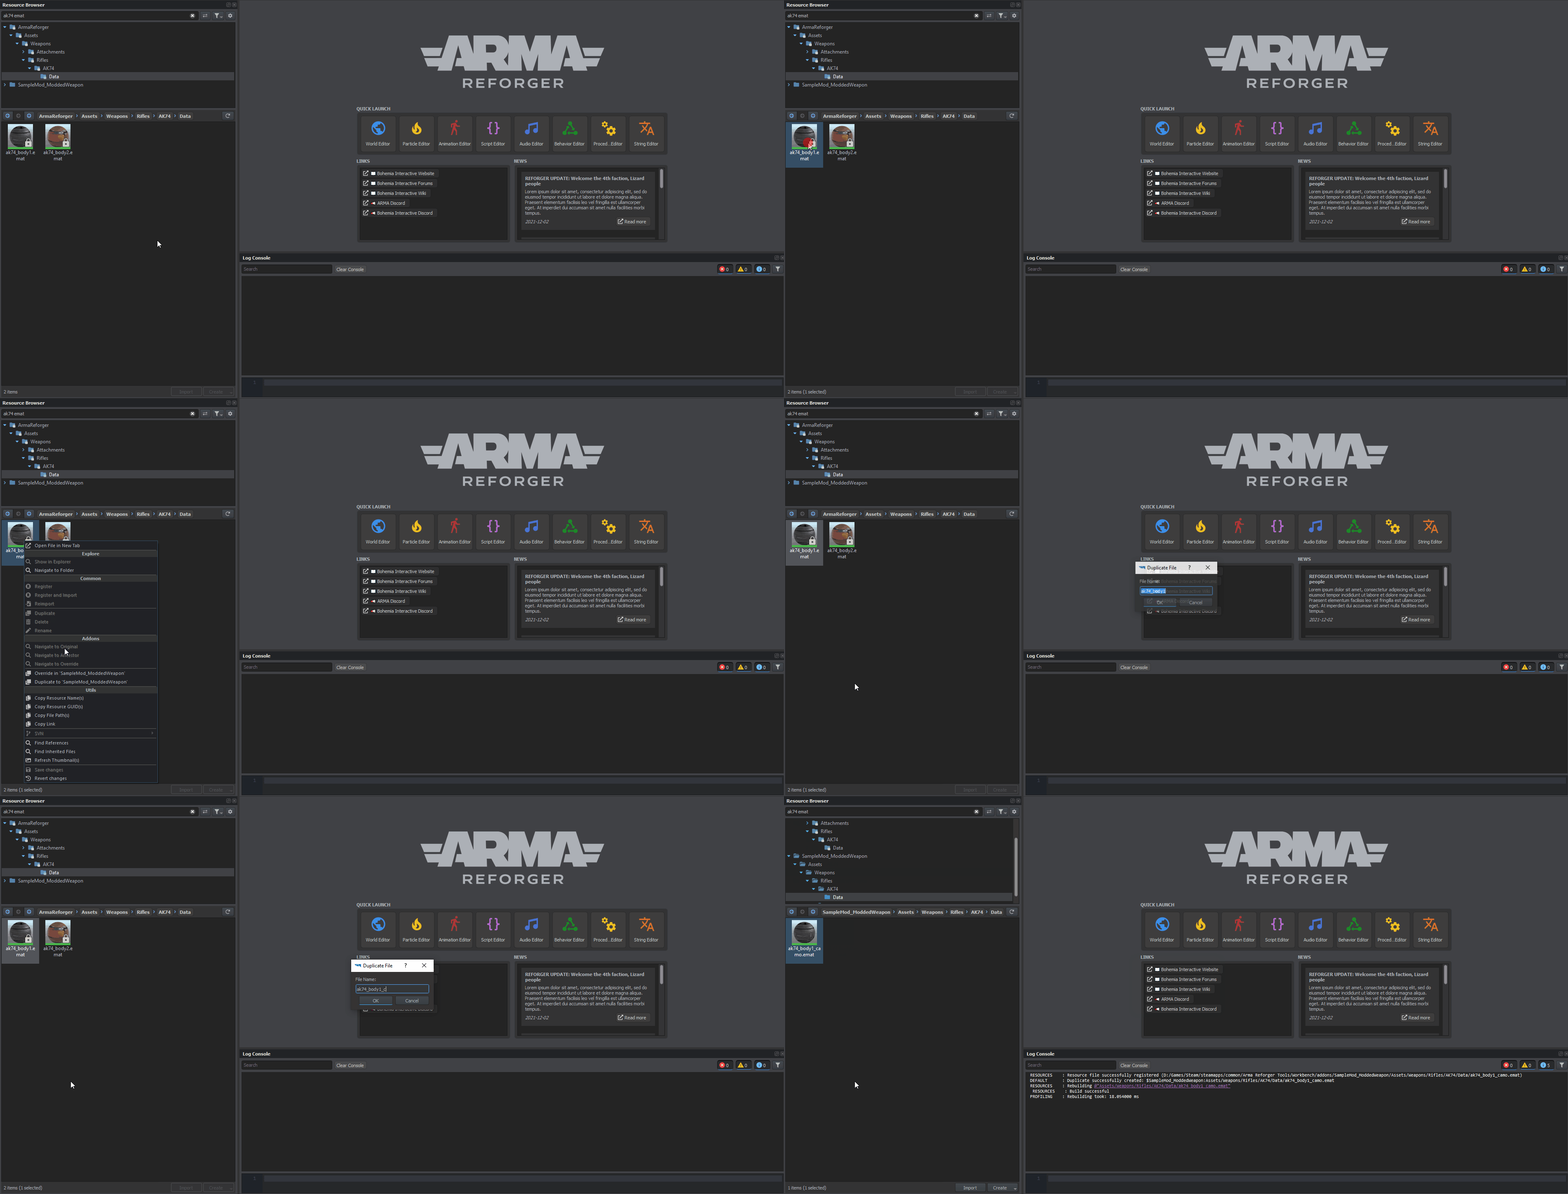
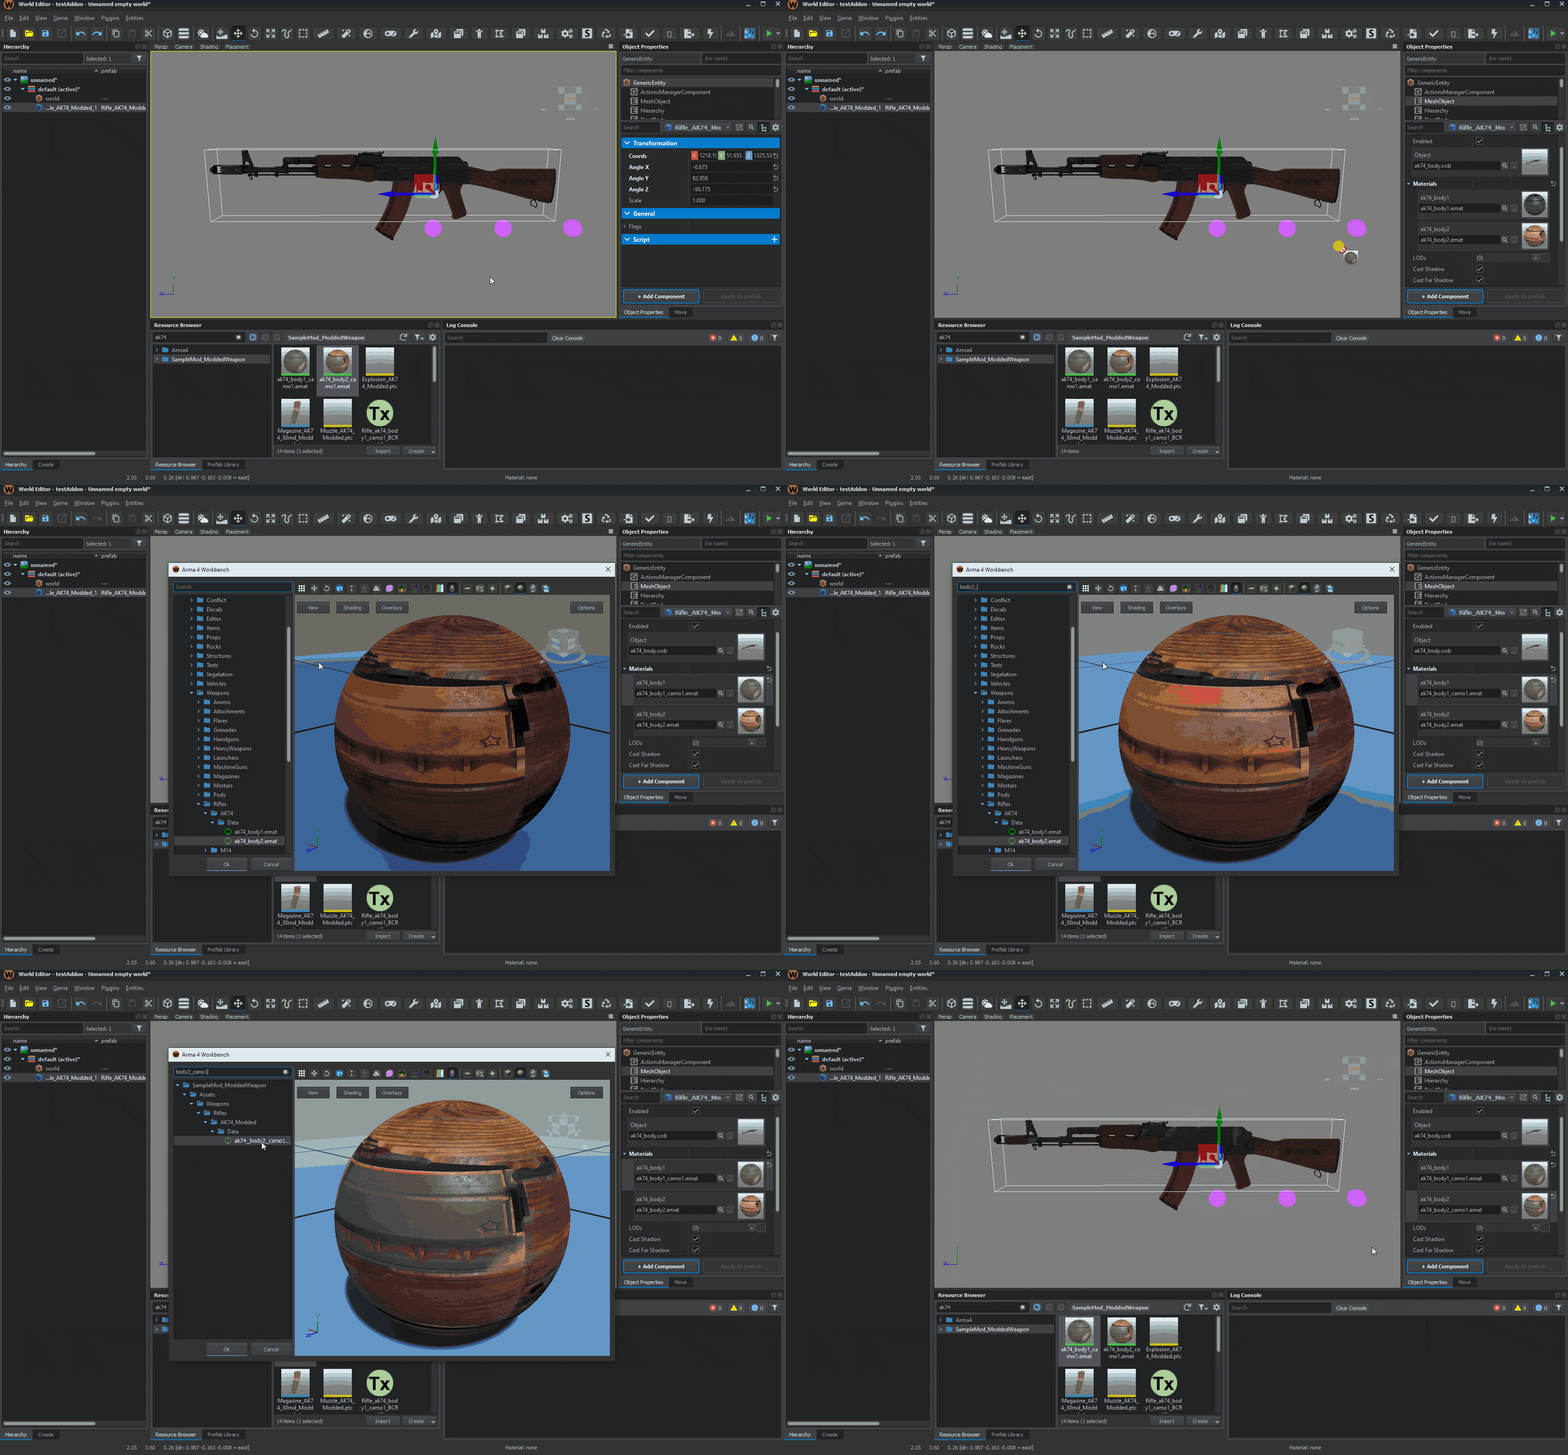
Another way to create new material is duplication of an existing one. Search for ".emat AK74" in Resource Browser and right-click on ak74_body1.emat. Next, select "Duplicate to 'SampleMod_ModdedWeapon" option from the context menu and type the new file name e.g ak74_body1_camo. Duplicated material will use the same type as parent asset so before proceeding further, the class type still needs to be changed: this is done the same way as when creating a new material.
The main difference between these two methods is that duplicated material will retain the original configuration; after changing its class to MatPBRCamo, the only thing to be filled would be camo-related parameters.
Once this is done, apply the same method to ak74_body2.emat then relocate duplicated materials to the target location (in this case SampleMod_ModdedWeapon) by dragging them in Resource Browser.
Material Configuration
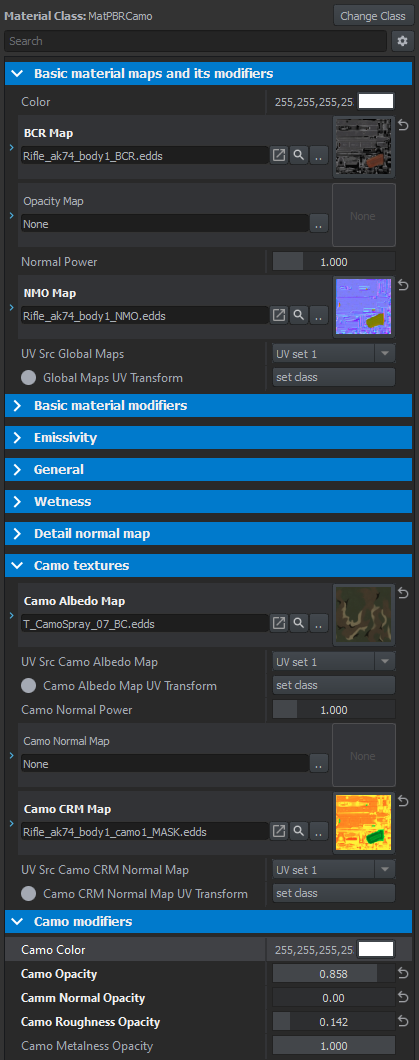
With materials ready and in place it is time to set them up correctly. If duplication has been used then most of the basic parameters should be there, otherwise see the picture on the right to fill in correct values.
Retexturing using MatPBRCamo
MatPBRCamo is an extension of the MatPBRBasic material which easily allows overlay camouflage pattern on the asset. In "Camo textures" tab the following maps can be assigned:
- Camo Albedo Map - RGB Albedo - seamless texture which will be overlaid on base albedo texture. Many camouflage patterns are available in "data\Common\Textures\Camouflage".
- Camo Normal Map - Optional. Classic normal map. It can be used to add additional bumpiness like some mud smudges or deep scratches
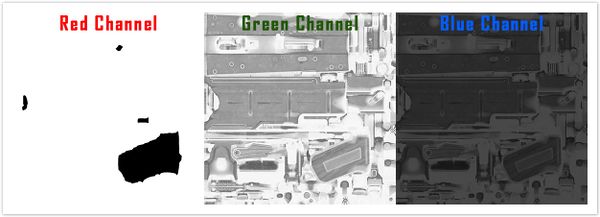
- Camo CRM Map - CRM stands for Camo/Roughness/Metallic. Textures per channel:
- Red = Mask - white color defines where all Camo textures are applied
- Green = Roughness - classic roughness
- Blue = Metallic - classic metallic
Camo Albedo Map UV Transform is quite a useful transform, since it lets control the size of the camo texture.
"Camo modifiers" contains opacity controls of each mask. If no Camo Normal Map is provided then Camo Normal Opacity should be set to 0.
Below is an example of Camo CRM Map. Roughness and metalness were copy pasted from base material but custom maps can be exported to these channels easily if that mask is created in a program like Substance Painter.
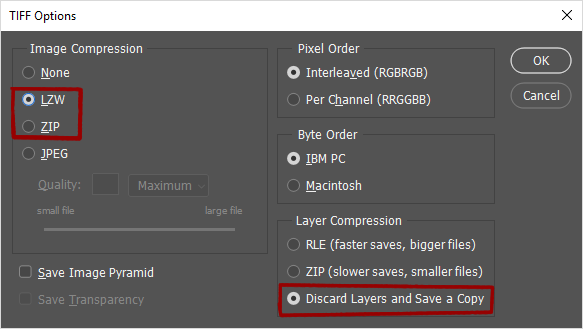
Texture that have been created should be in RGB Color mode with 8 Bits/Channel and saved in .tiff format with following settings.
More information over that can be found on the Textures page
Texture Import
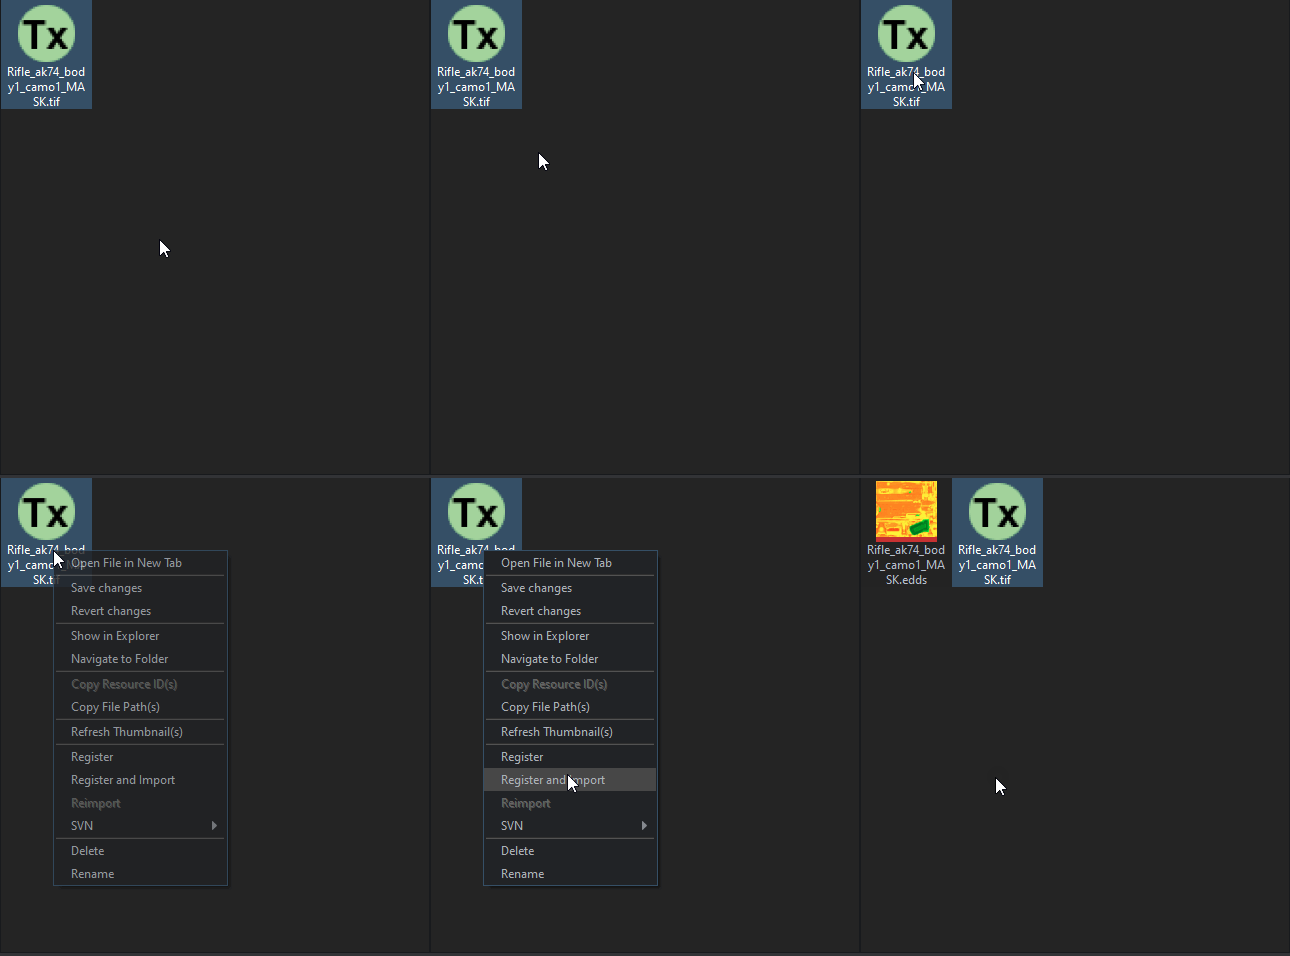
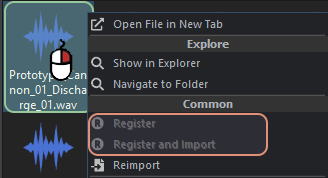
The TIFF file being processed, it is ready to be imported in Workbench. To do so, locate the file in Resource Browser and right-click on it. Select "Register and import" from the contextual menu. This action will import and convert the texture to Enfusion DDS file (.EDDS). In import tab there are few parameters which are quite crucial for some of the texture types but for more information, please take a look at Materials and Textures page again. With the texture imported, it is now possible to assign that mask in the new material.
Additional read
Apply Materials to Asset
It is possible to change materials on each prefab and entity instance which are using MeshObject component. After clicking on MeshObject component there is a small arrow next to the "Materials" property which will expand the list with currently selected materials. Once that list is expanded, the material can either be drag and dropped from Resource Browser to material field, or selected by clicking on material and selecting new material in the pop-up window that appeared.
Sounds Change
In this chapter, let's tinker with the weapon's sound effects through the following operations:
- Creating variant of existing audio project configuration
- Replacing firing sounds of a weapon
- Replacing bullet impacts sounds
Audio Editor Basics
Most of the audio configuration is performed in Audio Editor where it is possible to create quite complex things in a user-friendly visual environment. In this tutorial Weapons_Rifles_AK-74_Shot.acp will be used as weapon configuration base. After opening it in Audio Editor, it is now possible to create a copy of it through File → Save As option and new Weapons_Rifles_AK-74_Shot_modded.acp can be created in desired addon.
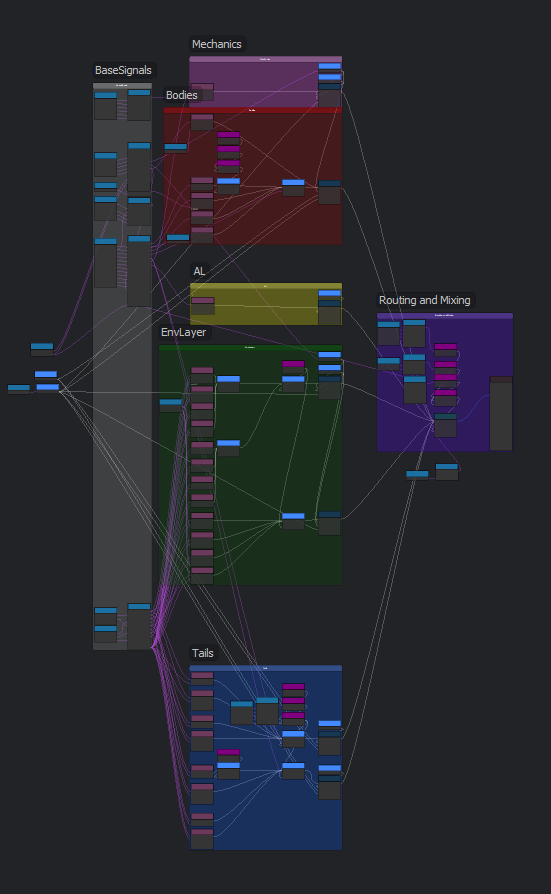
Without going too deep in the audio structure, a typical weapon sound uses multiple sound banks and sound shaders to create a final mix. Shaders are affected by various signals like distance from camera, environment around shooter or current weather conditions.
Audio Bank Content Change
In this tutorial, only smart part of the audio project will be modified - bodies & tails sounds.
Some of the shortcuts used in audio project files might be confusing at first glance.
Please refer to following table in case something is not clear:
| AL | Add Layer |
| FP or 1p | First Person |
| EQ | Equalizer |
| EL or EnvLayer | Environment Layer |
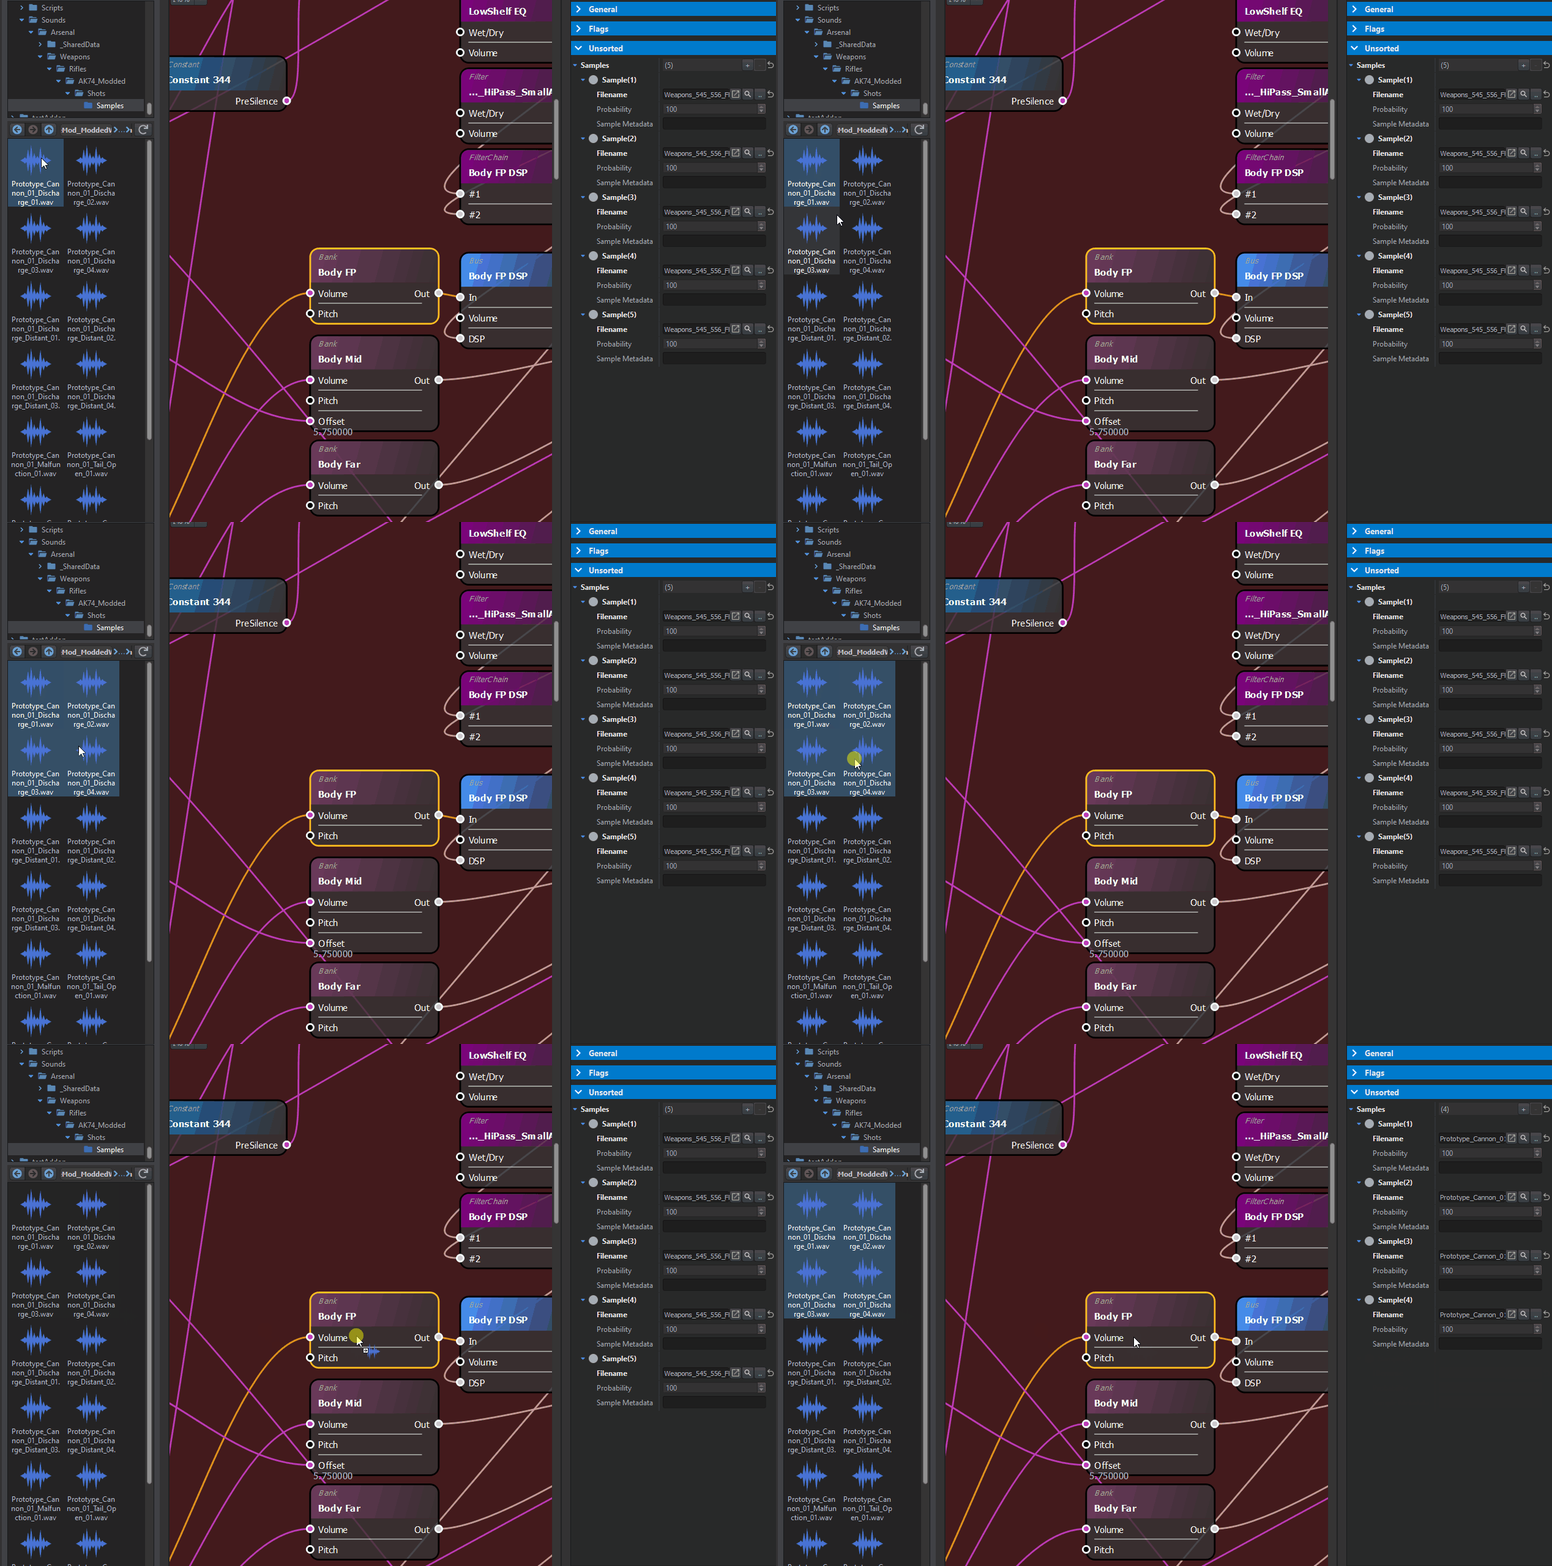
Starting with bodies' sounds, following audio banks will be adjusted:
- Body FP (Body First Person)
- Body Mid (Body medium range sound)
- Body Far (Body far range sound)
Sound banks contain list of files in their Samples array and some basic sound configuration like volume or pitch. New sounds can easily be added to an existing Sound Bank by simply drag & dropping wav files on a bank. Since the goal here is to completely replace an existing audio bank, + will be used to replace the bank.
In this example,
- Prototype_Cannon_01_Discharge_01.wav
- Prototype_Cannon_01_Discharge_02.wav
- Prototype_Cannon_01_Discharge_03.wav
- Prototype_Cannon_01_Discharge_04.wav
are assigned to Body FP & Body Mid banks and
- Prototype_Cannon_01_Discharge_Distant_01.wav
- Prototype_Cannon_01_Discharge_Distant_02.wav
- Prototype_Cannon_01_Discharge_Distant_03.wav
- Prototype_Cannon_01_Discharge_Distant_04.wav
are assigned to Body Far bank.
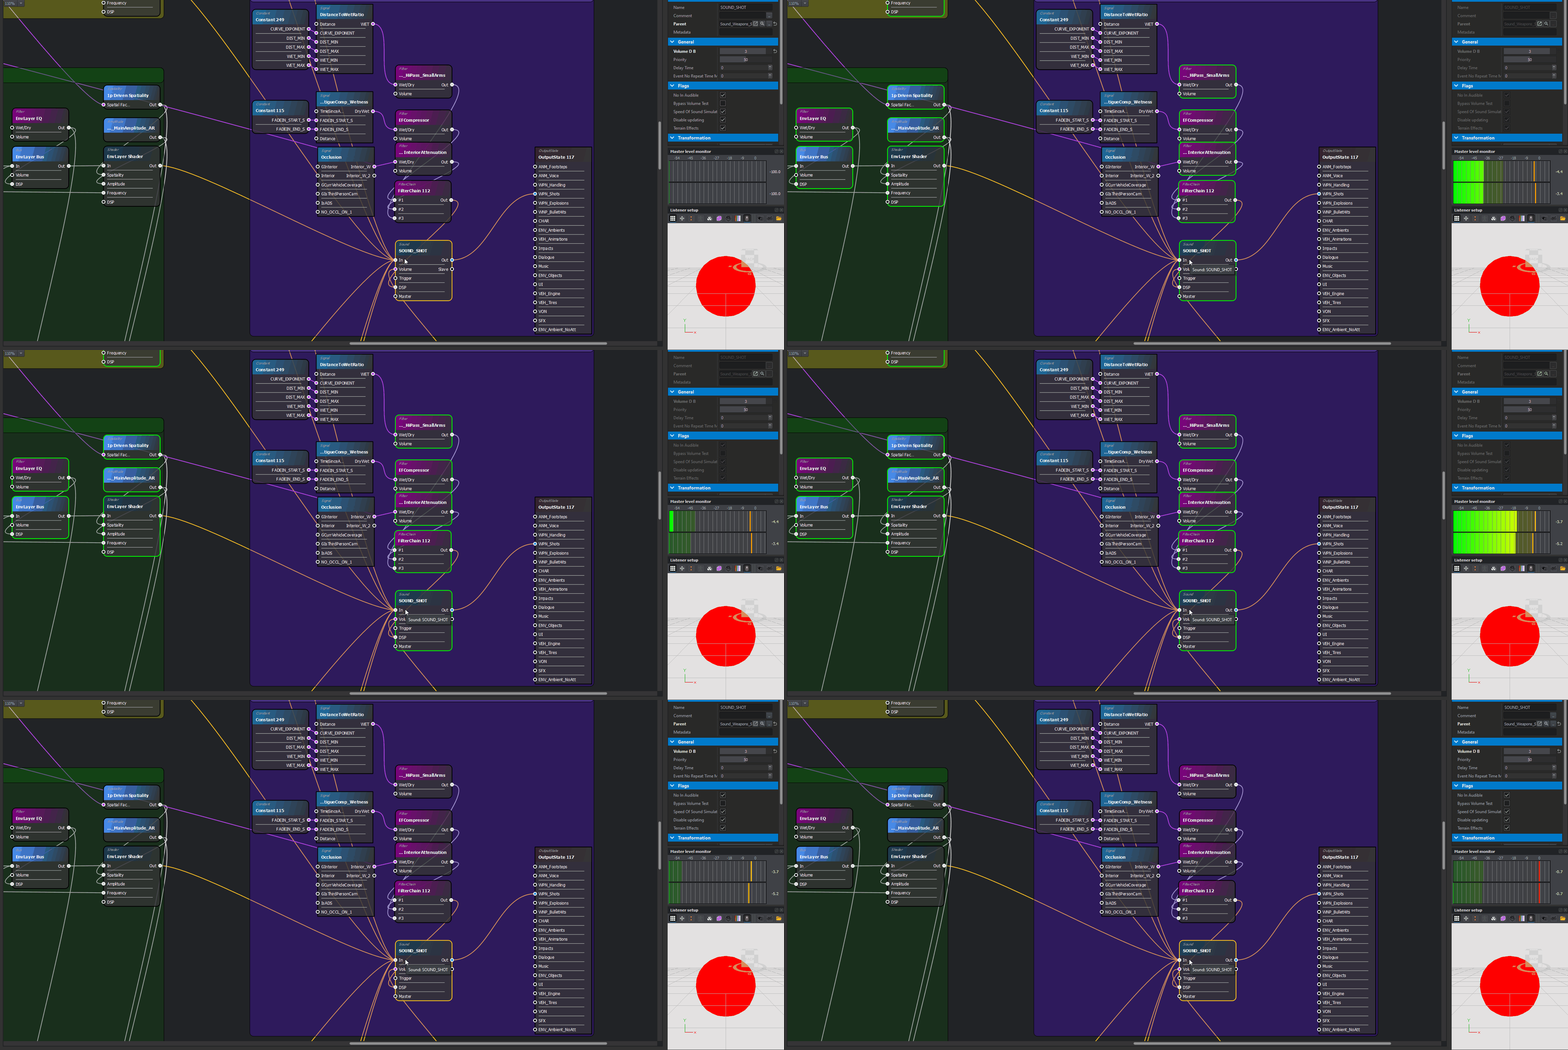
Once that action is complete, it is possible to preview the firing sound by selecting SOUND_SHOT in Routing and Mixing group and then pressing once . This should result in the playback of the whole mix with signals being set to some default values.
The same method can be applied to Tail Meadows Far, Tail Hills Far, Tail Forest Far & Tail Houses Far banks. Those banks are used for various sound tails - kind of echo which gun shot generates. Since this example has only one type of tail samples - Prototype_Cannon_01_Tail_Open - all of the
Apply New Sounds to Weapon
Once all adjustments in ACP are done, it is now possible to link those new firing sounds to the Rifle_AK74_Modded prefab.
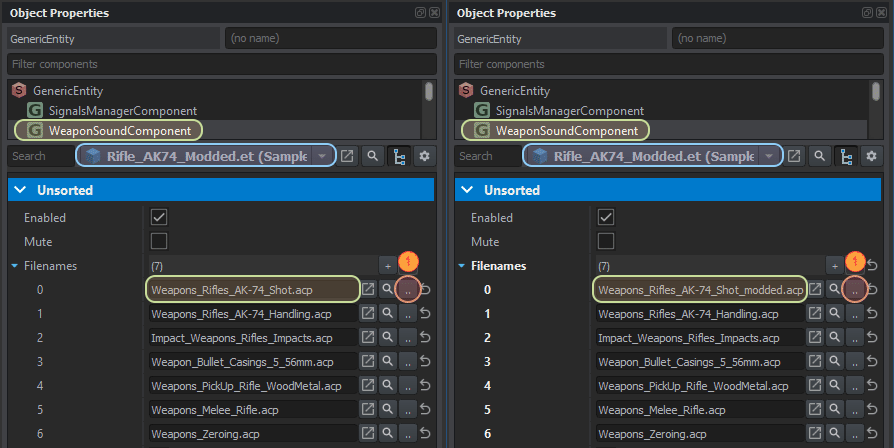
Weapon sounds are defined in WeaponSoundComponent and over there multiple ACP files are listed in Filenames array.
Here the goal would be replacing first entry in the array with index 0 - Weapons_Rifles_AK-74_Shot.acp. This will ensure that the modded variant of the firing sounds will be used instead of the original files. To do so, Weapons_Rifles_AK-74_Shot.acp has to be changed and this can be achieved in two ways:
- By clicking on two dots (1) a next to Weapons_Rifles_AK-74_Shot.acp (first entry in Filenames array) and selecting Weapons_Rifles_AK-74_Shot_modded.acp in pop up window that appeared.
- Drag and dropping Weapons_Rifles_AK-74_Shot_modded.acp prefab onto first element in the Filenames array (see Applying Ammo Config to weapon segment about drag and drop method)
As soon as this action is completed, don't forget to save the result. If change was applied to entity instance, don't forget to use Apply to prefab button and save current world afterwards!
Particle Effects Change
In this last chapter the weapon's particle effects will be affected through the following operations:
- Create new particle effects for muzzle flash & explosion using one of the existing effects as a base
- Link those particle effects to the modified weapon
Particles Editor Basics
Particles Editor opens on the new window with five main sections visible:
- Particle effect tab - allows to manage particle effects playback as well as add new emitters
- Emitter Properties tab - contains all possible parameters that can be used with selected emitter
- Particle-Lifetime Graphs tab - visualisation of emitter changes over time
- Log Console tab - listing all errors that Workbench detects
- Preview window - the final particle effect can be seen there
AK74_Muzzle.ptc will be the base for the new muzzle flash base - to do so, open particle selection menu (by either clicking on File > Open or clicking on the yellow folder icon in the top-left corner).
Particle Effect Playback
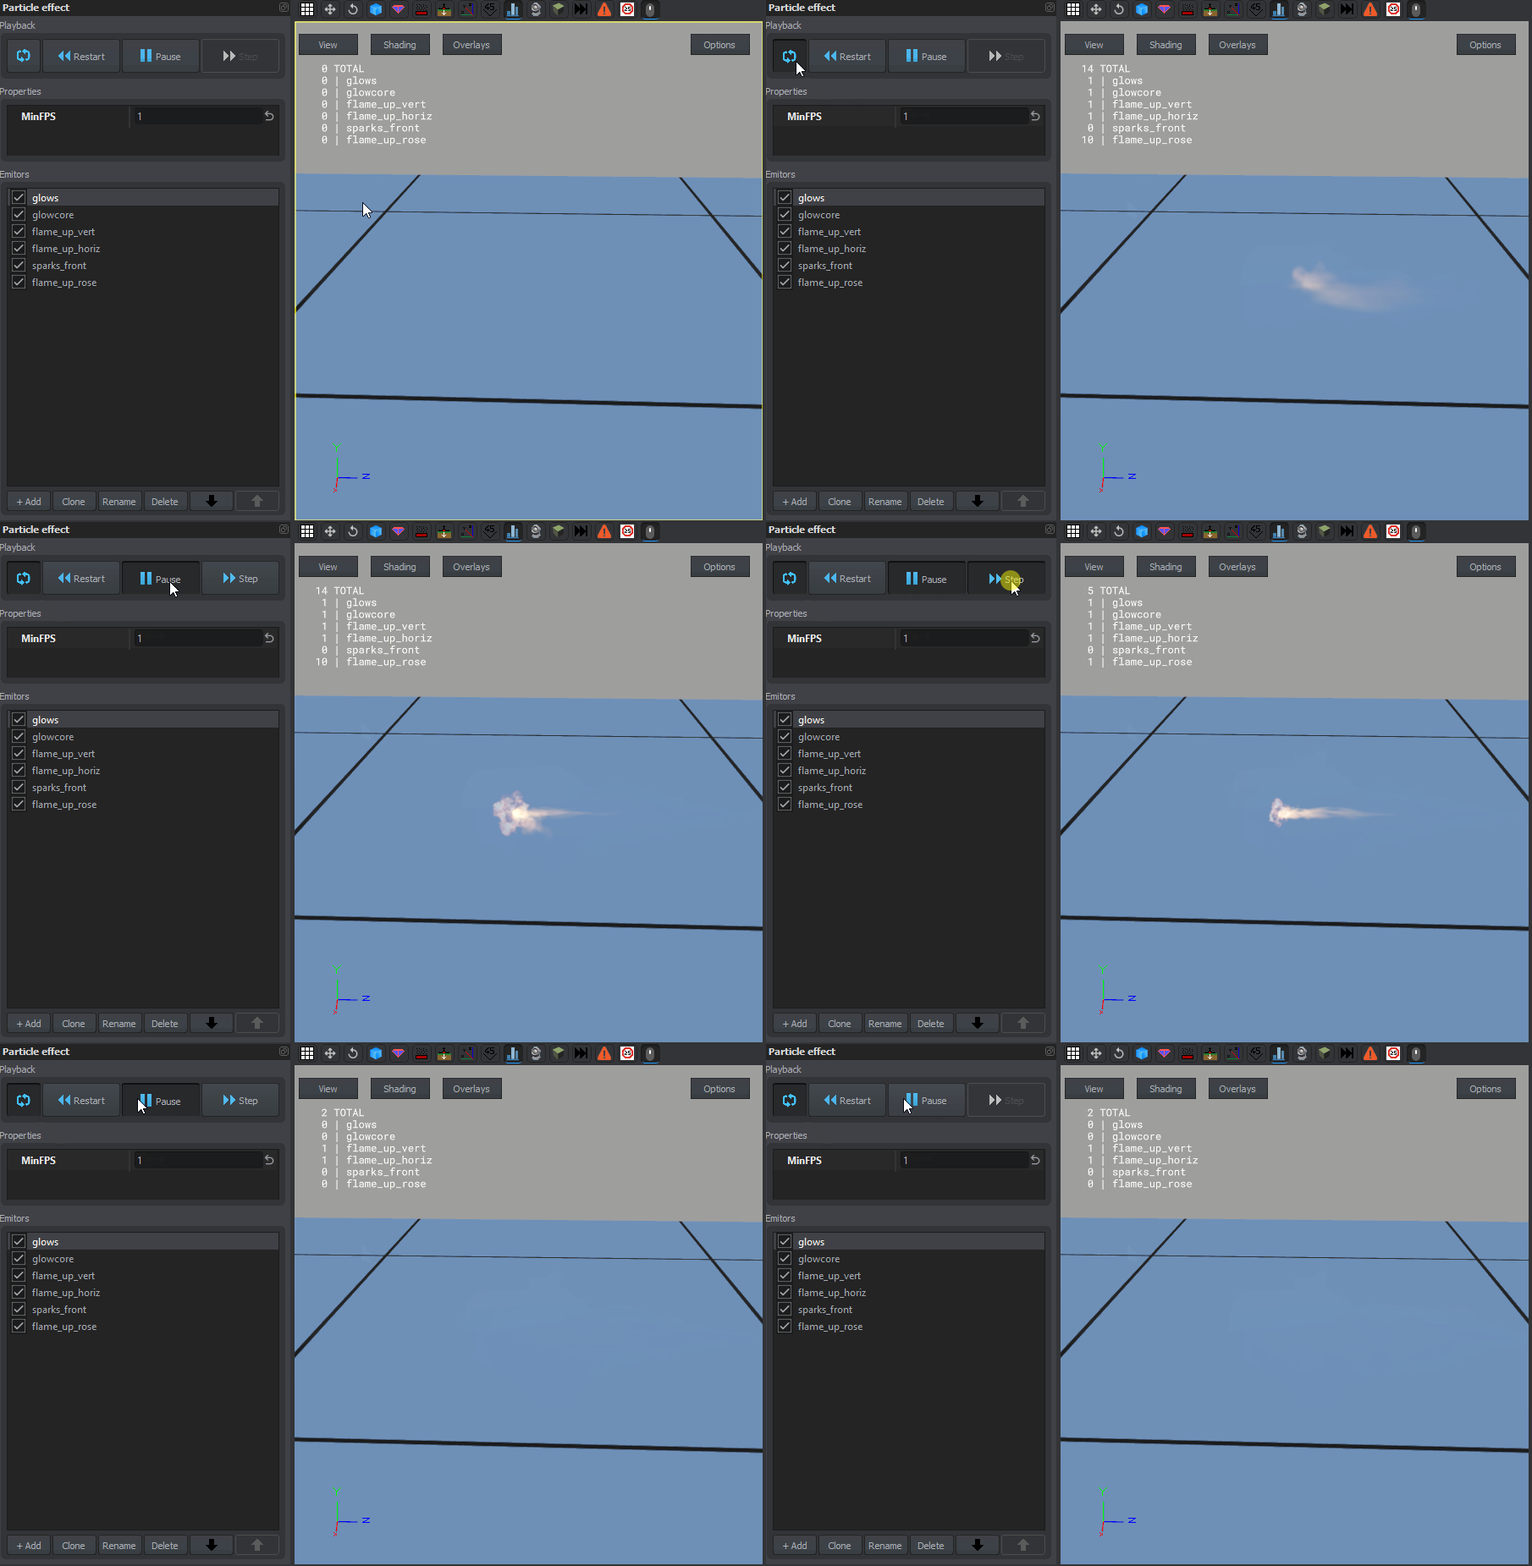
Once the particle effect is loaded, the list of emitters gets populated with a couple of entries but preview window remains most likely empty. To start playing the particle animation, click on the loop icon in the Playback options. This will activate looped playback which should allow to view the effect properly. Alternatively, the animation can be paused and browsed through in steps.
Muzzle flash
For the purpose of this tutorial, the muzzle effect's size will be multiplied by 10 and its colour will change to green and blue.
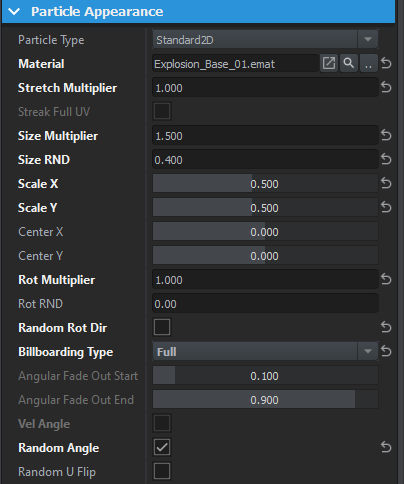
To do so, the Size Multiplier property in Particle appearance tab and Color in Particle lifetime tab will both be used.
Emitter properties
Particle lifetime
Size Multiplier, as the name suggest, is a size coefficient to the whole emitter. By changing that, the size of the muzzle flash can easily be increased.
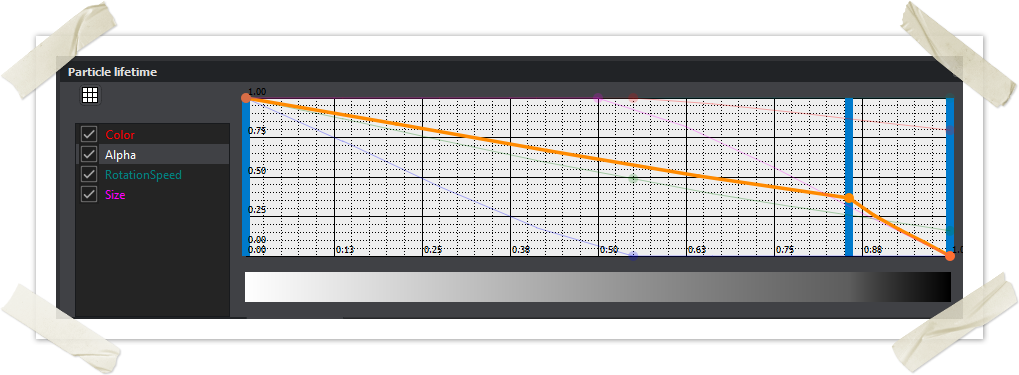
Particle life time editor on the other hand is a bit more complicated yet more interesting tool since it allows changing the particles' colour over its lifetime. By dragging dots on chart, it is possible to change values of each channel (Red/Green/Blue) over time. The right side represents the particle's life end (Life Time + Life Time RND). For instance, on the above short video's end state, the particle will gradually change its colour from green to blue. It is possible to add additional points to that curve to have the best, most accurate settings.
Note that the following procedure has to be performed on all the emitters!
Once all the values have been properly adjusted, it is time to save the new particle effect. To do so, navigate to "File" (top-left corner) and click on "Save effect as" button - save it as "Muzzle_AK74_Modded" in Sample Mod structure and this is it!
Explosion effect
Similar to the muzzle effect, Explosion_VOG25.ptc will be the base for the new explosion effect. Try changing the colour of this particle effect the same way as before then try to experiment with sparks "Alpha" setting in Particle lifetime editor just to see how powerful that tool is. To highlight that change, increase sparks' Life Time to 3 seconds - this way Alpha changes should be easier to spot.
Link Particle Effect to Weapon
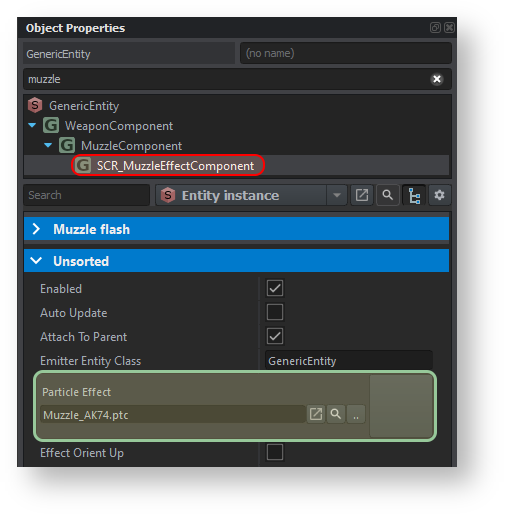
Muzzle particle effects are stored in SCR_MuzzleEffectComponent in the modded weapon. That component can be filtered by typing MuzzleEffect in the components filter input field (red box). Once that component has been selected, set the Particle Effect property to the new particle effect Muzzle_AK74_Modded.ptc.
Link Particle Effect to Explosion Effect
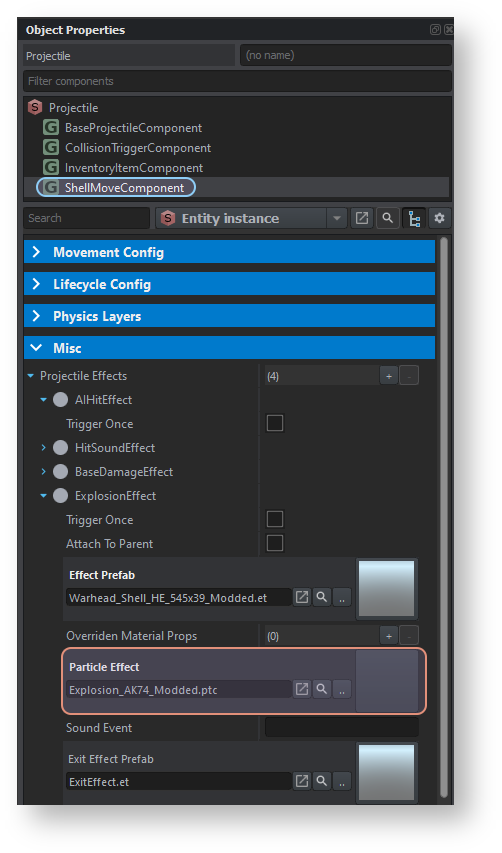
Explosion effects are stored in the ammunition Prefab that got created before (click here to get back to that paragraph). In Projectile Effects array try to locate Explosion Effect entry and then, fill the Particle Effect property with the new one (see the green box on the picture below).
Do not forget to apply that change to the Prefab once all the changes have been done!
Test Results In-Game
In this closing chapter the following steps will be mentioned:
- Placing the new creation in World Editor...
- ...and testing it in game!
The Prefab is now fully working and modded, it can now be used in some real scenario. First of all, in World Editor navigate to File → Load World (or alternatively use icon or the + shortcut) option and select Assets_Showcase_Base.ent file from main Sample Mod.
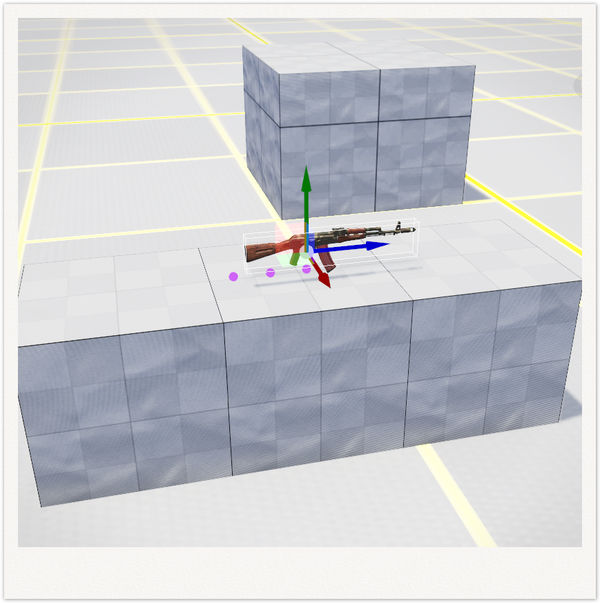
This world is very simple with an already prepared respawn system, the only thing to do is to place an instance of Rifle_AK74_Modded.et prefab from the Resource Browser somewhere on the terrain.
To do so, just search for Rifle_AK74_Modded.et in Resource Browser then drag and drop this asset into World Editor's main window.
Once this operation is done, press the Play Button which is going to switch World Editor preview window into Game Mode. In this mode, the player spawns as an unarmed Soviet soldier and should be able to pick up the placed rifle. Now remains to try and behold this modded weapon in game!

