|
|
| Line 1: |
Line 1: |
| [[File:A3_KeyFrameAnimation_Overview.gif|right|800px]] __ToC__
| | ==Overview== |
| == Overview == | | CfgAISkill is a set of arrays, related to [[AI Sub-skills]], defining the interpolation curve of each of the sub-skill. |
| It's all about '''Key Frame Animation''' with real time preview with '''3DEN''' integration.
| | ==Example== |
| A '''Key Frame''' is a location on a timeline which marks the beginning or end of a transition. It holds special information that defines where a transition should start or stop. The intermediate frames are interpolated over time between those definitions to create the illusion of motion. This interpolation is performed mathematically by the '''CPU'''.
| | In {w, x, y, z} value from (w,y) gets interpolated into (x,z) |
|
| |
|
| '''Keyframing''' is the simplest form of animating an object (be it 2D or 3D). Based on the notion that an object has a beginning state or condition and will be changing over time, in position, form, color, luminosity, or any other property, to some different final form. '''Keyframing''' takes the stance that we only need to show the "key" frames, or conditions, that desribe the transformation of this object, and that all other intermediate positions can be figured out from these. | | '''Example:''' |
| | [[File:CfgAISkill.jpg|thumb|Interpolation with vanilla A3 CfgAISkill]] |
| | ''spotDistance[] = {0,0.2, 1,0.4};'' value in a range 0-1 will change into value in a range 0.2-0.4. |
| | ''setSkill ["spotDistance", 0.5]'' results in ''skill "spotDistance"'' returning ''0.3'' |
| | ==Notes== |
| | More than 2 pairs of defining values can be used (minimum is 2 pairs). |
|
| |
|
| | The values are used to interpolate on run-time, so even after setting sub-skill by script command it will be interpolated and bound by this array. |
|
| |
|
| This system is all about interpolation and can be used for the following:
| | '''See also:''' [[:Category:AI|AI]], [[AI Sub-skills]], [[skill]], [[setSkill]], [[setUnitAbility]] |
|
| |
|
| * '''Camera Scene / Cut-Scene''': Camera path and timing
| | ==Arma 3== |
| * '''2D animations''': Ability to animate UI controls on screen
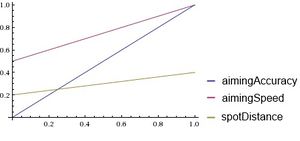
| | aimingAccuracy[] = {0, 0, 1, 1}; |
| * '''3D animations''': Ability to animate objects in the 3D world
| | aimingShake[] = {0, 0, 1, 1}; |
| * '''Numeric animation''': Ability to animate any number transition
| | aimingSpeed[] = {0, 0.5, 1, 1}; |
| | commanding[] = {0, 0, 1, 1}; |
| | courage[] = {0, 0, 1, 1}; |
| | endurance[] = {0, 0, 1, 1}; |
| | general[] = {0, 0, 1, 1}; |
| | reloadSpeed[] = {0, 0, 1, 1}; |
| | spotDistance[] = {0, 0, 1, 1}; |
| | spotTime[] = {0, 0, 1, 1}; |
|
| |
|
| ''The low level system also includes a library of '''Non-Linear Interpolation''' methods that can be used independently from the rest.''
| | [[Category:Arma 3: Editing]] |
| | [[Category:AI]] |
|
| |
|
| == Interpolation Algorithm ==
| |
|
| |
|
| * '''Linear''' - Linear interpolation is a method of curve fitting using linear polynomials to construct new data points within the range of a discrete set of known data points
| | [[Category:Arma 3: Editing]] |
| * '''Bezier Cubic''' - Non linear interpolation that uses 4 control points, Cubic Bezier interpolation
| | [[Category:AI]] |
| * '''Ease In''' - Non linear interpolation that starts slow and ends at desired speed
| | ==Overview== |
| * '''Ease Out''' - Non linear interpolation that starts at desired speed and slows down the closer it is from the end
| | Sub-skills are a set of parameters ultimately defining the individual AI unit performance in the game. |
| * '''Ease In Out''' - Non linear interpolation that starts slow and speeds up to desired speed reaching the half way through, slowing down the closer it is from the end
| |
| * '''Hermite''' - Non linear interpolation and only different a variation of Ease In Out
| |
| * '''Bounce In''' - Non linear interpolation that bounces at start
| |
| * '''Bounce Out''' - Non linear interpolation that bounces at the end
| |
| * '''Bounce In Out''' - Non linear interpolation that bounces at start and end
| |
| * '''Quintic In''' - Quintic version of ease in
| |
| * '''Quintic Out''' - Quintic version of ease out
| |
| * '''Quintic In Out''' - Quintic version of ease in out
| |
| * '''Berp''' - Boing interpolation that overshoots target and comes to a rest after
| |
| * '''Interpolate''' - Non linear interpolation from current value to target value based on speed, scaled by distance
| |
| * '''Interpolate Constant''' - Linear interpolation from current value to target value based on speed
| |
| | |
| ''There's both Float and Vector versions for each of the above methods''
| |
| | |
| == Math ==
| |
| | |
| * '''Bezier Length''' - Computes the length of a bezier spline
| |
| * '''Clamp''' - Clamps a float between min and max (inclusive)
| |
| * '''Clamp Vector''' - Clamps all axis of a vector between min and max (inclusive)
| |
| * '''Delta Time''' - Helper function to get and manage DeltaTime
| |
| * '''Find Look At''' - Calculates Forward and Up vectors to orientate an objects looking at position from another position
| |
| * '''Nearest Point''' - Computes the nearest point in a line
| |
| * '''Pow''' - Helper function for Expoent Power
| |
| * '''Pulsate''' - Pulsates a value between 0 and 1 with desired frequency and offsets
| |
| * '''Vector Divide''' - Divides a vector by a float
| |
| | |
| == [[Eden Editor]] Tutorial ==
| |
| For the 3DEN Keyframe Animation tutorial we will animate a UAV on a spline.
| |
| | |
| ===1. 3DEN Object Setup===
| |
| | |
| * Open 3DEN and place a player unit
| |
| * On the asset list, select Modules (F5) and select category Modules
| |
| * Search for '''Keyframe Animation''' category, here you'll find all related modules used to make up animations in 3DEN
| |
| | |
| [[File:A3_KeyFrameAnimation_tutorial3den_setupObjects.jpg|240px]]
| |
| | |
| ===2. Placing the Timeline===
| |
| | |
| * When in '''Modules > Keyframe Animation''' place a '''Timeline''' module
| |
| * Enable '''Play From Start''' - Will make the timeline start to be simulated when the scenario starts
| |
| * Set the '''Length''' to 15 seconds - This is the length of the timeline
| |
| * Enable '''Loop''' - Timeline will restart once it's simulation reaches the end
| |
| * In '''Event Looped''' put the following: <br/> <syntaxhighlight lang="cpp">hint "Timeline finished and is now looping";</syntaxhighlight>
| |
| | |
| [[File:A3_KeyFrameAnimation_tutorial3den_timeline1.jpg|240px]][[File:A3_KeyFrameAnimation_tutorial3den_timeline2.jpg|240px]] | |
| | |
| ===3. Placing the Curve===
| |
| | |
| * Place a '''Rich Curve''' module
| |
| * Right click on the newly created '''Rich Curve''' and synchronize it with the '''Timeline'''
| |
| * Set the '''Orientation Mode''' to Animation - This will make the orientation of the animated objects orientation follow the animation
| |
| | |
| [[File:A3_KeyFrameAnimation_tutorial3den_curveSync.jpg|240px]][[File:A3_KeyFrameAnimation_tutorial3den_curve1.jpg|240px]][[File:A3_KeyFrameAnimation_tutorial3den_curve2.jpg|240px]]
| |
| | |
| ===4. Placing the start and end keys===
| |
| | |
| * Place two '''Rich Curve Key'''s
| |
| * Select and then right click on the newly created '''Rich Curve Key'''s and synchronize them with the '''Rich Curve'''
| |
| [[File:A3_KeyFrameAnimation_tutorial3den_KeysSync.jpg|240px]] | |
| | |
| ===5. First Key Setup===
| |
| | |
| * Open the attributes of one of the placed keys, we will consider this one the first and so it is the start of our animation
| |
| * You can leave all the settings as default for now
| |
| | |
| [[File:A3_KeyFrameAnimation_tutorial3den_FirstKey.jpg|240px]]
| |
| | |
| ===6. Last Key Setup===
| |
| | |
| * Open the attributes of the other key, this will be the final point in our animation
| |
| * Set the '''Time''' property to '''10''', this means our animation will be in total 10 seconds long, since our first key starts at 0 and our last key is at 10
| |
| | |
| [[File:A3_KeyFrameAnimation_tutorial3den_LastKey.jpg|240px]]
| |
| | |
| ===7. First Animation===
| |
| | |
| * Congratulations, while not much so far, you have now created your first Animation in 3DEN
| |
| * Move the '''Key''' objects around and notice how the path of the animation is being drawn in red and how you are affecting the animation in real-time
| |
| * The red line defines the animation path or spline
| |
| * The red dot's define the animation density
| |
| ''Note: In order for things to be drawn at least one object part of the animation needs to be selected in 3DEN''
| |
| | |
| [[File:A3_KeyFrameAnimation_tutorial3den_anim1.gif]]
| |
| | |
| | |
| ===8. Adding an Animated Object===
| |
| | |
| * The next step is to add our '''Animated Object''', basically, an object that will follow your animation with real-time 3DEN preview
| |
| * In the '''Asset Browser''' select ''Units (F1) > NATO > Drones > MQ-4A Greyhawk'' and place it into the level
| |
| * Right click on the newly created UAV and synchronize it with the '''Curve''' object
| |
| * If you select an object which is part of the animation, you should start seeing the UAV being animated along your first animation
| |
| * Feel free to move the keys around and get a sense of the real-time editing features
| |
| | |
| [[File:A3_KeyFrameAnimation_tutorial3den_anim2.gif]][[File:A3_KeyFrameAnimation_tutorial3den_anim3.gif]][[File:A3_KeyFrameAnimation_tutorial3den_anim4.gif]]
| |
| | |
| ===9. Turning your animation into a spline (Bezier Cubic)===
| |
| | |
| * Select both keys in 3DEN and right click one of them, select '''Attributes'''
| |
| * Set the '''Interpolation Mode''' to ''Cubic''
| |
| * So now, your animation will have non linear (Bezier Cubic in this case) interpolation and we can now start adding control points to control the Bezier Cubic tangents
| |
| | |
| [[File:A3_KeyFrameAnimation_tutorial3den_anim5.gif]]
| |
| | |
| ===10. Adding Control Points to manipulate Tangents===
| |
| | |
| * There are two kinds of Control Points, Arrive and Leave (see [[HelloWorld]] for more info)
| |
| * Go back to ''Modules > Keyframe Animation'' and place two '''Rich Curve Key Control Points''', these will be used to control the spline tangents
| |
| * One of the '''Control Points''' synchronize with the first '''Key''', open its '''Attributes''' and set the '''Tangent Type''' to '''Leave'''
| |
| * The other '''Control Point''' you synchronize with the second '''Key''', open its '''Attributes''' and set the '''Tangent Type''' to '''Arrive''' (which should be set by default)
| |
| * At this point you should notice your spline tangents being afected, try to move the control points around and modify the spline
| |
| | |
| [[File:A3_KeyFrameAnimation_tutorial3den_anim6.gif]][[File:A3_KeyFrameAnimation_tutorial3den_anim7.gif]][[File:A3_KeyFrameAnimation_tutorial3den_anim8.gif]]
| |
|
| |
|
| ===11. Understanding 3DEN controls=== | | ==Sub-Skills== |
| | ===aimingAccuracy=== |
| | * Affects how well the AI can lead a target |
| | * Affects how accurately the AI estimate range and calculates bullet drop |
| | * Affects how well the AI compensates for weapon dispersion |
| | * Affects how much the AI will know to compensate for recoil (Higher value = more controlled fire) |
| | * Affects how certain the AI must be about its aim on target before opening fire |
|
| |
|
| When working on your Animation in 3DEN there are a few specific controls:
| | ===aimingShake=== |
| * '''LCtrl''' - Displays the index of all the keys of the highlighted animation starting at 0 for the first key, note that non selected keys (and it's control points) will be rendered in white while selected ones will render in green | | * Affects how steadily the AI can hold a weapon (Higher value = less weapon sway) |
| * '''LShift''' - If the mouse position is near the animation spline, a line will be drawn between mouse and spline that defines a point where a new key can easily be placed if LShift + Space key combination is used
| |
| * '''LShift + Space''' - If the above is valid, a new Key will be created at the exact place where the mouse is pointing to, the key will be registered with the given curve, will have control points and be set as Cubic
| |
|
| |
|
| ''Note: For Keyframe Animation controls to work you must have one or more animation highlighted in 3DEN, you can do that by selecting an object part of the animation (Timeline, Curve, Key or Control Point)''
| | ===aimingSpeed=== |
| | * Affects how quickly the AI can rotate and stabilize its aim (Higher value = faster, less error) |
|
| |
|
| [[File:A3_KeyFrameAnimation_tutorial3den_anim9.gif]][[File:A3_KeyFrameAnimation_tutorial3den_anim10.gif]]
| | ===commanding=== |
| | * Affects how quickly recognized targets are shared with the group (Higher value = faster reporting) |
|
| |
|
| ===12. Adding a Key onto the Animation=== | | ===courage=== |
| | * Affects unit's subordinates' morale (Higher value = more courage) |
|
| |
|
| '''Keys''' can be directly placed onto the animation by using the keyboard combination '''LShift (Highlight) + Space (Spawn Key)''', this is a fast and straight forward way to add keys to your animation, since even properties like '''Time''' will be computed automatically for you, same with the registration done with the '''Curve'''. The created '''Keys''' using this method are set to '''Cubic''' and '''Control Points''' are created with them and registered. In future this could be a 3DEN setting.
| | ===endurance=== |
| * ''Press and hold'' '''LShift''' and move your mouse pointer near the highlighted spline / curve
| | ''Disabled in Arma3'' |
| * Once there is a connection between mouse and your curve, while still holding '''LShift''' also press '''Space''' once, this will create the key
| |
|
| |
|
| ''Note: For Keyframe Animation controls to work you must have one or more animation highlighted in 3DEN, you can do that by selecting an object part of the animation (Timeline, Curve, Key or Control Point)''
| | ===general=== |
| | * Raw "Skill", value is distributed to sub-skills unless defined otherwise. Affects the AI's decision making. |
|
| |
|
| [[File:A3_KeyFrameAnimation_tutorial3den_anim11.gif]]
| | ===reloadSpeed=== |
| | * Affects the delay between switching or reloading a weapon (Higher value = less delay) |
|
| |
|
| ===13. Lockable Control Points (Bezier Cubic)=== | | ===spotDistance=== |
| | * Affects the AI ability to spot targets within it's visual or audible range (Higher value = more likely to spot) |
| | * Affects the accuracy of the information (Higher value = more accurate information) |
|
| |
|
| When control points are locked you are able to have matematically accurate and smooth transition between key frames. You can set the lock mode in each key.
| | ===spotTime=== |
| | * Affects how quick the AI react to death, damage or observing an enemy (Higher value = quicker reaction) |
|
| |
|
| * To set the '''Control Points Lock State''' just open your '''Key''' attributes (to which control points are synchronized) and toggle the option '''Lock Control Points'''
| |
|
| |
|
| [[File:A3_KeyFrameAnimation_tutorial3den_anim12.gif]][[File:A3_KeyFrameAnimation_tutorial3den_anim13.gif]] | | ==Notes== |
| | Each sub-skill is used in several calculations. Value of each sub-skill is inherited from the value set by skill slider in [[Mission Editor: Units|Insert Unit]] dialogue or [[setSkill]] command, or more precisely with setSkill alternative syntax. This value is interpolated into ranges defined in [[CfgAISkill]] and multiplied by a value of AI Level Skill or Precision set in player's profile (.Arma3Profile file). |
|
| |
|
| ''Note: Always make sure your Control Points are configured correctly, a key can have one Arrive and one Leave control point'' | | '''See also:''' [[:Category:AI|AI]], [[skill]], [[setSkill]], [[setUnitAbility]], [[CfgAISkill]], [[ArmA:_Difficulty#Adjusting_Accuracy_Separately]], [[disableAI]] |
| | |
| ===14. Play===
| |
| Now that everything is ready, you can preview the mission and observe the UAV moving.
| |
| | |
| | |
| [[Category:Arma 3: Editing]] | |
| [[Category:Arma 3 Key Frame Animation|Tutorial 3den]] | |
Overview
CfgAISkill is a set of arrays, related to AI Sub-skills, defining the interpolation curve of each of the sub-skill.
Example
In {w, x, y, z} value from (w,y) gets interpolated into (x,z)
Example:
Interpolation with vanilla A3 CfgAISkill
spotDistance[] = {0,0.2, 1,0.4}; value in a range 0-1 will change into value in a range 0.2-0.4.
setSkill ["spotDistance", 0.5] results in skill "spotDistance" returning 0.3
Notes
More than 2 pairs of defining values can be used (minimum is 2 pairs).
The values are used to interpolate on run-time, so even after setting sub-skill by script command it will be interpolated and bound by this array.
See also: AI, AI Sub-skills, skill, setSkill, setUnitAbility
Arma 3
aimingAccuracy[] = {0, 0, 1, 1};
aimingShake[] = {0, 0, 1, 1};
aimingSpeed[] = {0, 0.5, 1, 1};
commanding[] = {0, 0, 1, 1};
courage[] = {0, 0, 1, 1};
endurance[] = {0, 0, 1, 1};
general[] = {0, 0, 1, 1};
reloadSpeed[] = {0, 0, 1, 1};
spotDistance[] = {0, 0, 1, 1};
spotTime[] = {0, 0, 1, 1};
Overview
Sub-skills are a set of parameters ultimately defining the individual AI unit performance in the game.
Sub-Skills
aimingAccuracy
- Affects how well the AI can lead a target
- Affects how accurately the AI estimate range and calculates bullet drop
- Affects how well the AI compensates for weapon dispersion
- Affects how much the AI will know to compensate for recoil (Higher value = more controlled fire)
- Affects how certain the AI must be about its aim on target before opening fire
aimingShake
- Affects how steadily the AI can hold a weapon (Higher value = less weapon sway)
aimingSpeed
- Affects how quickly the AI can rotate and stabilize its aim (Higher value = faster, less error)
commanding
- Affects how quickly recognized targets are shared with the group (Higher value = faster reporting)
courage
- Affects unit's subordinates' morale (Higher value = more courage)
endurance
Disabled in Arma3
general
- Raw "Skill", value is distributed to sub-skills unless defined otherwise. Affects the AI's decision making.
reloadSpeed
- Affects the delay between switching or reloading a weapon (Higher value = less delay)
spotDistance
- Affects the AI ability to spot targets within it's visual or audible range (Higher value = more likely to spot)
- Affects the accuracy of the information (Higher value = more accurate information)
spotTime
- Affects how quick the AI react to death, damage or observing an enemy (Higher value = quicker reaction)
Notes
Each sub-skill is used in several calculations. Value of each sub-skill is inherited from the value set by skill slider in Insert Unit dialogue or setSkill command, or more precisely with setSkill alternative syntax. This value is interpolated into ranges defined in CfgAISkill and multiplied by a value of AI Level Skill or Precision set in player's profile (.Arma3Profile file).
See also: AI, skill, setSkill, setUnitAbility, CfgAISkill, ArmA:_Difficulty#Adjusting_Accuracy_Separately, disableAI
