Reyhard/Sandbox – User
No edit summary |
No edit summary |
||
| Line 350: | Line 350: | ||
= Adding scripted action = | = Adding scripted action = | ||
{{GameCategory|armaR|Modding|Tutorials|Assets}} | {{GameCategory|armaR|Modding|Tutorials|Assets}} | ||
Revision as of 09:41, 8 August 2022
Goals of this tutorial
In this tutorial you will learn about:
- How to prepare prop in FBX format for Enfusion
- How to import FBX into Workbench
- How to configure new prop in Workbench
- How to add procedural animation with sound & custom action to prop prefab
Preparation
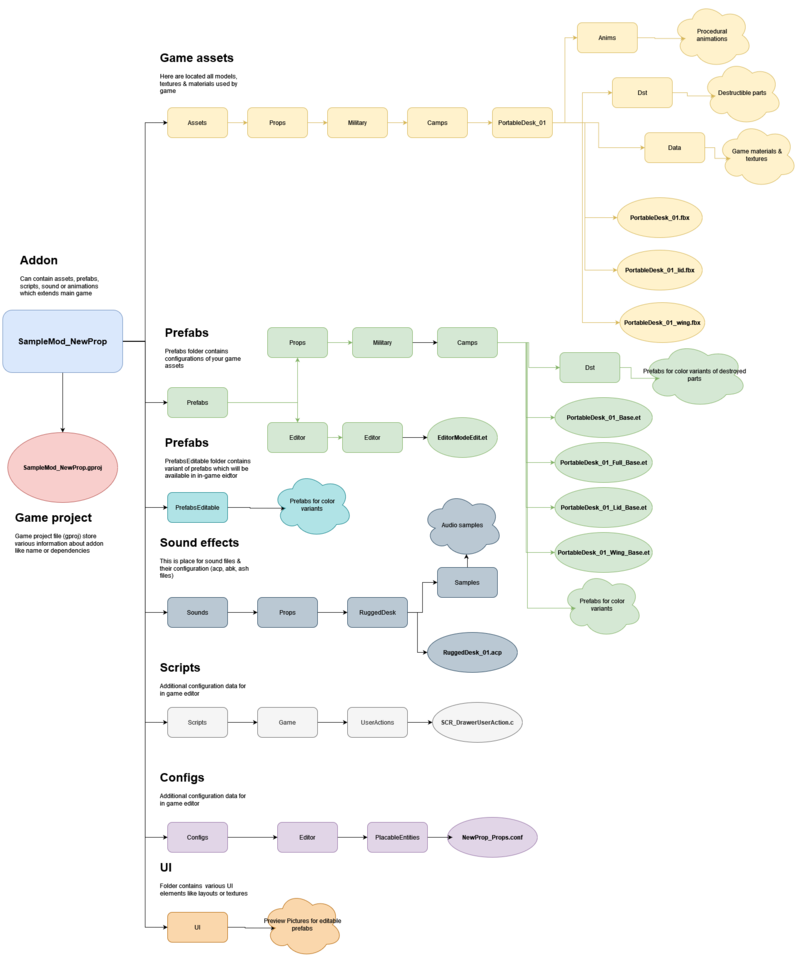
Preparing structure
While keeping to official structure is not mandatory and there are no engine restrictions asset wise about it, it's recommended to follow guidelines listed here - Data (file) structure - to ensure that all automation plugins are parsing your assets correctly and make it later easy to navigate.
Therefore, your first task will be preparing following file structure
Cutting object to parts
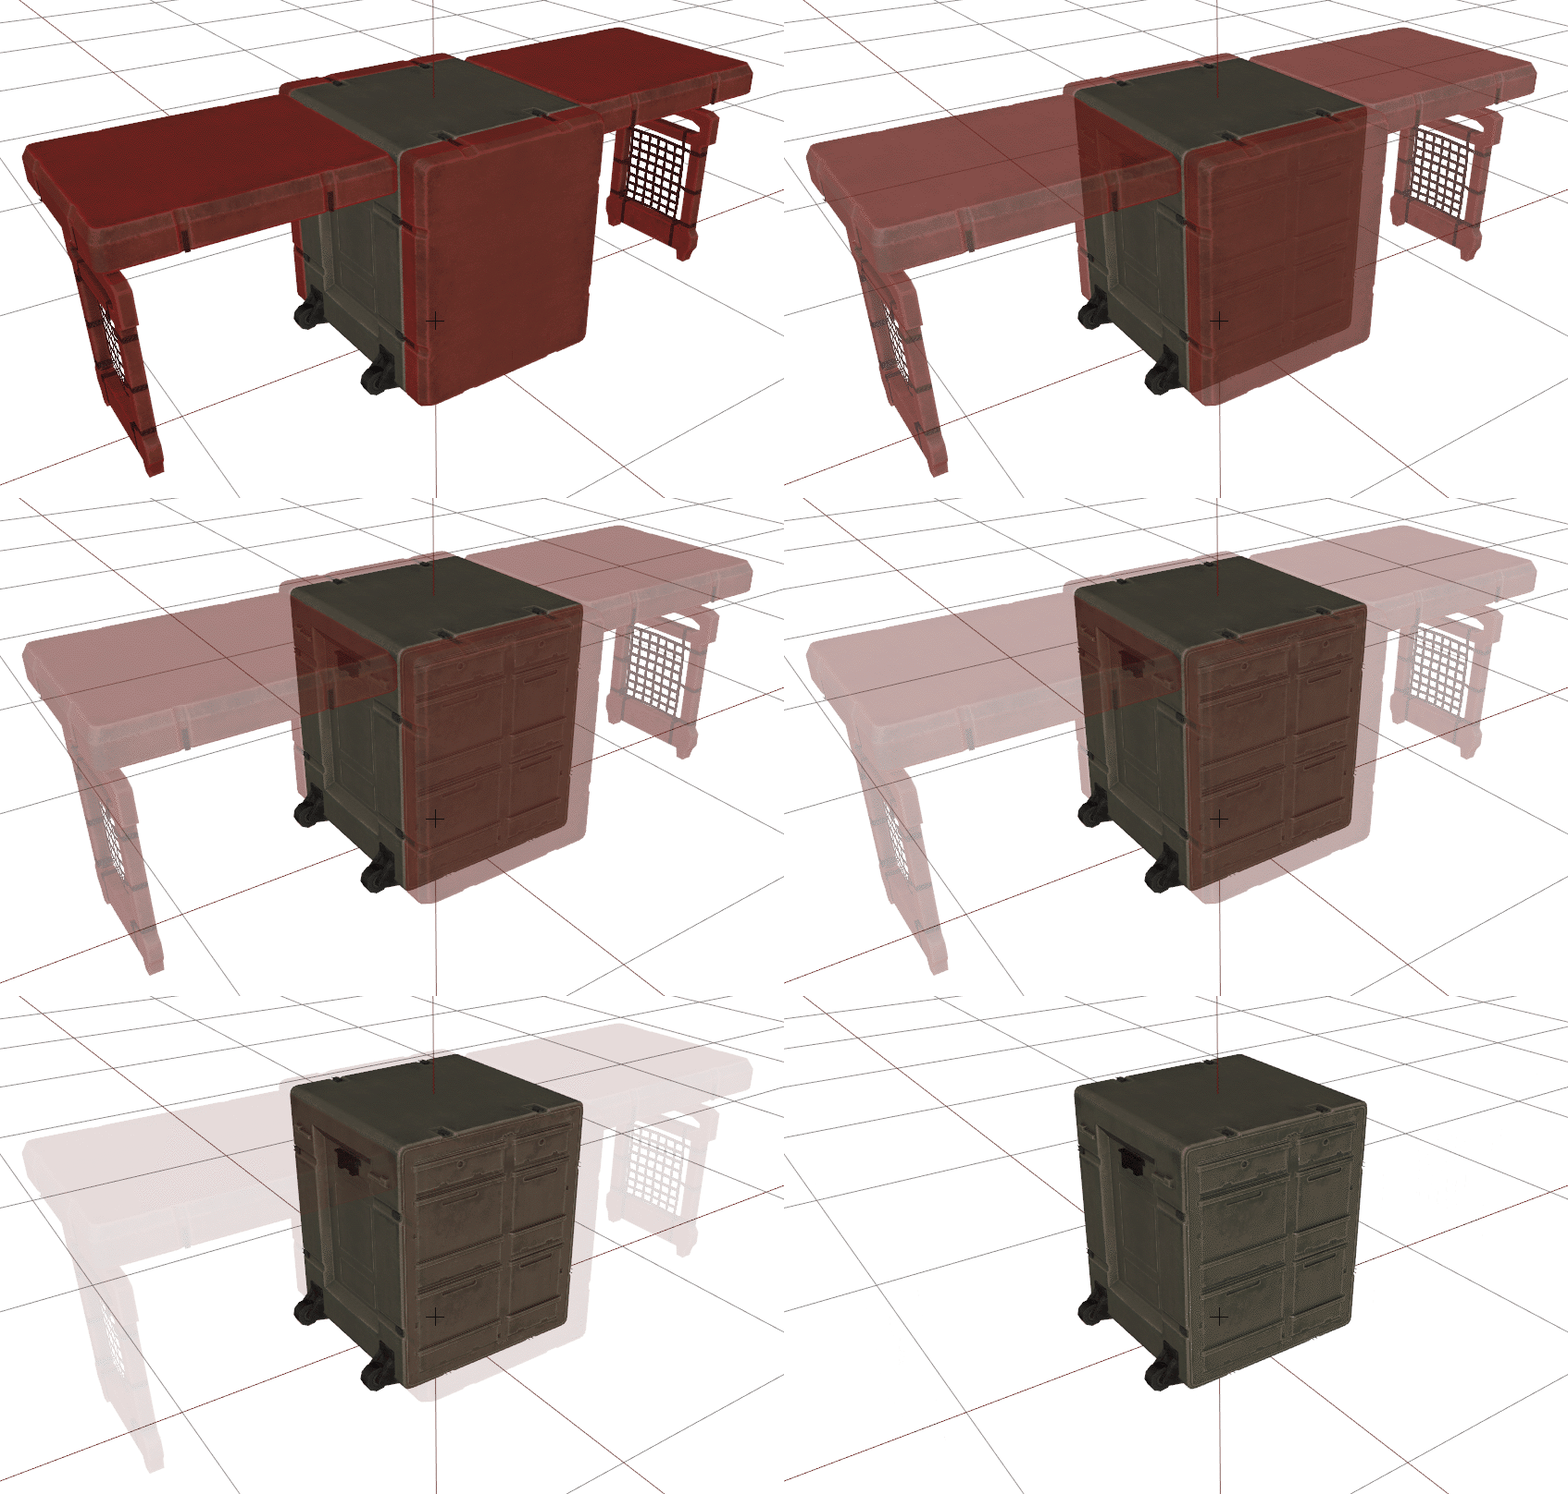
Portable desk source model contained all optional elements, like desk wing and lids, in single model. In Arma 3, subvariants of such assets would be created by hiding each element via model config animations. Something like that is no longer necessary nor recommended (hiding of mesh has some performance drawback) - instead, additional parts of the model can be either added by SlotManagerComponent or through Hierarchy.
In case of those asset, one wing (PortableDesk_01_wing.fbx) and one lid (PortableDesk_01_lid.fbx) should be moved to separate FBX files and then all of them should be removed from the main mesh (PortableDesk_01.fbx)
Adding sockets
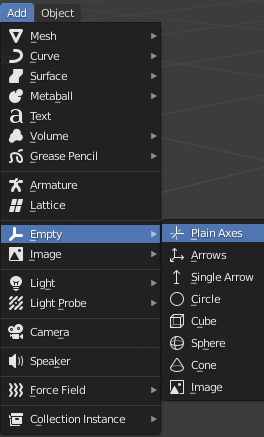
Sockets are empty objects (in Blender nomenclature) which can be used to attach elements (prefabs) or actions to it. In Blender, such sockets can be added via Add→ Empty→ Plain Axis option.
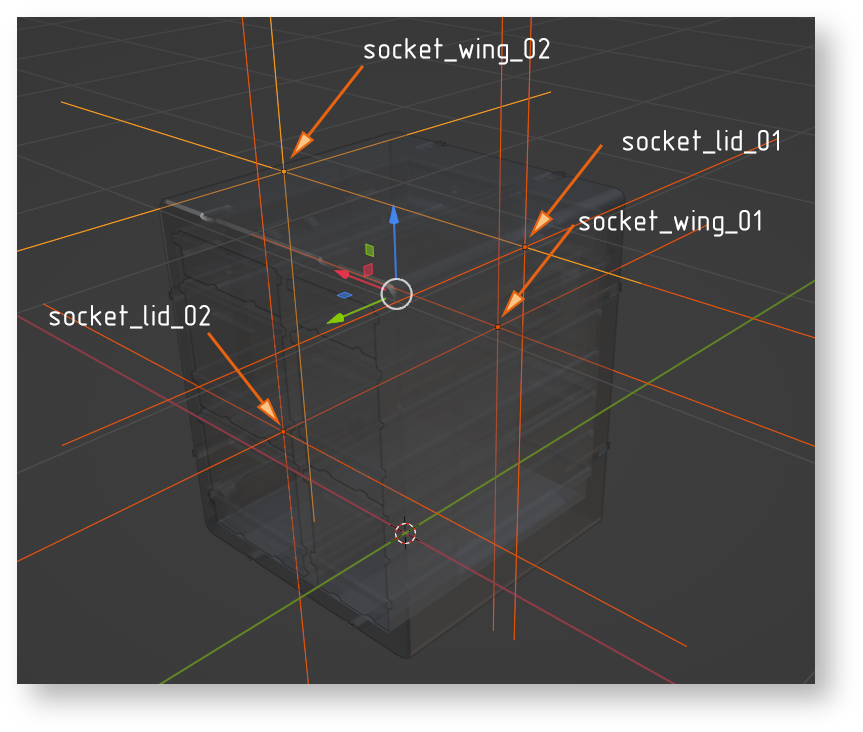
It is quite important to properly orientate those empty objects since their position & rotation will be used in various systems, like in SlotManagerComponent for attaching various parts of rugged desk (this is covered in detail in later part of this tutorial).
At this stage, main, PortableDesk_01.fbx, file should have following sockets
- socket_wing_01 & socket_wing_02 - for both wing models
- socket_lid_01 & socket_lid_02 - for both lids
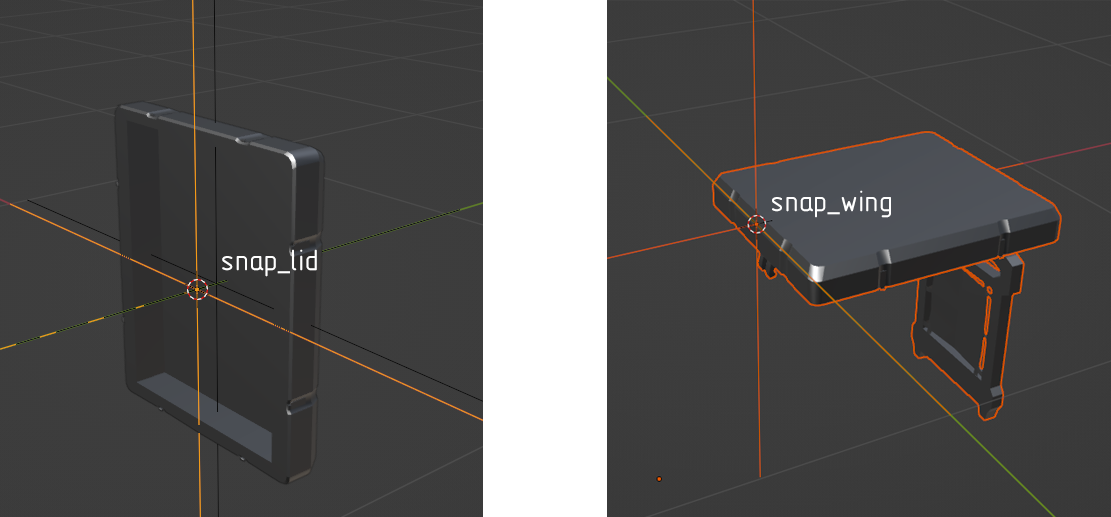
Then, PortableDesk_01_lid.fbx & PortableDesk_01_wing.fbx should have corresponding snappoints - i.e. snap_wing and snap_lid.
Those points would be used later to connect (aka snap) both models together so their position and orientation is extremely important!
Setting skeleton & rigging mesh
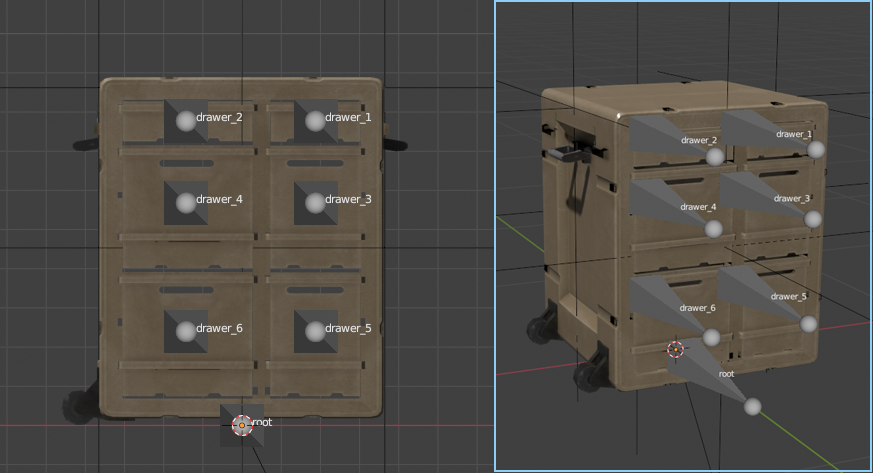
This asset has six drawers which can be animated. In order to make those drawers animated, it is necessary to add proper skeleton to the model and then skin those movable selections to newly created bones.
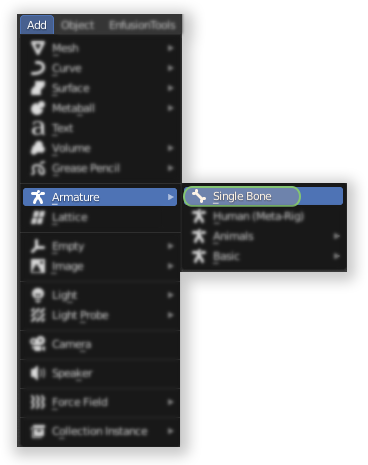
In Blender, new armature can be easily created by adding new Single Bone in Add → Armature menu when in Object Mode. This new bone can be called root and it will be serving as main bone of this skeleton.
Similar to sockets, orientation of bones is quite important for animation. Unlike in RV engine, animations are no longer using two vertices to create axis of transformation but instead rotation & position of bone is used to determine origin of animation.
Once root bone was created, it is possible to add bone for each of the drawers like on picture below.
Colliders & material names
Colliders are special type of objects which are used to calculate various kinds of collisions - be it physic simulation or tracing of bullet penetration. There are few rules regarding those colliders and most of them listed on collider related segment of FBX Import page.
When importing asset from previous Arma game - like in this example - you are most likely going to have already convex components ready from Geometry, Fire Geometry, View Geometry or Geometry Physx LODs. If you are using P3D importer which is part of Enfusion Blender Tools, then those components will be automatically converted to trimesh colliders ( UTM_ prefix). Since trimesh colliders are not recommended for general collision, it might be wise to verify if object can be converted to trimesh.
If you are using Blender, there is small handy tool to assist you with assigning correct game materials & layer presets on colliders - more details about can be found on Arma_Reforger:Enfusion_Blender_Tools:_Objects_Tools.
In this sample, rugged desk uses simple box mesh, so usage of UBX_ prefix is recommended.
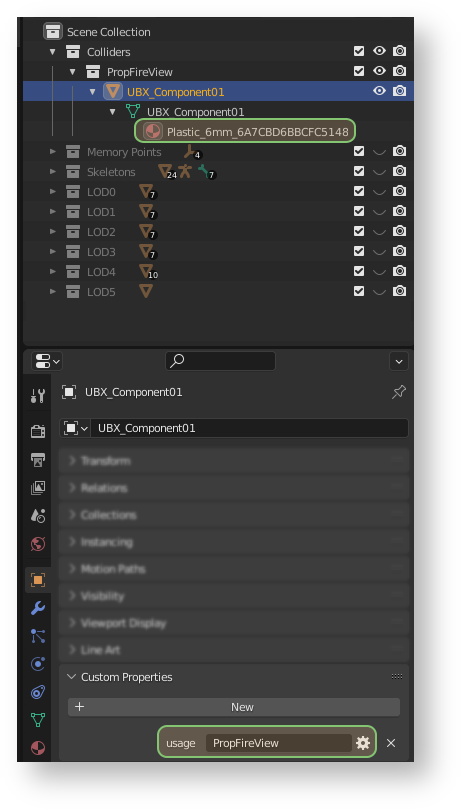
Next thing when it comes to configuration of colliders is configuration of Layer Preset. This is done through usage custom property (details about adding that property can be found on following FBX Import page). For simple prop like this one, layer preset should be set to PropFireView. If you have multiple colliders, you have to add that property to each of them!
After layer preset is set, it is time for setting Game Material. This is done by assigning to collider a material with specific name and again, details of naming are described on FBX Import page. For this example prop, Plastic_6mm game materials is used, since it is assumed that single wall is 3mm thick and due to to geometry is a simple box, those walls are counted twice.
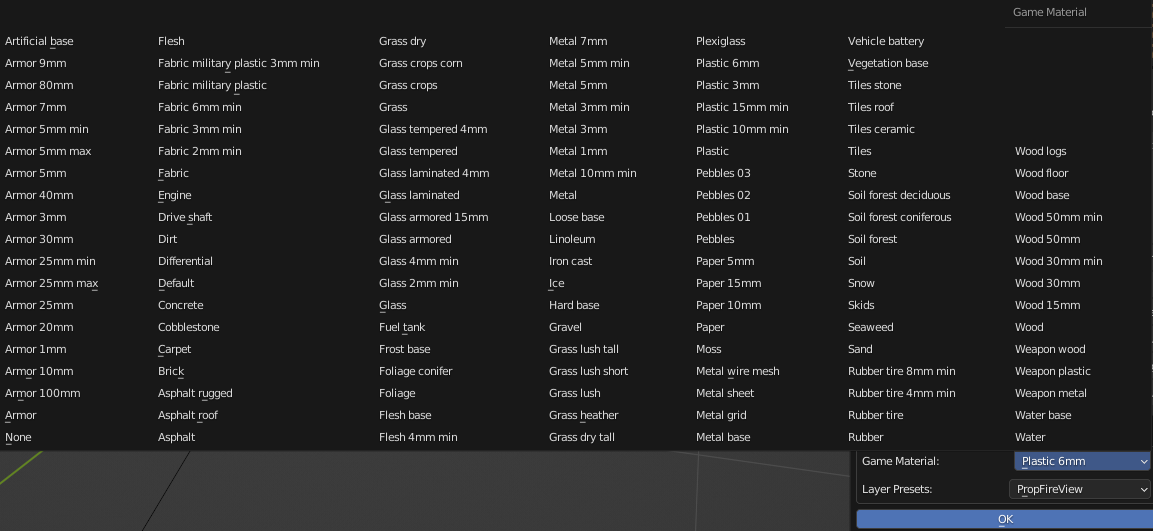
Below is screen showing Game Materials & Layer Presets selection menu from Enfusion Blender Tools. Using this simple tool it is possible to easily select desired game material and layer preset, which will be automatically. Please note that before using that feature it is necessary to sort objects and setup plugin correctly.
FBX export settings
Most of the general rules can be found on FBX Import page . In principle, when exporting from i.e. 3DS Max, you have to make sure that you are exporting in binary format in version 2014/2015. Furthermore, Triangulation & Preserve Edge Orientation should be turned off.
Blender wise, there are 3 most important things to keep in mind when exporting FBX
Preparing textures
When importing textures of weapon from previous Real Virtuality games like Arma 3 there is no real automated or simple method of conversion spec-gloss textures to PBR (Physicial Based Rendering) Metal Rough ones - current industry standard. Therefore in most cases it's much easier to do textures from scratch in i.e. Substance Painter.
There are tons of materials on the internet how to create proper PBR texture and it's highly recommend to search for it via some popular search engines. More information about maps and textures used by Reforger can be found on Arma_Reforger:Textures page
For this asset, assuming that Substance Painter is used, it is recommended to use one of the shared export profiles - Arma Reforger - BCR + NMO, which should create textures compatible with Reforger.
Importing & registering new model
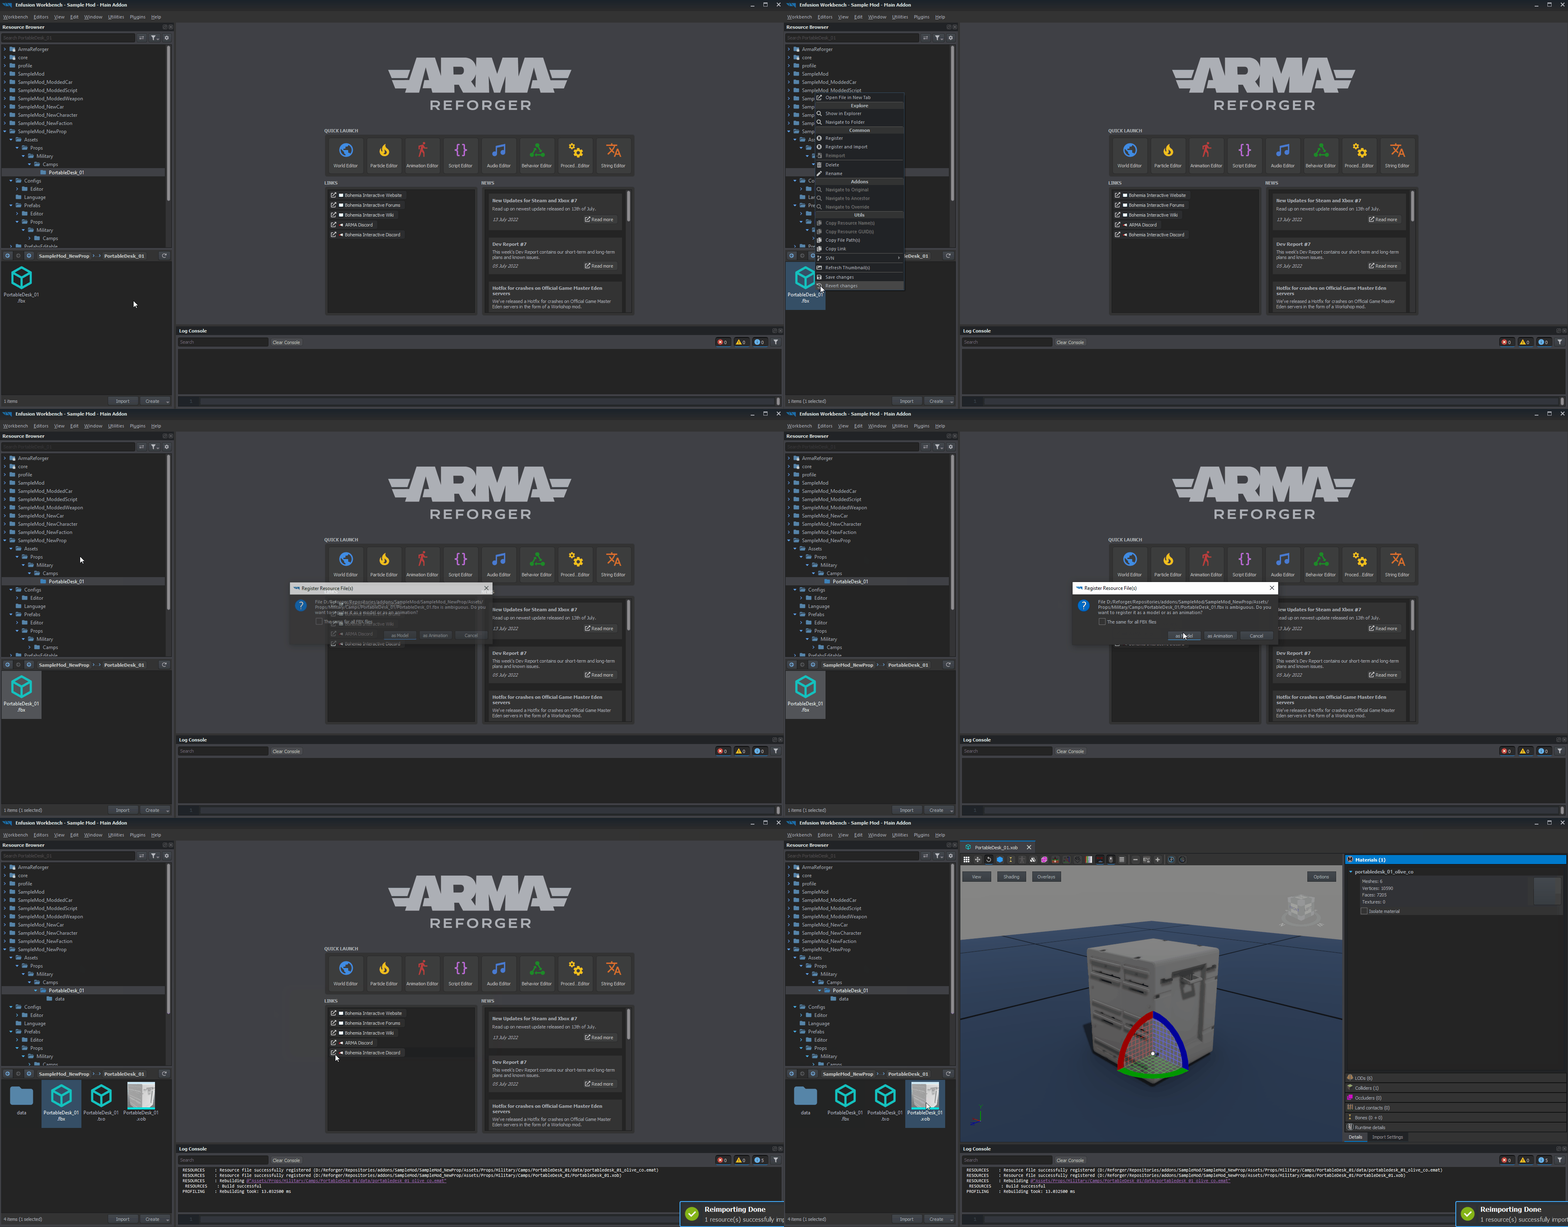
Importing and registering of new model is quite simple and this involves following steps:
- Locating FBX file that you wish to convert in Resource Browser
- Clicking on that FBX with RMB and then selecting "Register and Import" option from the context menu
- From pop up menu with title Register Resource (File(s), select "as Model" option
After that, conversion of FBX into XOB will begin and depending on complexity of the model it might take some time. In case of that simple prop.
Once model is imported, a new XOB should appear in Resource Browser - this file can be now opened in new Resource Manager tab for preview and game related parameters tweaking by double clicking with ![]() on it.
on it.
While Workbench still supports relative paths for materials, this method is discouraged and should not be used.
Import settings
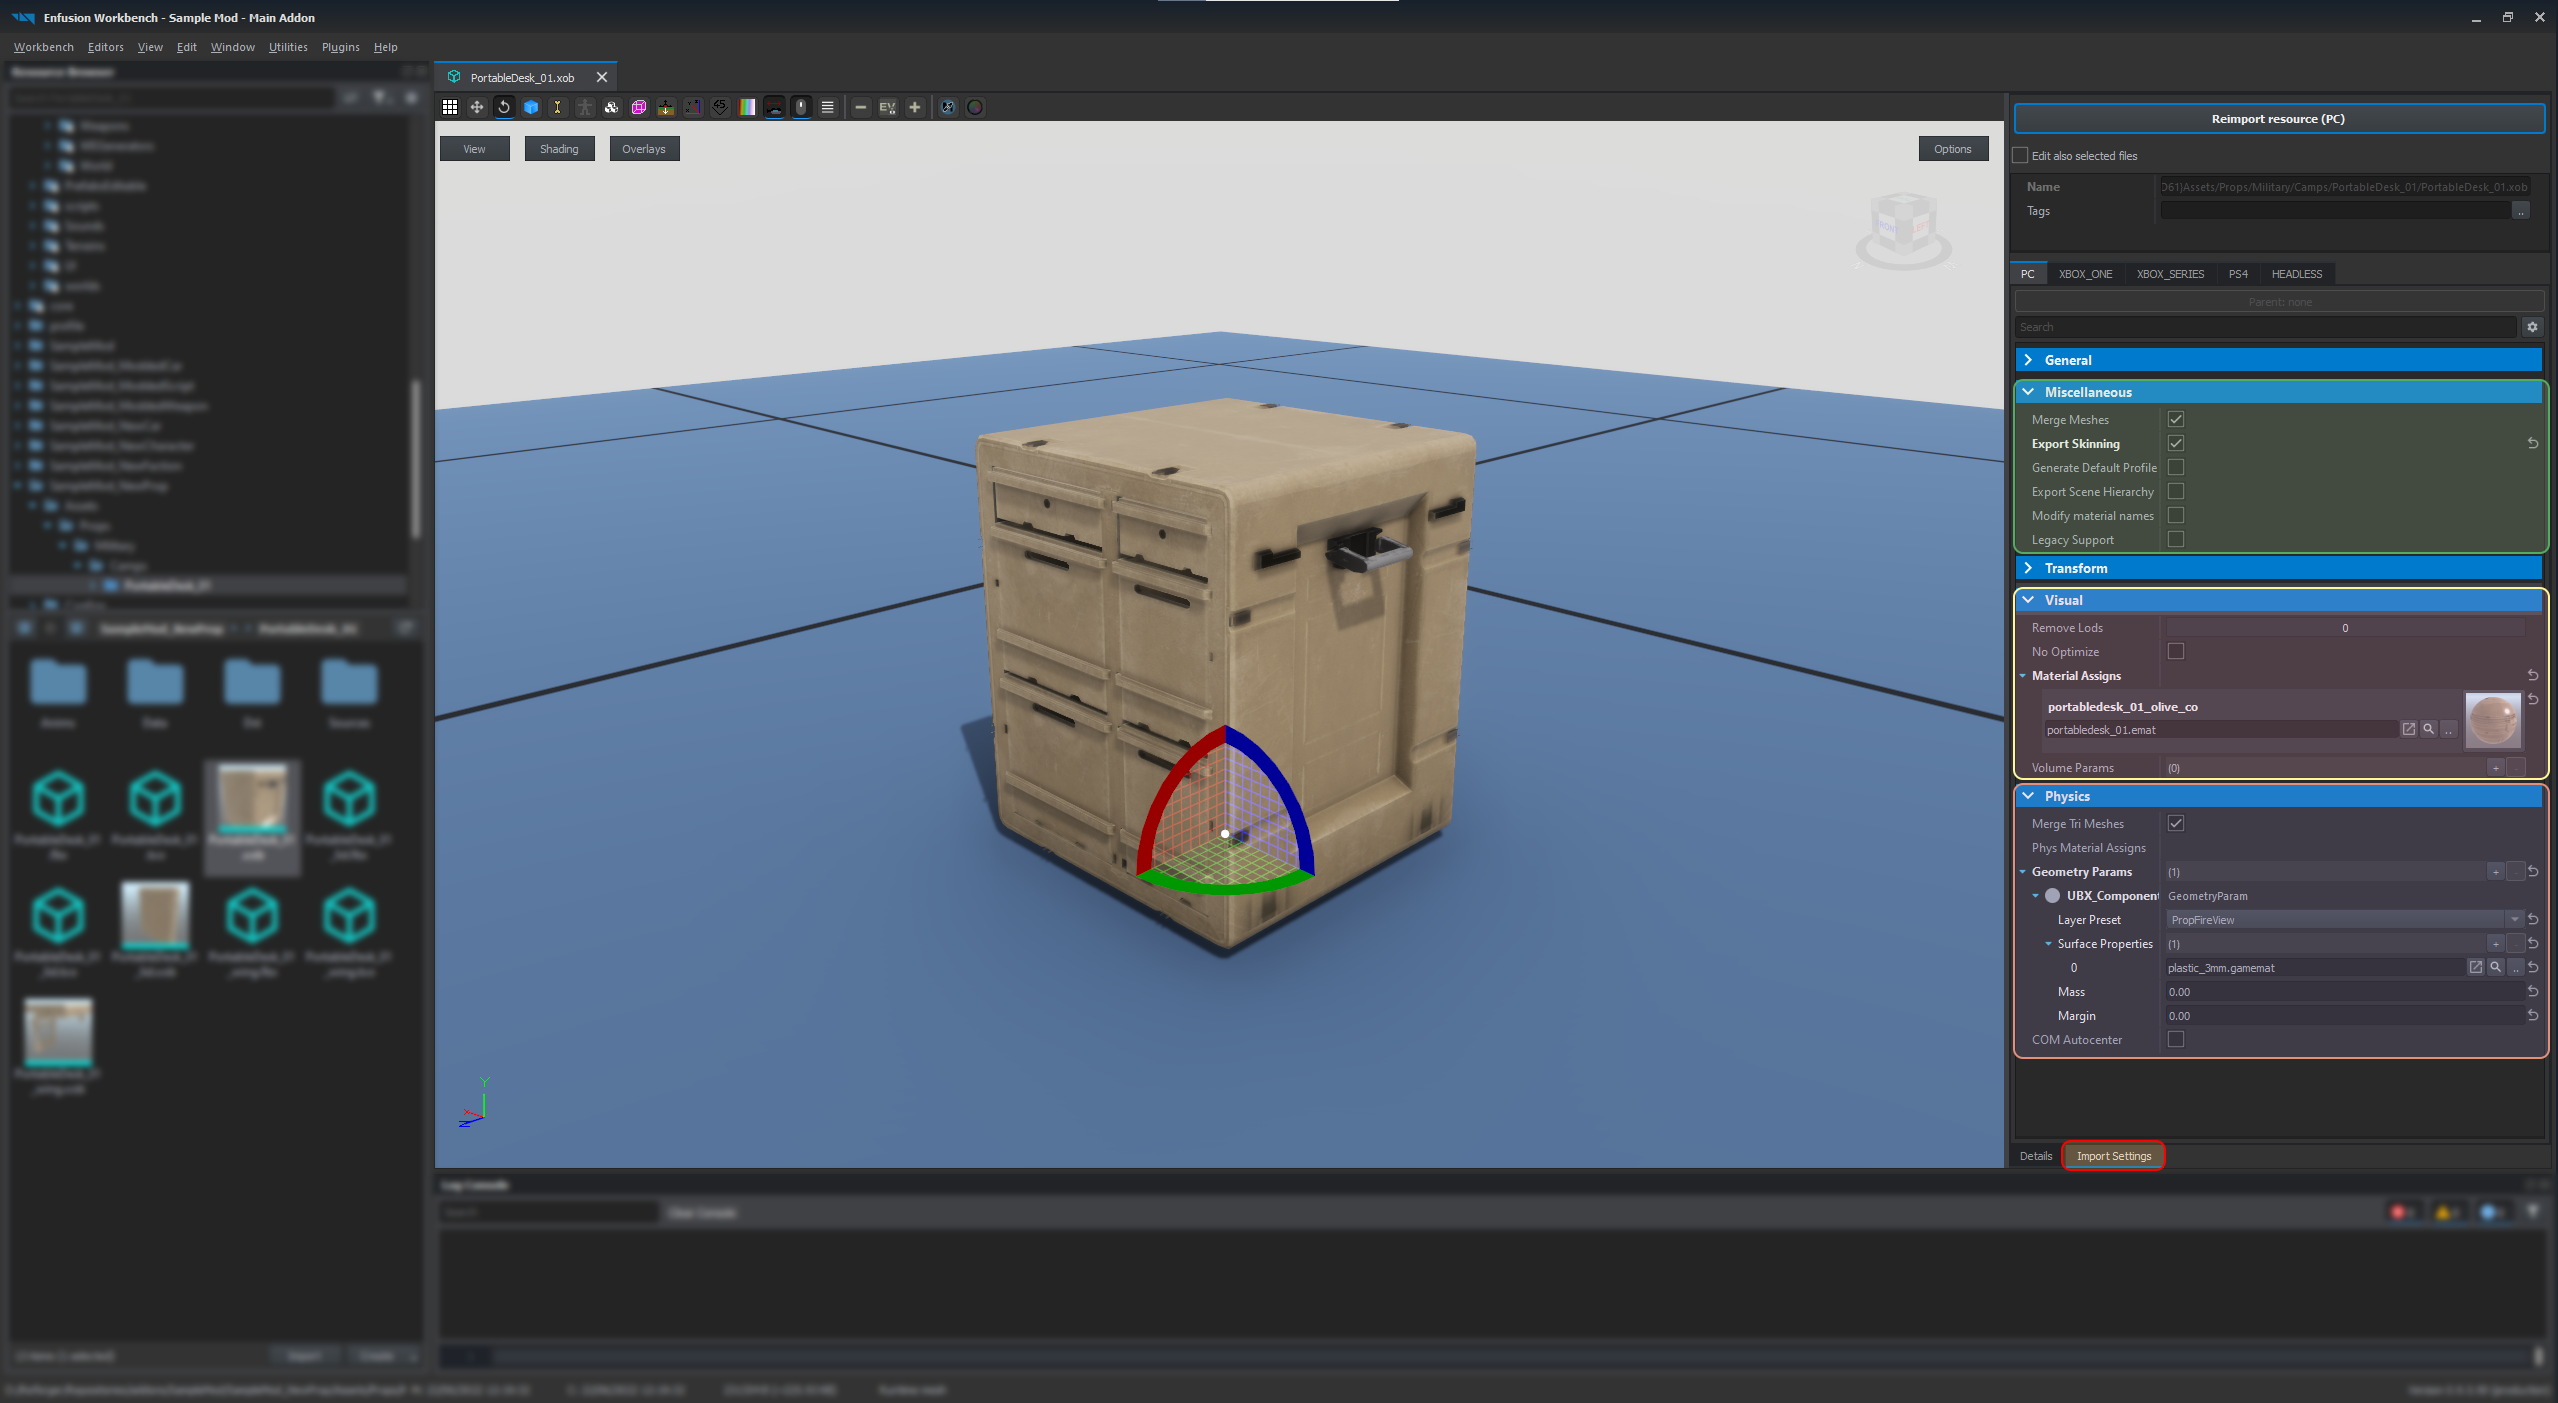
If everything went fine, main Resource Manager window should look like that:
On the right side of the viewport, there is a panel where you can select between two tabs:
- Details - shows various statistics (i.e. vertex, face or face count) and informations about materials, colliders, skeleton or LODs present in the imported model. This tab is by default selected when opening new model.
- Import Settings - in this tab it is possible to modify how FBX is imported to the game and it is possible to modify transformation, materials, physics or other misc parameters here.
After briefly checking if model has correct number of LOD (levels of details) and it looks visually fine, it's time to move to Import Settings tab, where there are couple important things to set.
Physics setup
After initial import was done it's time to make sure that materials & colliders are using proper materials & colliders. If it fails to find such texture, new dummy material (see area marked in orange on screen below) will be created in data folder next to the FBX model.
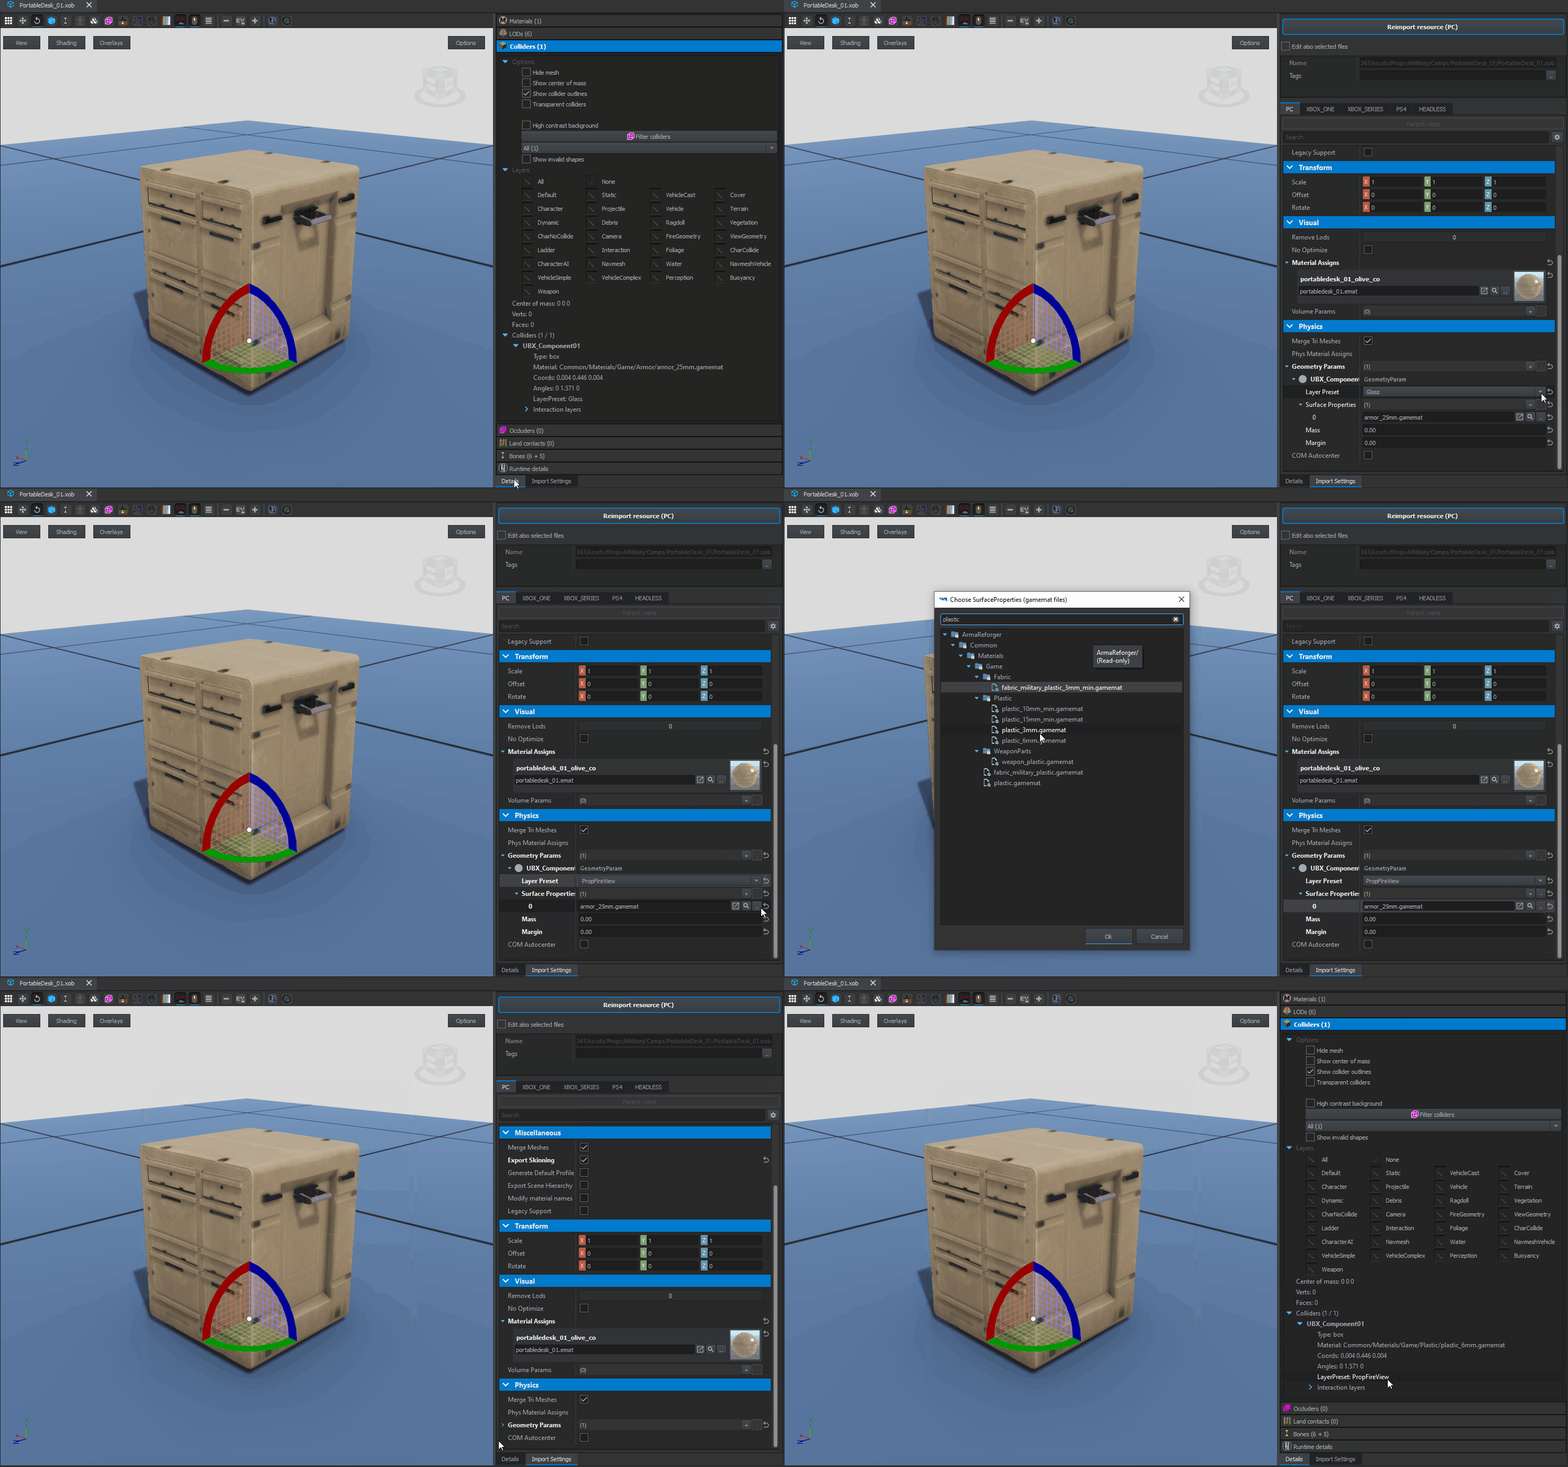
If everything was setup correctly in Blender, imported model should already have one collider imported with correctly assigned Layer Preset (PropFireView) and Surface Properties (plastic_3mm.gamemat). Otherwise, here is the list of some common issues:
Geometry Params list is empty
If both Colliders array in Details and Geometry Params array in Import Settings are empty, check for following errors:
- Check if objects which are supposed to be colliders have correct prefix - i.e. UBX, UCX, etc. See FBX Import page for more information
- Check Console Log if there are no errors regarding convexity or shape of the collider. See FBX Import page for more information
Wrong Game Material
If impact effect on the asset are using default dirt impact effects or following error appears in console
RESOURCES : GetResourceObject @"{411A617924FC3D61}Assets/Props/Military/Camps/PortableDesk_01/PortableDesk_01.xob"
RESOURCES (E): Wrong&patched resource GUID in @"Assets/Props/Military/Camps/PortableDesk_01/PortableDesk_01.xob" for property UBX_Component01 resource name @"Plastic_6m.gamemat"
RESOURCES : GetResourceObject @"{D4D49F200A5937E1}Plastic_6m.gamemat"
RESOURCES (E): Failed to open
then check for following errors:
- Make sure in 3D software of your choice that material assigned to collider is correctly named, i.e. Plastic_6mm_6A7CBD6BBCFC5148 - see Game Material section of FBX Import page.
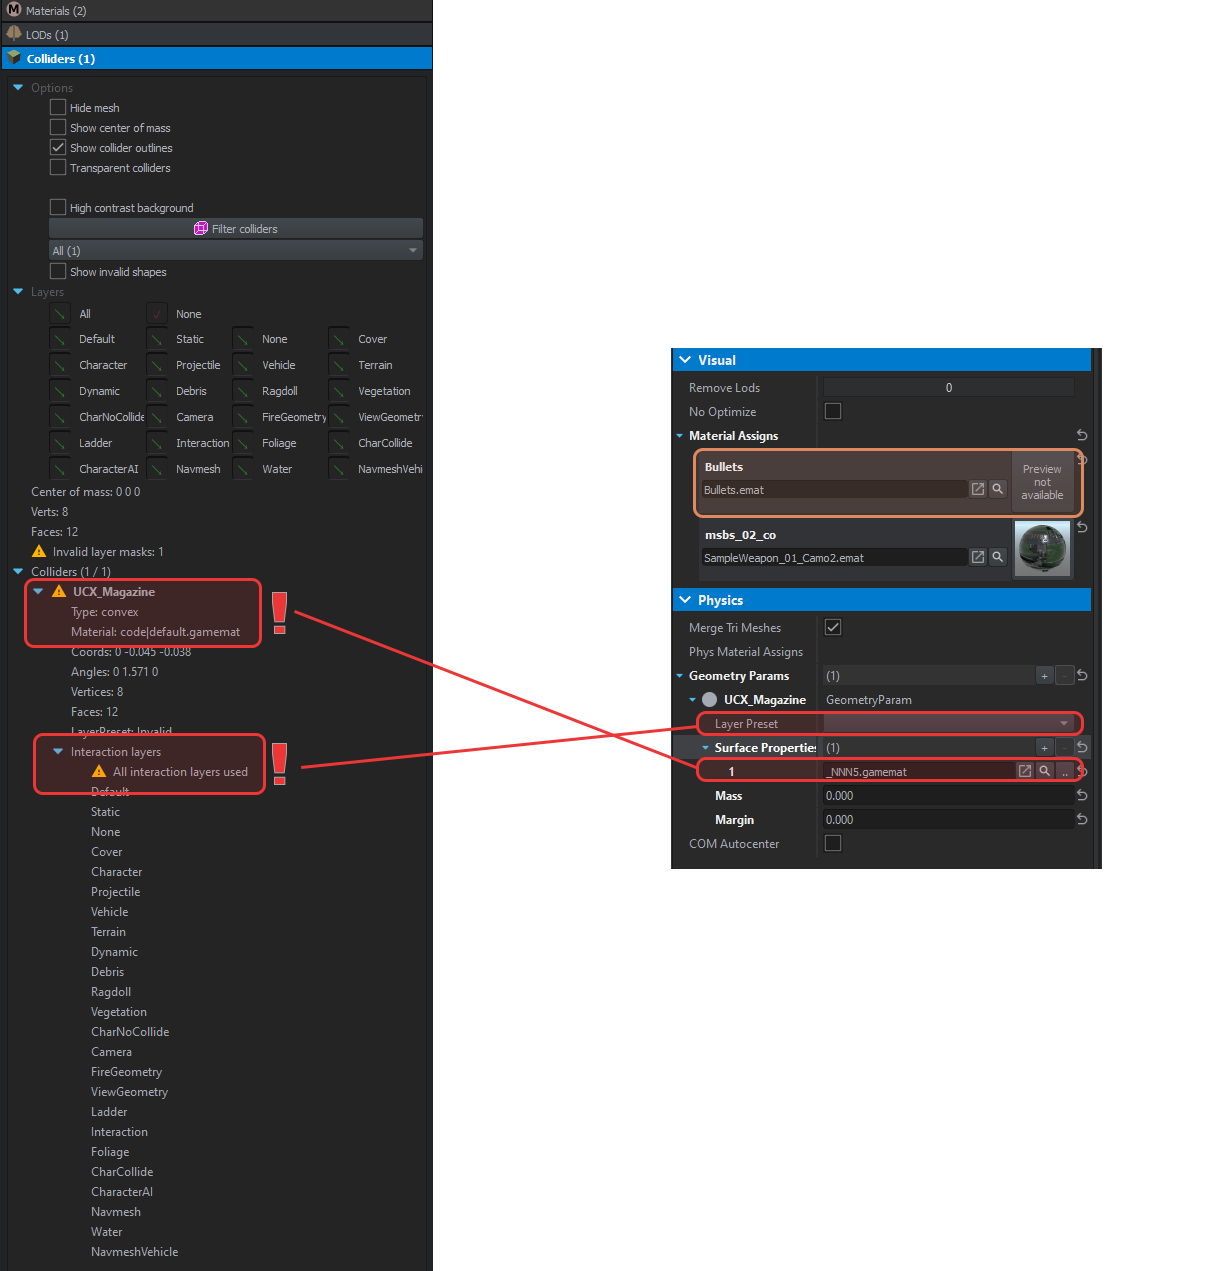
Wrong Layer Preset
If you see warning triangle Colliders section of Details tab or All interaction layers used error, then check for following things:
- Make sure that collider has correct Layer Preset assigned
- Make sure that Custom Properties option is checked in FBX export settings
Changing parameters
If for some reason you don't want to touch FBX and want to change Layer Preset or assigned game materials in Workbench itself, then it is possible to do that by manipulating Layer Preset & Surface Properties parameters in Physics section of Import Settings tab. Changes to those parameters require usage of Reimport resource button - otherwise information stored in XOB would not be updated. This method is not recommended though.
Skeleton & Hierarchy
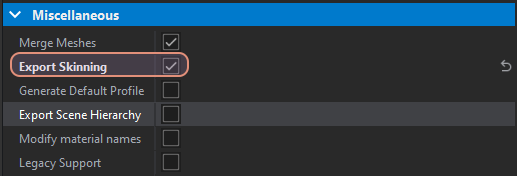
In case of models with skeleton (Armature) it is quite important to check Export Skinning option in Miscellaneous section of Import Settings.
Since Rugged Desk is supposed to have six animated drawers, it is important to enable that option and then reimport the model via Reimport resource (PC) button.
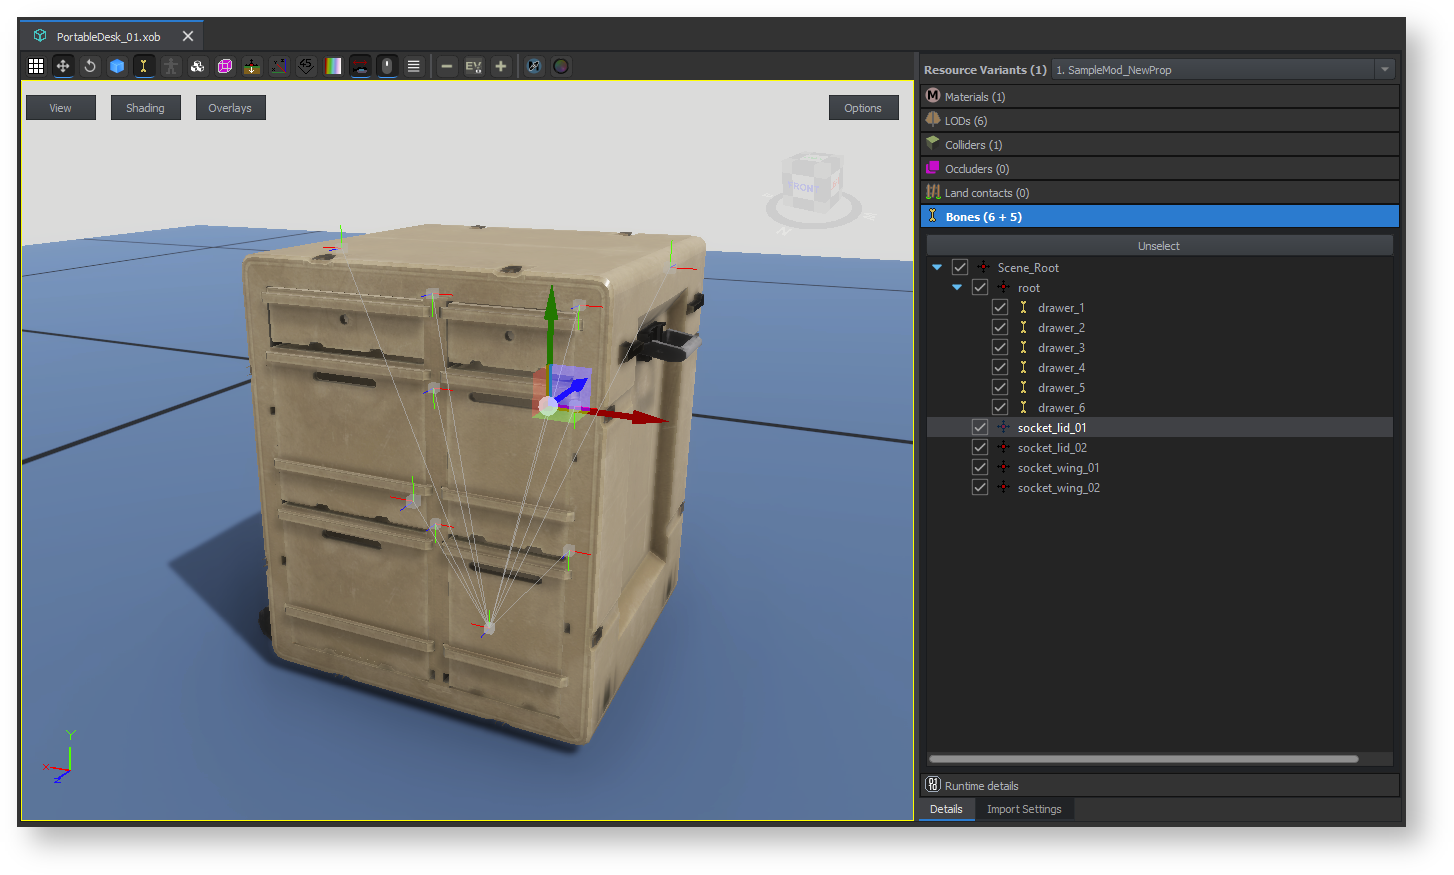
If skeleton was imported correctly', Details tab' in right section of the Resource Manger view port should show some non zero number in Bones section. In case of Rugged Desk, this object should have 6 skinned bones, 4 sockets and one dummy hierarchy element (root), which should be visible as Bones (6 + 5). First number in the bracket indicates number of skinned bones and 2nd one indicates of empty bones (either bones which are not skinned to anything or empty objects)
For Rugged Desk wing & lid it is possible to just use Export Scene Hierarchy - this should allow to use empty objects created before for snapping purposes.
Importing textures
By default, Workbench importer will create new materials (emats) using MatPBRBasic shader in Data folder next to the imported model, based on material names located in FBX. If material suitable for the mesh already exist somewhere in available projects, it is possible to change linked material by changing elements in Material Assigns located in Visual section of Import Settings - this option will be later used for Portable Desk lid & wing, which share same materials.
Once those materials are ready, you can use same procedures as the ones described on Sample Modded Weapon - Documentation - Creating New Materials page.
Adding basic configuration
Creating prefab
Prefabs for props can be prepared in multiple ways and it also depends on amount of functions that are planned to be added to such asset.
In general, it is recommend to use one of those two prefabs as a base:
- Props_Base.et - prefab for simple, non destructible assets
- Destructible_Props_Base.et - prefab dedicated for assets which can be destroyed
Since this sample is planned to have destruction, Destructible_Props_Base.et prefab can be used as a base.
In general, it is possible to create new inherited prefab in two ways:
- By dropping parent prefab in World Editor and drag and dropping that entity into Resource Browser field
- By using Inherit Prefab in Addon on prefab selected in Resource Browser attached to World Editor
No matter what method was picked, it is recommended to create base prefab for props, which might have some variants. In this tutorial Portable Desk have 3 texture variants prepared, so such base class will be more than welcome.
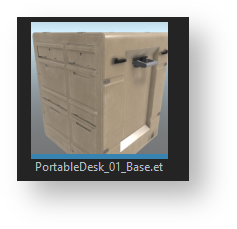
In this case, new prefab, which inherits from Destructible_Props_Base.et , should be called PortableDesk_01_Base.et
Final step in initial configuration will be assigning previously imported mesh. This can be done by simply assigning Rugged Desk XOB into Object property of MeshObject component in PortableDesk_01_Base.et prefab.
If change was applied to MeshObject component of prefab instance, don't forget to press Apply to prefab button and then save currently loaded world!
Creating texture variants
Since this assets is supposed to have three color variants, new prefab variants have to be prepared
- Create new prefabs, inheriting from PortableDesk_01_Base.et, either via World Editor viewport drag and drop method or via Inherit Prefab action available in Resource Browser attached to World Editor
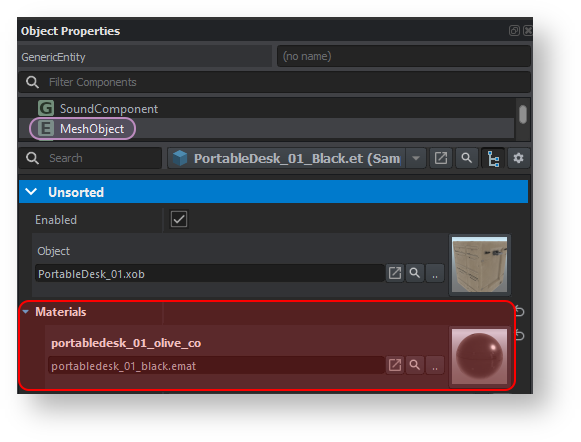
- Once new prefabs are created, open them and one by one, change assigned materials in Materials array inside MeshObject component to appropriate material created before.
- Apply changes to the prefabs if changes were applied to entity instance, otherwise (if hierarchy tree was used) this step can be skipped
- Permanently save changes to the prefabs by either saving current world or, if in prefab edit mode, save the prefab directly.
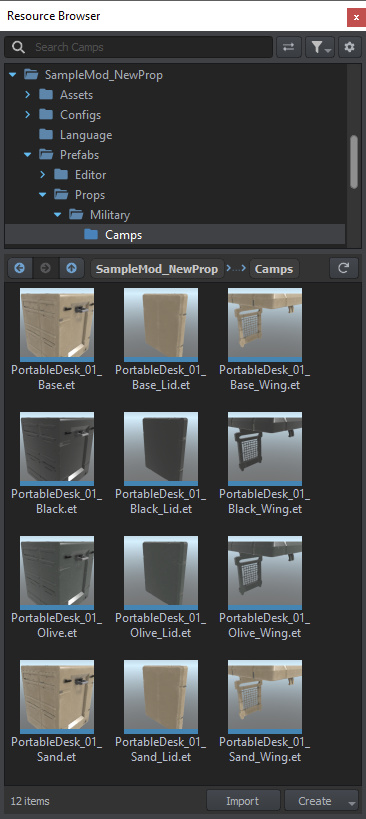
In the end, following files should be present in next to the PortableDesk_01_Base.et
- PortableDesk_01_Black.et
- PortableDesk_01_Olive.et
- PortableDesk_01_Sand.et
Creating prefabs for smaller parts
Procedure described above should be also applied to lid and wing prefabs so they have base prefab (inheriting from Destructible_Props_Base.et ) and color variants. Those prefabs should be really simple at this stage so MeshObject and RigidBody components which they inheriting from Destructible_Props_Base should be enough.
In the end, following set of prefabs should be created
- PortableDesk_01_wing_base.et
- PortableDesk_01_wing_Black.et
- PortableDesk_01_wing_Olive.et
- PortableDesk_01_wing_Sand.et
- PortableDesk_01_lid_base.et
- PortableDesk_01_lid_Black.et
- PortableDesk_01_lid_Olive.et
- PortableDesk_01_lid_Sand.et
Creating prop variants
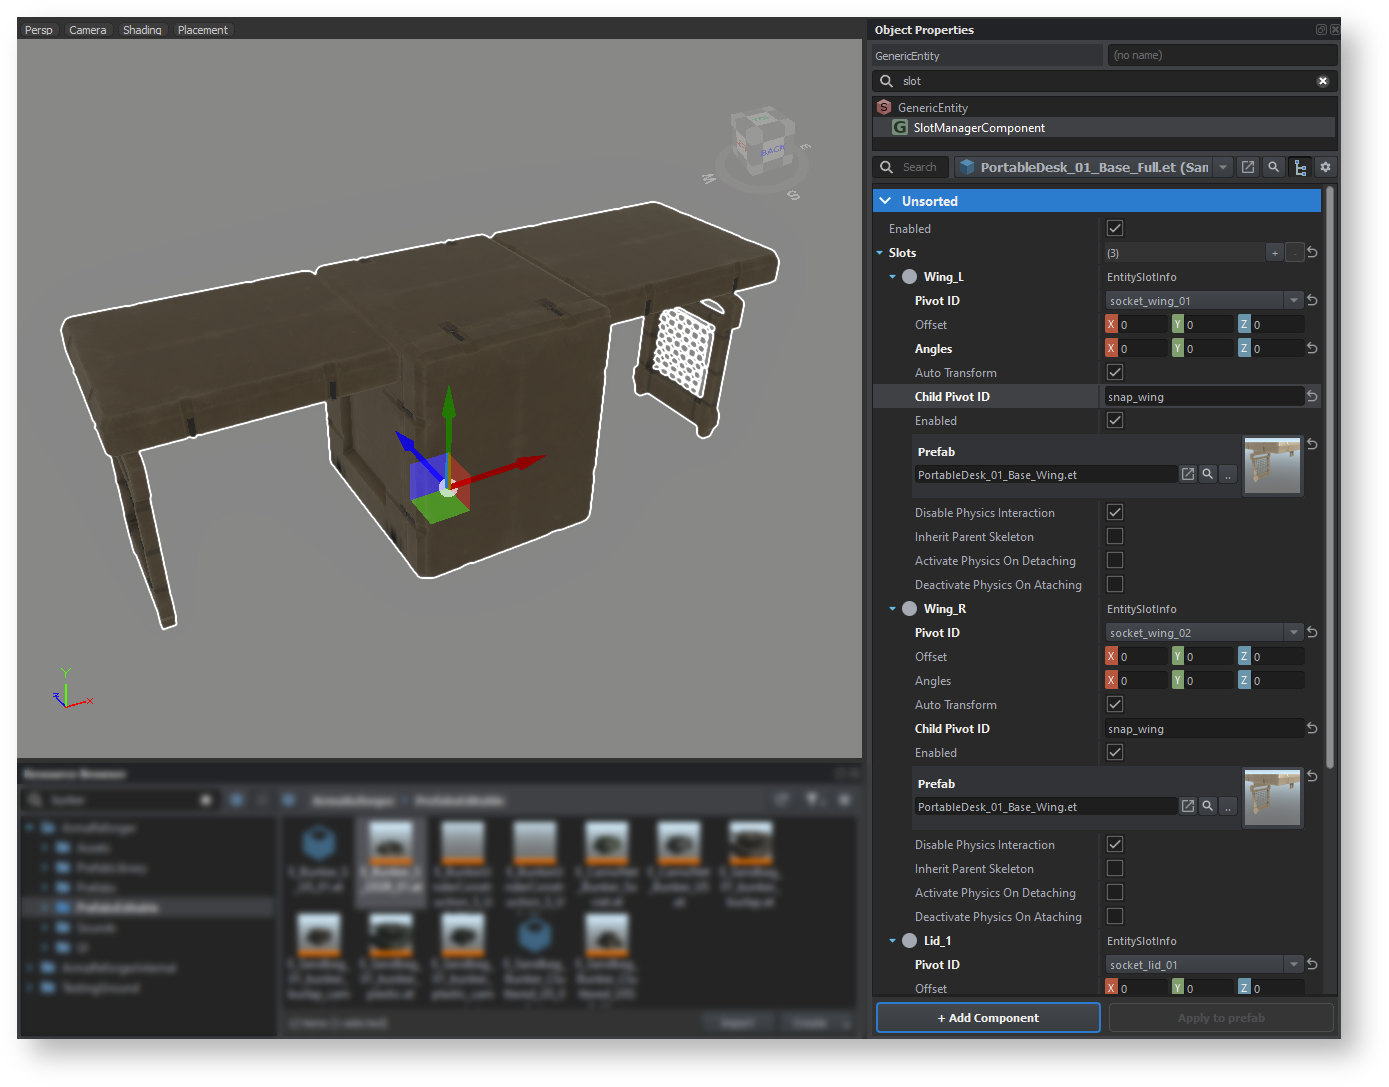
In order to create a variant of Portable Rugged Desk with for instance both wings and lids attached, it is possible to utilize SlotManagerComponent to attach additional elements. Before going any further though, it is recommend to start with creating a new base prefab - PortableDesk_01_Base_Full.et - which will serve as a base asset with all additions attached. Since the core of the desk remains the same, this new base prefab should inherit from PortableDesk_01_Base.et
Once base prefab is there, follow below steps to :
- Add new SlotManagerComponent via + Add Component button
- Select SlotManagerComponent and add new element to Slots array by clicking on plus sign on the right side of that property
- Select EntitySlotInfo from the list that appeared
- Type new name of that slot. For instance slot for wing can be called Wing_L
- In Wing_L element, locate Pivot ID property and select socket_wing_01 from the list
- In Child Pivot ID type name of the snap point which is located in the mesh - in this case it is called snap_wing
- In Prefab property, assign prefab which you want to use - in this case it will be PortableDesk_01_Base_Wing.et
This procedure should be repeated for the rest of the slots - Wing_R, Lid_1 & Lid2. In case the prefabs from the slots are incorrectly attached, please make sure that orientation of sockets and snap points is correct. Otherwise, the new PortableDesk_01_Base_Full.et should look like that:
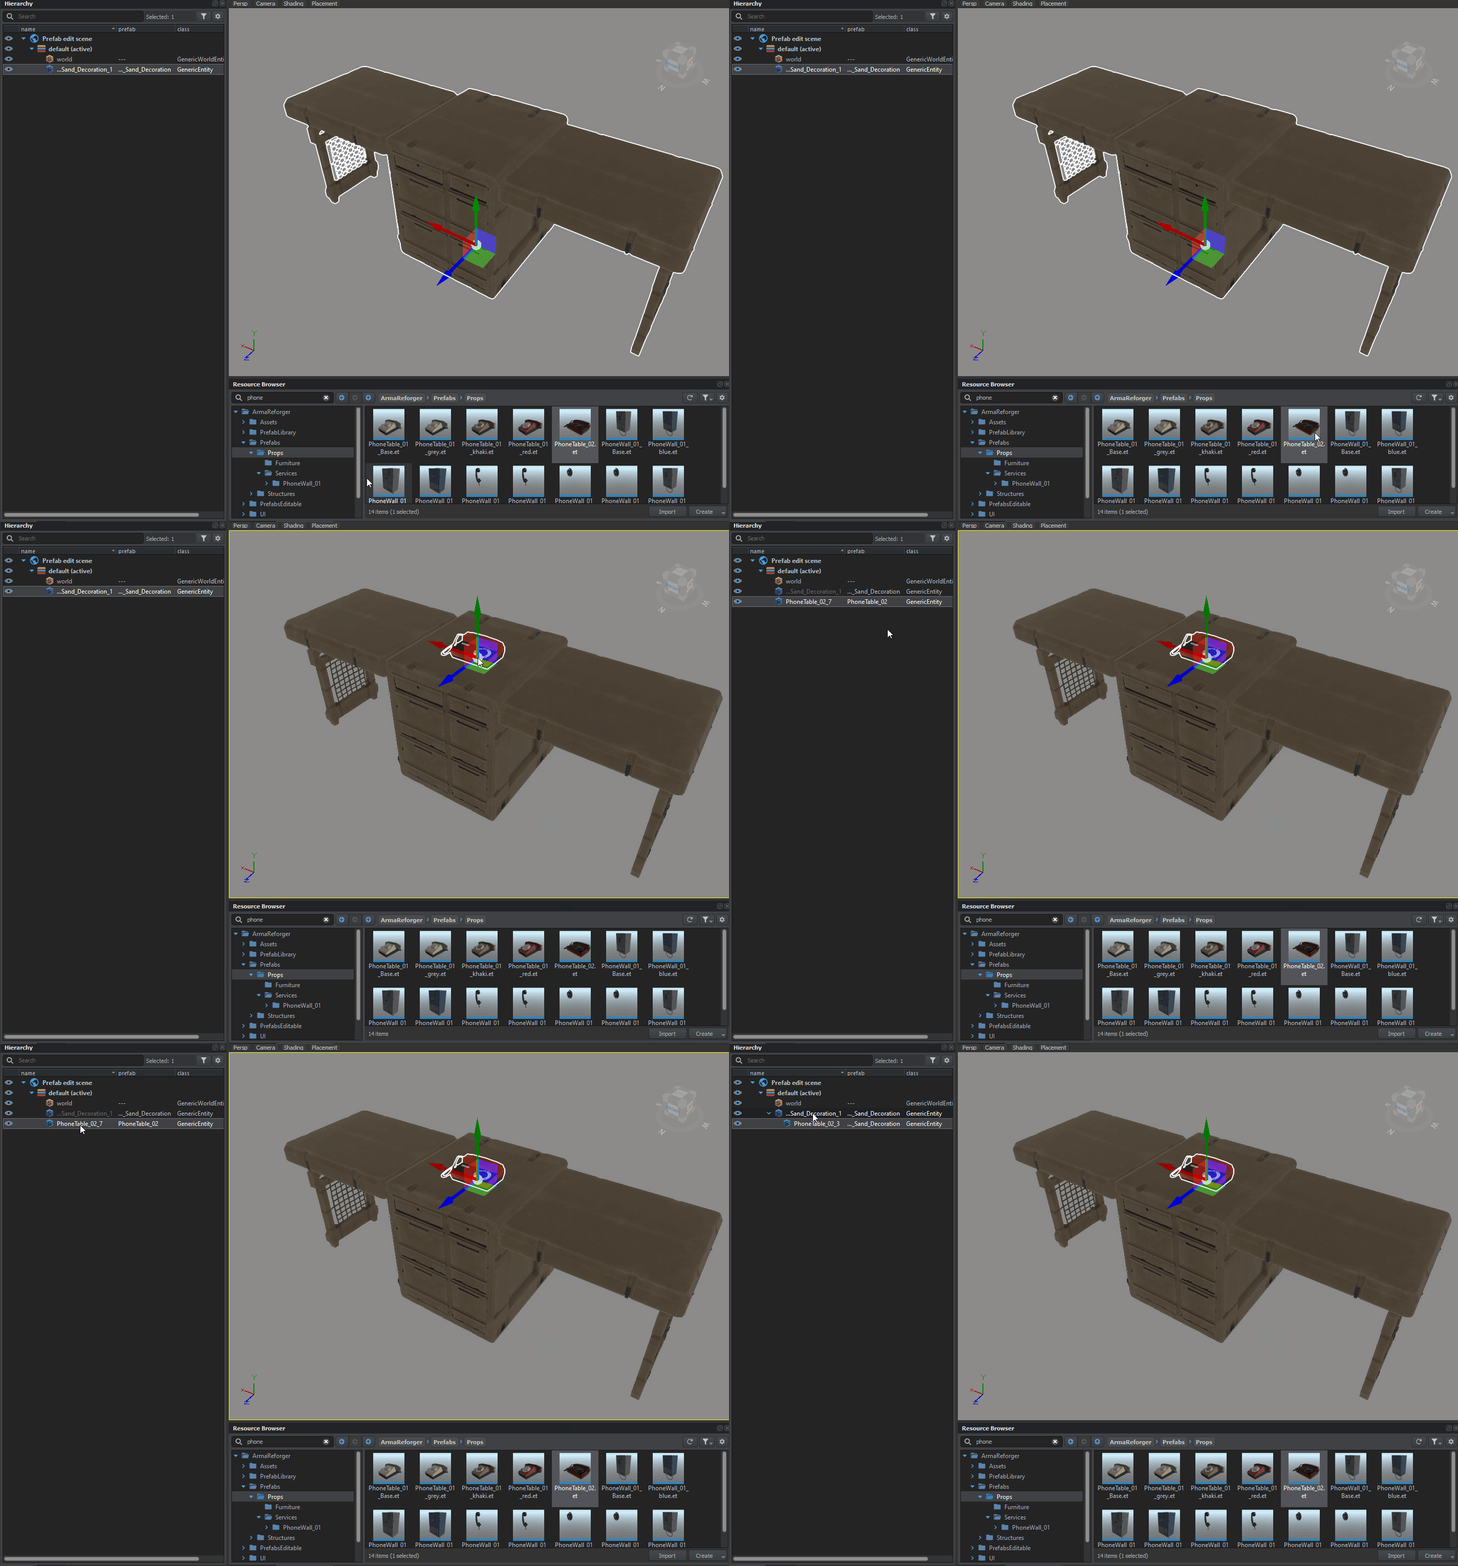
Beside using SlotManagerComponent, it is also possible to utilize hierarchy. This is especially useful when you for instance want to create a mini composition out of prefab, like add a telephone, some notebooks or ashtrays to it. After adding Hierarchy component to both parent and children prefab, it is even possible to utilize Pivot ID to snap prefabs to desired place. There is no way to define Child Pivot ID using that method though and thats why SlotManagerComponent was used here.
Principles of adding entity to prefab are described on Prefabs Basics page
Adding procedural animation
Creating new procedural animation project
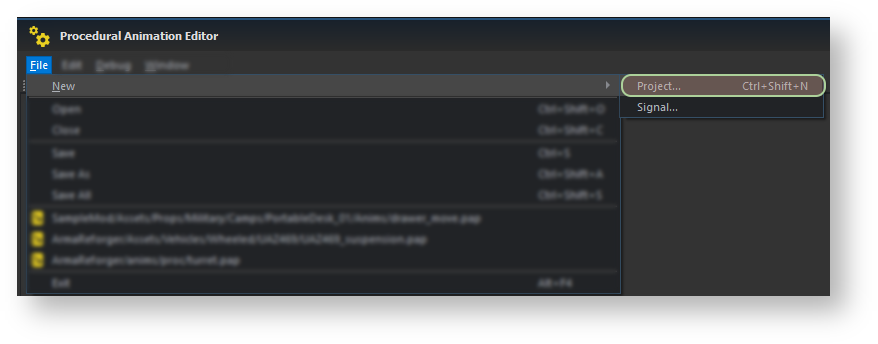
First step in creation of new procedural animation project would be launching of Procedural Animation Editor. After that, new project can be created by navigating to File → New → Project... ( alternatively, Ctrl + ⇧ Shift + N shortcut can be used) in order to create new Procedural Animation Project. Procedural Animation Project is quite similar in purpose to animation definitions in Real Virtuality Model Config but with much better signal processing (more about it next chapter).
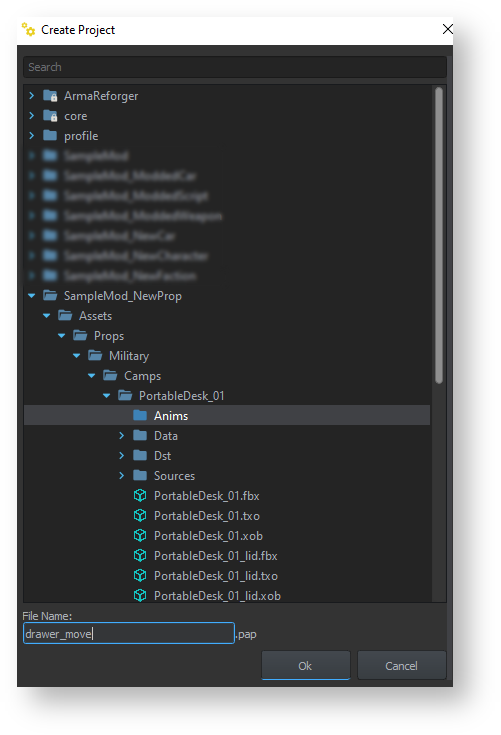
Once that step is completed, a new pop up window will appear asking for save location. In Arma Reforger, asset specific procedural animations are stored next to the model somewhere in inside Asset folder structure. Common animations, like turrets or wheel animations which are used by multiple vehicles, are located in Anims/Proc folder.
Here, situation is quite simplified and Rugged Desk animations are assumed to be specific to this asset and are placed in Assets/Props/Military/Camps/PortableDesk_01/Anims/ folder.
Creating new procedural animation signal
Once new Procedural Animation Project is created, it is possible to populate it with actual data. First step towards this goal would be creating new signal. To differentiate it from Audio Editor signals, Procedural Animation Editor signals have .siga extension.
Signals are quite essential part of procedural animation since they are controlling how signals from scripted or engine events are processed. For those familiar with Real Virtuality Engine, signals are somewhat similar in their purpose to source parameter in Model Config - this time though it is possible to do much more complex processing of signals like mixing values, non linear movement and mixing two or more signals together.
