Mod Project Setup – Arma Reforger
Lou Montana (talk | contribs) m (Some wiki formatting) |
|||
| (26 intermediate revisions by 2 users not shown) | |||
| Line 1: | Line 1: | ||
{{TOC|side|| | {{TOC|side||4}} | ||
== Prerequisites == | == Prerequisites == | ||
* {{GameCategory|armaR|link= y}} installed | * {{GameCategory|armaR|link= y}} installed | ||
* Workbench installed | * {{GameCategory|armaR|Modding|Official Tools|text= Workbench}} installed | ||
== Workbench Launcher Setup == | |||
Before creating a new project, it is necessary to set Enfusion Workbench Launcher so it knows where Reforger data is located. Reforger data is essential for Workbench to function correctly so its important | |||
There are two ways how to prepare Workbench for creation of the addon - automatic & manual - which are described below | |||
=== Preparing Data === | |||
By default, every time '''Arma Reforger (game)''' is launched, executable will automatically add hidden link to the data '''ArmaReforger.gproj''' in Windows Register. | |||
It might happen though, that automatic detection is not working (f.e. installation dir was moved) and because of that, '''it is recommended to manually add ArmaReforger.gproj''' to Project list | |||
==== Adding Arma Reforger Project ==== | |||
# Start the Workbench either through Steam ({{hl|Tools > Arma Reforger Tools > START}}) or by double-clicking '''ArmaReforgerWorkbenchSteam.exe''' located in the Workbench installation directory.<br>The following screen will appear:<br>[[File:armareforger_modsetup-launcherwindow-reforgernotfound.png]] | |||
# Click "Add Existing" button | |||
# Browse to {{hl|ArmaReforger.gproj}} (located in {{hl|<{{armaR}} installation directory>\addons\data\ArmaReforger.gproj}}) and select it | |||
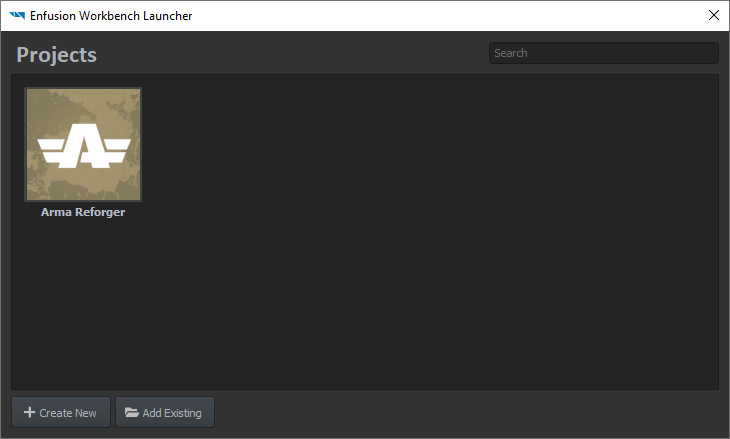
#{{armaR}} project is now listed in the Projects window.<br>[[File:armareforger_modsetup-launcherwindow-reforgerfound.png]] | |||
==== Adding Other Existing Projects ==== | |||
Other projects, like dependencies, can be added one by one via '''Add Existing Project''' as described above or by using '''Scan for Projects''' button. | |||
* Click on '''+ Add Project''' button | |||
* Select '''Scan for Projects''' from the list | |||
* Select folder where you have addons located, which you want to use as dependencies | |||
* Confirm selection | |||
[[File:armareforger-modsetup-scan-for-projects.gif]] | |||
Now you can either try to launch one of those mods or use them as dependencies | |||
{{Feature|informative|Projects list is stored in user profile. You can use different profile via [[Arma_Reforger:Startup_Parameters#profile|-profile]] command line parameter, allowing you to have '''set of mods''' for various occasions or for '''different version of game'''. | |||
[[File:armareforger-modsetup-profile-cli.png]]}} | |||
== Project Creation == | == Project Creation == | ||
* | * Open Enfusion Workbench Launcher if you don't have it already open.<br><!-- -->[[File:armareforger_modsetup-launcherwindow-reforgerfound.png]]<br><!-- -->This interface displays existing projects known to Workbench and will later display the current creation; an existing project is openable by selecting it and clicking '''Open''' to edit it. | ||
-->[[File:armareforger_modsetup-launcherwindow-reforgerfound.png]]<br><!-- | |||
-->This interface displays existing projects known to Workbench and will later display the current creation; an existing project is openable by selecting it and clicking '''Open''' to edit it. | |||
* Click "'''Create New'''" to open the project creation interface | * Click "'''Create New'''" to open the project creation interface | ||
{| | {| | ||
| Line 19: | Line 48: | ||
** the project's name can only contain '''letters''', '''numbers''', '''spaces''' and the following symbols: '''-''' (dash) '''_''' (underscore) and '''.''' (dot). | ** the project's name can only contain '''letters''', '''numbers''', '''spaces''' and the following symbols: '''-''' (dash) '''_''' (underscore) and '''.''' (dot). | ||
* Confirm or edit the project's location<!-- | * Confirm or edit the project's location<!-- | ||
-->{{Feature|important|Be sure to pick a location where the current Windows user has write permissions (e.g {{hl|C:\Users\Username\Documents}} - '''not''' {{hl|C:\Program Files}}).}} | --> | ||
*{{Feature|warning|Do not create projects in '''OneDrive''' directories - such project will fail to load! }}{{Feature|important|Be sure to pick a location where the current Windows user has write permissions (e.g {{hl|C:\Users\Username\Documents}} - '''not''' {{hl|C:\Program Files}}).}}<!-- | |||
-->{{Feature|informative| | |||
The default project directory's location is {{hl|%userProfile%\Documents\My Games\ArmaReforgerWorkbench\addons}}; the default project name (and directory name) is {{hl|New Enfusion Project}} - it can only contain letters, numbers, ampersands, spaces, dashes, dots and underscores. | |||
}} | |||
* Pick the project's dependencies: | * Pick the project's dependencies: | ||
** dependencies are other projects (and/or mods) on which the current project relies to work | ** dependencies are other projects (and/or mods) on which the current project relies to work | ||
| Line 26: | Line 59: | ||
** {{armaR}} is a default dependency: an {{armaR}} mod needs {{armaR}} data to run properly | ** {{armaR}} is a default dependency: an {{armaR}} mod needs {{armaR}} data to run properly | ||
* Click "'''OK'''" to create the project. | * Click "'''OK'''" to create the project. | ||
{{Messagebox|Dependencies of created project can be later changed in [[Arma_Reforger:Resource_Manager:_Options#Dependencies|Resource Manager Options]]|✩|#88cc88}}''Et voilà !'' The project is created and the Workbench [[Arma Reforger:Resource Manager|'''Resource Manager''']] is waiting for input. | |||
{{Feature|informative|The {{hl|addon.gproj}} file can be renamed to have a more fitting name; the project will then need to be re-added to the Projects list on Workbench opening.}} | |||
{{Messagebox|'''Recommended read''': | |||
* {{GameCategory|armaR|Modding|Official Tools|text= Tools Documentation}} - for general knowledge about using Workbench | |||
* {{GameCategory|armaR|Modding|Tutorials|Assets|text= Asset Creation Tutorials}} - if you intend to create or modify assets, like changing weapon parameters or adding new vehicle | |||
* {{GameCategory|armaR|Modding|Tutorials|Scripting|text= Scripting Tutorials}} - this category contains various pages explaining how to create your first script | |||
* {{GameCategory|armaR|Modding|Tutorials|Scenario|text= Scenario Creation Tutorials}} - tutorials explaining how to create your first scenario in World Editor | |||
* {{GameCategory|armaR|Modding|Tutorials|Terrains|text= Terrain Tutorials}} - tutorials containing information how to create your first terrain | |||
|📖|lightgrey}} | |||
== Managing Projects == | |||
=== Launching Project === | |||
When launching Enfusion Workbench Launcher second and after projects were added to the list, launching of mods can be done in following ways: | |||
'' | * By double clicking with {{Controls|LMB}} on mod (either tile or element in list view) | ||
* By clicking on it with with {{Controls|rmb}} and selecting option "'''Open'''" (1) from context menu | |||
[[File:armareforger-modsetup-open-project.png]] | |||
==== With Mods ==== | |||
[[File:armareforger-modsetup-open-with-presets.png|thumb|Launching mod with additional mods and preset menu]] | |||
Launching your project with other addons, which are '''not dependencies''', can be done via '''Open with Addons''' '''(2 on picture above)''' option which is available in context menu visible after pressing on mod in list with {{Controls|rmb}}. After selecting this option, a new menu '''''- Open project with additional addons''''' (similar to one, used for setting dependencies) - will show up and you will be able to select your dependencies. | |||
== | ===== Presets ===== | ||
List of additionally launched mods in '''''Open project with additional addons''''' menu is saved and restored when using this option. Additionally, selections of those addons is stored in '''Presets,''' which you can use to switch between specific mod sets. '''Presets''' are shared for all addons listed in '''Enfusion Workbench Launcher.''' | |||
'''You can select one of the 8 presets''' by clicking on '''Preset ''x''''' list box in top right corner of the window'''.''' | |||
=== Removing Projects === | |||
Projects can be removed by Enfusion Project List by clicking on them with {{Controls|rmb}} and then selecting '''Remove from List''' option. This will remove project '''only from the list''' and data itself will remain intact. | |||
[[File:armareforger-modsetup-removing-project.png]] | |||
=== Projects View === | |||
It is possible to switch between List & Grid view. To do so, click on '''cog''' icon in top right corner and select one of the views from the context menu. | |||
[[File:armareforger-modsetup-list-grid-view.gif|alt=]] | |||
== Experimental Branch == | |||
[[ | It is also possible to create and publish projects using Experimental Branch of the tools. For more info, head out to [[Arma Reforger:Experimental Branch|'''Experimental Branch''']] page. | ||
== Troubleshooting == | |||
{{armaR}} project is | === {{armaR}} project is not found in the Projects window === | ||
[[ | * You need to add '''Arma Reforger game project''' ('''not your project!''') to the list. See instructions listed in [[Arma Reforger:Mod Project Setup#Adding Arma Reforger Project|Adding Arma Reforger Project]] section | ||
{{Feature|important|Be sure to use the adequate Workbench to open the corresponding data. Using default Workbench to open e.g Experimental branch data may result in errors!}} | |||
{{GameCategory|armaR|Modding}} | {{GameCategory|armaR|Modding|Tutorials}} | ||
Latest revision as of 11:24, 22 April 2024
Prerequisites
- Arma Reforger installed
- Workbench installed
Workbench Launcher Setup
Before creating a new project, it is necessary to set Enfusion Workbench Launcher so it knows where Reforger data is located. Reforger data is essential for Workbench to function correctly so its important
There are two ways how to prepare Workbench for creation of the addon - automatic & manual - which are described below
Preparing Data
By default, every time Arma Reforger (game) is launched, executable will automatically add hidden link to the data ArmaReforger.gproj in Windows Register.
It might happen though, that automatic detection is not working (f.e. installation dir was moved) and because of that, it is recommended to manually add ArmaReforger.gproj to Project list
Adding Arma Reforger Project
- Start the Workbench either through Steam (Tools > Arma Reforger Tools > START) or by double-clicking ArmaReforgerWorkbenchSteam.exe located in the Workbench installation directory.
The following screen will appear: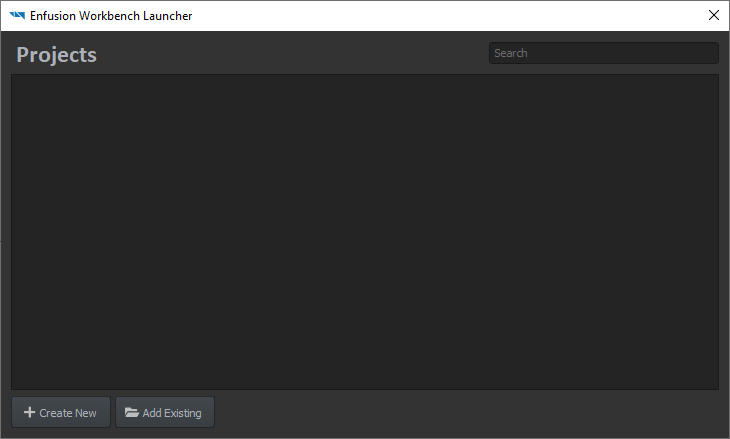
- Click "Add Existing" button
- Browse to ArmaReforger.gproj (located in <Arma Reforger installation directory>\addons\data\ArmaReforger.gproj) and select it
- Arma Reforger project is now listed in the Projects window.


Adding Other Existing Projects
Other projects, like dependencies, can be added one by one via Add Existing Project as described above or by using Scan for Projects button.
- Click on + Add Project button
- Select Scan for Projects from the list
- Select folder where you have addons located, which you want to use as dependencies
- Confirm selection

Now you can either try to launch one of those mods or use them as dependencies

Project Creation
- Open Enfusion Workbench Launcher if you don't have it already open.
This interface displays existing projects known to Workbench and will later display the current creation; an existing project is openable by selecting it and clicking Open to edit it. - Click "Create New" to open the project creation interface


- Enter the project's name
- the project's name can only contain letters, numbers, spaces and the following symbols: - (dash) _ (underscore) and . (dot).
- Confirm or edit the project's location
- Pick the project's dependencies:
- dependencies are other projects (and/or mods) on which the current project relies to work
- a project cannot be loaded if a dependency is missing
- the dependency link is one-way: a dependency does not need the current project in order to be loaded
- Arma Reforger is a default dependency: an Arma Reforger mod needs Arma Reforger data to run properly
- Click "OK" to create the project.
Et voilà ! The project is created and the Workbench Resource Manager is waiting for input.
Managing Projects
Launching Project
When launching Enfusion Workbench Launcher second and after projects were added to the list, launching of mods can be done in following ways:
- By double clicking with
 on mod (either tile or element in list view)
 - By clicking on it with with
 and selecting option "Open" (1) from context menu

With Mods

Launching your project with other addons, which are not dependencies, can be done via Open with Addons (2 on picture above) option which is available in context menu visible after pressing on mod in list with ![]() . After selecting this option, a new menu - Open project with additional addons (similar to one, used for setting dependencies) - will show up and you will be able to select your dependencies.
. After selecting this option, a new menu - Open project with additional addons (similar to one, used for setting dependencies) - will show up and you will be able to select your dependencies.
Presets
List of additionally launched mods in Open project with additional addons menu is saved and restored when using this option. Additionally, selections of those addons is stored in Presets, which you can use to switch between specific mod sets. Presets are shared for all addons listed in Enfusion Workbench Launcher.
You can select one of the 8 presets by clicking on Preset x list box in top right corner of the window.
Removing Projects
Projects can be removed by Enfusion Project List by clicking on them with ![]() and then selecting Remove from List option. This will remove project only from the list and data itself will remain intact.
and then selecting Remove from List option. This will remove project only from the list and data itself will remain intact.

Projects View
It is possible to switch between List & Grid view. To do so, click on cog icon in top right corner and select one of the views from the context menu.

Experimental Branch
It is also possible to create and publish projects using Experimental Branch of the tools. For more info, head out to Experimental Branch page.
Troubleshooting
Arma Reforger project is not found in the Projects window
- You need to add Arma Reforger game project (not your project!) to the list. See instructions listed in Adding Arma Reforger Project section