Triggers: Difference between revisions
(Scripting Section added) |
|||
| Line 64: | Line 64: | ||
== Scripting == | == Scripting == | ||
It is possible to create, read and update triggers via scripts. This works for pretty much any of the triggers properties, but you can ''not'' obtain the position of a trigger that has been created within the editor. Available Commands are: | It is possible to create, read and update triggers via scripts. This works for pretty much any of the triggers properties, but you can ''not'' obtain the position of a trigger that has been created within the editor. Available Commands are: | ||
* [[createTrigger]] ( | * [[createTrigger]] (contains an Example) | ||
* [[setTriggerActivation]] | * [[setTriggerActivation]] | ||
* [[setTriggerArea]] | * [[setTriggerArea]] | ||
Revision as of 12:56, 25 October 2009
Introduction
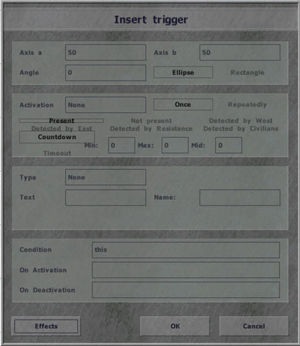
See ArmA:Mission Editor - Triggers for a thorough overview of triggers and it's fields for activation, effects, etc.
Triggers are an essential function for mission designers. A trigger (sometimes called a sensor) allows a mission designer to control events within a mission. Some common uses for triggers are controlling the timing of squad moves, camera control in cutscene, or even play the appropriate music when the time is right.
Activation
There are several combinations that can be created to activate the trigger. The trigger can be used to check if east or west is present, not present, or even detected by other sides within the trigger. A trigger can also be used to set up radio commands. (Be aware though, that a unit that has been setCaptive will not trigger any detected events.)
A trigger can be linked to one particular unit or group by going into Group Mode (F2), and dragging a line from the trigger to the desired unit. After this the Activation field will be set to "Vehicle". It can then be changed to either "Whole group", "Group leader" or "Any group member".
If an activation is set to "repeatedly" the trigger first has to be 'deactivated' before it can fire again (e.g. if a unit activated the trigger by entering it, it will first have to leave it, before the trigger can become active again.)
Seized by...
New activation type Seized by... was added since ArmA version 1.05. It's designed to allow easy detection of domination of one side in given area. "Seized by..." should be used only with "Time out" option selected. The level of dominance needed for activation of this trigger type is depending on Min, Mid and Max time given in "Time Out" section: if the dominance is really overhelming, min. time is enough for this trigger to get activated. If the dominance is less severe, the trigger will be activated after timed out to max. value. Note that this trigger estimates side strengths in the area based on their normalized firepower per time.
Example of typical usage to detect if the area of a trigger is seized by BLUFOR:
Create a trigger configured as:
- Activation Seized by BLUFOR
- Present
- TimeOut 15-30-60
If Detected by BLUFOR is set, it limits the OPFOR units used for estimating balance of power in the trigger area only to those currently known to BLUFOR and the designer must ensure that entire trigger area is well known to BLUFOR before considering the area secured (or create multiple triggers that need to be active at the same time).
Type
What does the trigger do when activated
- None
- Guarded by OPFOR - make sure OPFOR units available as guards visit the area
- Guarded by BLUFOR
- Guarded by Independents
- Switch - switch a group to next waypoint (needs to be synchonized with a waypoint)
- End #1 - terminate the mission
- End #2
- End #3
- End #4
- End #5
- End #6
- Lose
Countdown
Defines (in seconds) how long to wait until On Activation is fired after Condition was true. Min, Max and Mid allow you to add some randomization to the time.
Timeout
Defines (in seconds) random range from Min. to Max. for how long the trigger condition field expression must be active in order to make the trigger activated. From ArmA 1.05 Timout is the default option for newly created triggers.
Condition
In addition to the 'Activation' options above, this field allows you to specify other conditions that have to be fulfilled before the Trigger activates. By default only the boolean variable this is present in this field. It is set to the result of the main 'Activation' condition (e.g. 'east'/'present'). The expression in this field must return a boolean value (e.g. "this && alive player"). Trigger conditions are tested every 0.5 seconds.
On Activation/Deactivation
Defines action that is performed when trigger condition changes to true or false. Expression must either be an assignment or return nothing. Variable denoting trigger can be created by filling in name field. Array variable thisList will contain a list of all vehicles that met the trigger condition (e.g. hint format ["%1 units in area",count thisList]).
Effects
Allows the mission designer to add music, environmental sounds, or to display title messages. Many use the effects to create quick and easy cutscenes.
Scripting
It is possible to create, read and update triggers via scripts. This works for pretty much any of the triggers properties, but you can not obtain the position of a trigger that has been created within the editor. Available Commands are:
- createTrigger (contains an Example)
- setTriggerActivation
- setTriggerArea
- setTriggerStatements
- setTriggerText
- setTriggerTimeout
- setTriggerType
- triggerActivated
- triggerActivation
- triggerArea
- triggerAttachedVehicle
- triggerAttachObject
- triggerAttachVehicle
- triggerStatements
- triggerText
- triggerTimeout
- triggerType

