
MIDI track – Ylands
(Redirected from Ylands MIDI track)
Jump to navigation
Jump to search
Overview
It is possible to import MIDI music tracks using the Music library. Custom tracks can be utilized in music playlists by Music preset or triggered trough Visual scripting.
Requirements & specifications
3rd party software
- MIDI bank
- MIDI editor, recommended free alternatives:
- MIDI plugins:
MIDI specifications
- MIDI file contains information about channels (or programs - they contain the information about which instrument sound should be used), notes (their pitch, length and channel assignment) and other parameters (like note volume, composition's tempo and time signature).
- We use a freely available General MIDI bank with 128 instruments "General User GS SoftSynth 1.44". You can download the bank here: http://www.schristiancollins.com/generaluser.ph
- Each MIDI file can contain up to 16 channels and each channel can have 1 instrument assigned, that means you are limited to 16 instruments in one composition.
- Your MIDI file's channels need to have a correctly set up instrument (with values 0-127 or 1-128 depending on your software), otherwise nothing will play.
- MIDI file can have more than 16 tracks, which means that multiple tracks can go into 1 channel.
- Important thing to keep in mind if you want to use percussion - 10th channel needs to be left with default sound (Acoustic Grand Piano) as that is the channel used for percussion (+ your notes have to be assigned to this channel of course). Some MIDI editors number channels 0 - 15 and some 1 - 16, but it is always the 10th channel reserved for percussion.
- Notes in MIDI are called events, just like instruments are called programs.
MIDI preview
- In order to preview your song with same instrument sounds that we use, you can use the VLC media player and download the MIDI bank that we use in Ylands.
- Please note that if you simply play the MIDI file from Windows/Mac using any audio player, MIDI bank from your operating system will be used and that's the reason why it would sound differently.
- VLC setup
- Open Tools -> Preferences.
- At the bottom, select All under Show settings.
- Go to Input / Codecs -> Audio Codecs -> FluidSynth
- Click browse next to the "SoundFont" editbox and select the MIDI bank SF2 file.
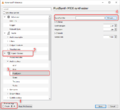
VLC

Creating and editing the MIDI file
- MIDI editor is required if you want to edit an existing MIDI file or you want to compose your own song.
- There are different free MIDI editors, we will provide you with few examples and write down a short tutorials how to work with them. You can then use this knowledge in other editors because the core is the same, only the interface and tools are different.
- MIDI editors can be divided into two main categories in terms of how they handle note input - score input or piano roll. We will present a free editor from both categories.
Muse Score
- This is a notation based program so you will input notes into staves. This is recommended for those who have music theory knowledge.
- First off, you can select a MIDI bank that the program will use. Folder that contains MIDI bank (unzipped) should be copied into C:\Users\admin\Documents\MuseScore3\SoundFonts. Or you can change folder where the program searches for MIDI bank in Edit - Preferences - General and there you will see SoundFonts row.
Settings

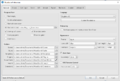
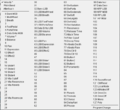
- Set up your instruments via Edit - Instruments. Simply find and add the desired instrument and select a proper clef for it.
- Next, it is important to have a mixer opened. Open it via View - Mixer or F10. It is opened on the right side and it shares a window with Inspector. Inspector is used only occasionally and contains info about a note. You can either close it or collapse its rows (if you have a note selected). I recommend doing it so that you can see name of tracks in the bottom of mixer.
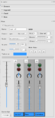
Mixer

- You can change a sound by selecting a track and clicking on "Sound". Before exporting the MIDI file, be sure that each instrument has its own channel and you leave channel 10 for percussion (if you plan to use percussion in your composition).
- On the left side, you can change fundamental things like Key and Time signature, Clefs and Tempo.
- Notes are placed by activating Note input in the left upper corner or by pressing "N" key by default.
- Then you select how long note you want to put in. Deleting notes is made by selecting notes and then pressing "Delete".
- You can save a MuseScore project that you will edit again next time. However if you want to make a MIDI file, you have to go for File - Export - Export to: MIDI.
Midi Editor
- This editor always uses a default bank for your sound card. You either have to install our MIDI bank to your sound card (refer to sound card's manual for that) or use your operating system's default one.
- It's a piano roll based program, inserted notes are "boxes". It is more friendly to those who don't know note names and don't know basic music theory.
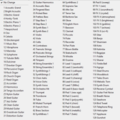
- Open your MIDI file and set up your instruments - click on the Channels tab on the right side.
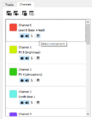
Instruments

- There you can set up an instrument for each channel by clicking the keyboard icon.
- In case of this editor, percussion channel is number 9. So if you want to use percussion, you this channel and leave the default sound there.
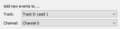
- Then add and edit tracks. Each track can have its custom name and a specified colour. When you select a track, you can specify its channel in the bottom right corner.
Events
- Then you can start typing in notes (events). Be sure to have selected the track that you want your notes in.
- In the top, you have the tools to either create new events (notes) or delete them. You can also turn on "Magnet". This will ensure that when you switch to "Standard tool" and you move with notes, they will snap to beats.

Tools

- If you want all your new notes played exactly on beats, you can do so by selecting the group of notes ("Select Events" tool) and then clicking on "Quantify selection". This will move notes to the closest half-beat border.
- You can change note's track routing by clicking on the note and then in the right section double click on "Track".
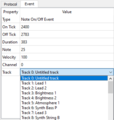
Events

- Below your piano roll is a place for MIDI parameters. These parameters are either for the whole song or for individual notes.
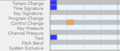
Piano roll

- In the beginning of your song, you should specify its Tempo and Time Signature. Make a new event and in the right assign correct properties. You can change these parameters during the song anytime you want.
- You can also play with other parameters that are located in the Control Change row. For example, you can edit volume of a track and channel by selecting the Control value 7 (Channel volume), filling proper track and channel and volume (0 - 127).
MAGIX Music Maker
- This is a simplified version of professional audio programs called DAW (Digital Audio Workstation). These programs handle both MIDI and audio files.
- Free version of Music Maker doesn't have any restrictions concerning MIDI editing, it only lacks more virtual instruments and plug-ins compared to payed versions.
- Free version supports only VST1 plug-in interface, not VST2 and VST3. I will elaborate more on a very useful plug-in for you further down.
- In Music Maker, you can have only one tempo and beat signature for your composition. It can be set up in the transport control.

Transport control
- Right clicking in a track will give you an option to create a new MIDI object.
New MIDI

- After opening new MIDI object you can start putting in notes.
- In the top, you have the option to change grid quantization value - it will divide each bar into specified number of beats. The second button indicates how short or long notes you want to put in, if you leave it with hash tag, you will place the same length of notes as the grid.
- The Q number means quantization - if you recorded notes that are off the beat, it will automatically move all selected notes into nearest beat border, depending on your grid quantization value. If no note is selected, then quantization will apply to whole MIDI object.
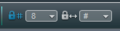
Quantization
- Then you have multiple tools for putting in notes.
- Most useful are the first two - Selection and Note Pencil. With Selection you can select multiple notes and then copy or duplicate them, move, quantize, delete or transpose up or down (with keyboard arrows). Note Pencil makes notes of a specified length but if you hold down left mouse button and slide your mouse, you can prolong the note.

Tools
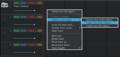
- You can also open Velocity/Controller Editor in the top. This will bring up a window, where you can specify various MIDI parameters. Under the piano roll you can switch tools for controlling MIDI parameters and also change which parameter is shown.
- Most important are Velocity, which controls how loud is the note from the beginning and Volume. With that you can change note volume during its progress. If any parameter was altered in the selected MIDI object, a star * will be shown next to the parameter.
Parameters

- You can work with MIDI objects in the track view freely as you want. They show a representation of MIDI notes inside of them. After selecting it, you can copy paste it, duplicate (Ctrl + D), move or delete it. You can also prolong or shorten the MIDI object by going with your mouse on the beginning or end of the object. It is also possible to open a MIDI object, select any or all (Ctrl + A) notes, copy them and then open a different MIDI object and paste these notes in.
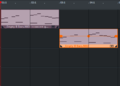
MIDI object

- If you go to File - Settings - Program settings (or P shortcut by default), you can specify your MIDI hardware if you have any, select Audio device for playback and change other options based on your preferences.
- You can easily export your song as WAV or MP3 via File - Export , however MIDI exporting is problematic. You can only export single MIDI objects. That means that you must have all notes for one track in one MIDI object. Once you open MIDI editor, go to File - Export MIDI. To assign instruments and complete the song, you'll have to import your MIDI file(s) into one of the above mentioned programs (or a different one), assign notes to channels, choose channel instruments, set up a song tempo and then export the final MIDI file.
Sforzando: VST plug-in for any DAW
- This free plug-in will allow you to load any MIDI bank and then use its sound for playback. Thus you can use sounds from the free MIDI bank that we use.
- VSTs are by default located in this folder: C:\Program Files\VSTPlugins
- Before mentioned Music Maker will see this plug-in and you will be able to use it when composing in Music Maker.
- However it's still only a sound. In order to write in the MIDI file which instrument it should always play, it needs to be saved in the file. If your DAW cannot do it, you have to open your MIDI file in one of the above mentioned MIDI editors and assign instruments to channels. Some DAWs, like any version of MAGIX Samplitude ( https://www.magix.com/int/music/samplitude/ ) is able to do it. In the Track editor under MIDI, you can specify MIDI program:
Track editor

- So, you can setup the VST with our MIDI bank for the correct playback sound and then set the correct instrument for the channel and after exporting MIDI you will not have to do anything with it.