Tutorial - User interface – Ylands
Every game needs at least some very basic UI - both for menus, dialogues but also a HUD that shows health points, objectives and other similar information.
In Ylands you can create custom UI objects of two types:
This is a canvas where you define various indicators such as HP, texts, bars and more. These are purely informational and can’t contain any elements player can interact with (buttons, input fields etc.). You can have active more than one at any given time.
Custom Windows is UI that allows players some sort of interaction. It can be a simple window with one button or a visually sophisticated skill tree where the player can spend skill points. It can be solid overlay over the scene view or be just a small shape anywhere on the screen - be it as it may, unlike with HUD displayed, the player can never control their character or interact with the game scene as long as a Custom Window is visible.
These Game Logics share a layout editor to customize their appearance. For more information, go to Layout Editor wiki page
The Button
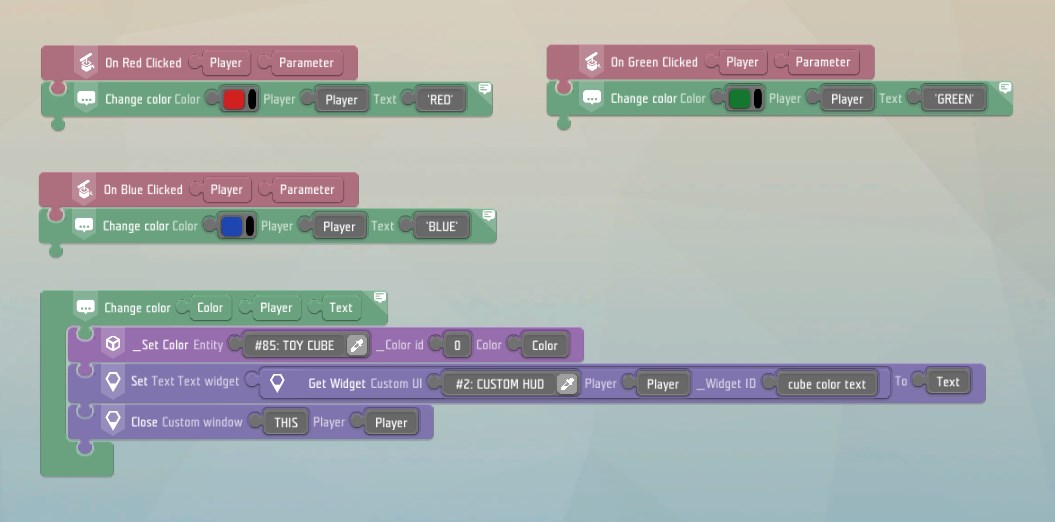
Whenever the player presses the button a Custom Window Game Logic is shown and three colored buttons appear on the screen. Pressing any of those buttons will color the small cube placed in the scene with the same color as well as adjust the text visible in current HUD.
If you take a look inside the Custom Window Game Logic script you will see how we can access various UI/Custom Windows elements called widgets. With specific instructions we can adjust their values, colors or text they show. We just need to select in which GL the widget is located and select it by its name. If we plan doing this in more places, it makes sense to store the widget inside a variable so that we could later access it in a more convenient way.
- To avoid clutter, this script is making use of a Custom Instruction.
- Apart from classic data types, in visual scripting, you can use a color tile to set a color value to a variable.
The Trigger Zones
There is Custom HUD already active when the game starts. Entering the green or red Trigger Zone adds or reduces hit points variable value and reflects the change on a health bar visible in the UI.
- Every time the player enters the zone (repeat count set in the properties of the trigger zone), his Hit Points are increased by 10 points
- The fill property of the Image widget ranges from 0-1, therefore it is necessary to divide the value of player's Hit Points (in the range of 0-100) by 100.
Note:
When interacting with UI, the instructions require you to set which player you want the UI to show to etc. Remember, that in MP games there may be more players than one. If your game is a single player one, you can easily store the Player reference when the Player spawns within the Spawn point and then use this reference when working with UI.


